Tuesday, October 26, 2010

Using the GeoShield to build an Open Source Hardware GPS

I've been trying to get a GPS sensor working with my Arduino for a long time. And without fail, they just don't work. Don't get me wrong - the ones that other people have made work, but they're spotty, and you have to be in the right corner, the right place at the right time. And if a leaf flitters off a tree at just the right time, the dew moisture creates enough interference that the signal's lost. And just when the signal comes back, it fails again just as quickly and then I barely get enough data points to recreate anything interesting.


Not any more >:-)


There may be cheaper GPS shields out there, but that's not the point. The point of the GeoShield is that it works, and it's competitive with commercial off-the-shelf GPS's. Out of the box. No coding, no digging around, it just works. And if you combine it and a TouchShield Slide, you have a completely portable DIY GPS... that is as powerful as most of the mainstream GPS's out there you can buy off the shelf.
This is the only GPS shield I've been able to test reliably in cities, from cars, and inside cases. So the steps to create an Arduino GPS with the GeoShield are pretty straight forward. You'll need:
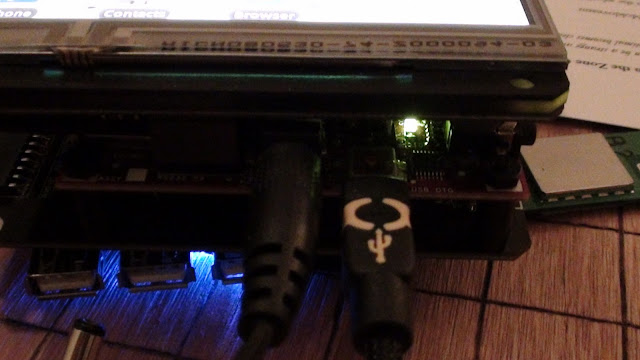
The Lithium BackPack goes in back of the DoubleWide ExtenderShield next to the Arduino, and the TouchShield Slide and the GeoShield go on top. Like this:


Here's a side angle:
And here's a funky perspective shot:
As you can see from the pictures, the GeoShield has a GPS sensor smack dab in the middle of the shield, with retro wireless solder pads emanating from it, as if to replicate a 1940's moving picture radio tower. On top of the GeoShield are a line of 4 user-controllable I/O pins (for debugging, of course), and then a GPS Rx and Tx pin, and finally a power white LED that tells you when it's powered up and has a signal. It's specifically designed this way because of all my hours of frustration with other GPS shields, wondering, "Does this thing ever work? Is it even powered on?" So this shield is designed to eliminate variables quickly, and get you up and running as quickly as possible. Oh yeah, and it also has a built in 3-axis accelerometer and compass, so it deserves it's name, "GeoShield".


Here's a link to the Open Source App Store app code that shows off a simple Night Rider program, plus polling of the GPS, Compass and 3-axis Accelerometer. The heart of the code is built into the Antipasto Arduino IDE function set:

void loop() {

   gps_msg = geo.readGPS();
  
   /* Print the GPS data */
   Serial.print(gps_msg);
  
   /* Parse GPS data and send to the PC */
   //for (int i=0; i< strlen(gps_msg); i++) {
   //  handleGPS(gps_msg[i]);
   //}

   /* Print the Compass heading, Accel X, Accel Y, Accel Z data */
   sprintf(out, "$GEO,H%d,X%d,Y%d,Z%d\n", comp, x, y, z);  
comp = geo.readCompass();
x = geo.readAccelX();
y = geo.readAccelY();
z = geo.readAccelZ();

//   delay(100);
   Serial.print(out);
  
   Sensor.print("co", comp);
   Sensor.print("xa", x);
   Sensor.print("ya", y);
   Sensor.print("za", z);
}


Here's a video showing it off:

The coolest part is that if you load up the pass-through sketch onto the Arduino, you can uncomment the coupe of lines that say, "print out to the PC", and then you can plug it in, load up a program like GPSFox, and get this:
Voila! Proof that it works - even from inside a friend's apartment!


Justin just uploaded the GeoShield over onto the Liquidware Shop, here...

Monday, October 25, 2010

Up and running on the Android DIY Development Kit in 180 seconds

Android is a high performance open source hardware and software development system platform - but you have to really enjoy googling around for relatively funky command line arguments to get a device up and running for the first time. This post is meant to save anyone who's picking up Android for the first time some serious time... I really wanted to name this "in 60 seconds or less" but I timed myself, and I'm being realistic - it takes about 3 minutes. 


The google guys knew what they were doing, or at least did a great job building something pretty cool that works. Chris and I have been spending a decent amount of time learning how to program Android, and so I figured I'd write up a brief tutorial for anyone out there that doesn't want to spend nearly as much time as it took us to figure it out.

The first step in programming Android is to download the Android SDK

On Ubuntu Linux, I downloaded the SDK into the home directory, and unzipped / untarred it. The next step is to get the Android DIY Starter Kit or the Hardware Development Kit recognizing on the USB port. The next step involves plugging a USB cable into the side of the gadget. Once it's in, run the command:
 

lsusb


I get a bunch of Bus 001 through Bus 005, followed by Device blablabla information. Here's the trick: you want to find the ID of the Android device, so run lsusb while the device is unplugged, and then run it again. On my computer, the line that changes when the Android gadget is plugged in is:

Bus 001 Device 004: ID 18d1:9018

Ok. Now create a file called "51-android.rules". See the part in the line above that says, "18d1"? and "Device 004"? That's idVendor and idProduct respectively. So change those values in the file content below:

SUBSYSTEMS=="usb"
ATTRS{idVendor}=="18d1",
ATTRS{idProduct}=="0004",
MODE="0666"

Then copy the file here:

/etc/udev/rules.d/51-android.rules

This is a rather convoluted and manual way to get the Ubuntu Linux OS recognizing the Android Gadget as a native Android device. Now, you can cd into the SDK directory, and type:

./adb devices

And the device should show up. This is what I get:

List of devices attached
20100720 device

Now I can use this command to get access to the Android Shell:

./adb shell

To copy files on and off of the Android gadget, use these commands:

./adb push
./adb pull
./adb --help

And most importantly... if you have an APK downloaded or compiled for Android, and you want to install it, just use:

./adb install blabla.apk

Voila!

Tuesday, October 19, 2010

Introducing the DIY Android Gadget Starter Kit

This past weekend, Chris and I hacked Android onto the Beagleboard Embedded Gadget Pack. It was the culmination of about 3 weeks worth of working straight through, sleeping very little, and consuming many ASCII bunsen burner Red Bull's :-) The result is the DIY Android Gadget Starter Kit, which includes everything anyone would want or need to get started programming Android hardware and software applications, and to make a custom Android device.

Here's a picture of the Android DIY kit assembled:
The DIY Android Modular Gadget development kit uses the same base modules as the Open SciCal, which got written up on Wired (thanks!), and also as the Embedded Beagleboard Gadget Pack, which has been really popular with embedded systems engineers:
 
This is a nice perspective shot of the Android home menu, where the apps are typically stored and can be launched. The settings menu and options are fully functional, and the system comes preloaded with SL4A, a high performance scripting language that lets programmers write GUI's in Perl or Python (and a handful of other scripting languages):
 
Justin uploaded all of the modules, components, and preprogrammed SD cards onto the Liquidware shop over here... and here.

Monday, October 18, 2010

Breaking Hardware Barriers: Linux vs. Android Gadgets

Here's a quick video showing off the DIY Android Modular Gadget I made with Chris:


Motivation
As it turns out, getting Android up and running on the Beagleboard is not too hard. Others have done it before. The hard part is doing it on a little modular gadget, that you can touch and type on the screen with natively, like any other Android gadget.

Ever since Google started controlling how many Android development kits are released, developers have had very few options for programming on Android. My goal was to make an Android Development Kit that significantly reduced the amount of time it normally takes to integrate custom hardware into the Android development.

Breaking barriers
Rapid prototyping with open source hardware isn't easy. It's certainly easier today than it was 5 or 10 years ago, and I like to think based on the emails and messages and calls I've gotten from friends and fellow developers, that projects like the Open SciCal and the Linux-based Beagleboard Embedded Starter Kit help.

In the last couple months, I've been hacking away on the Linux modular gadget platform, and for most applications, it's amazingly fast and sharp. The only time it's lacking a bit is when it comes to developing a quick and dirty GUI.

Linux vs. Android
Embedded systems development can take two very different forms. On the one hand, it can rely heavily on low level programming languages, and a native Linux cross-language, multi-compiler, shell-integrated environment. This is useful for building applications like scientific calculators, data loggers, industrial design and automation controllers. Basically, it's good for devices that don't need glitzy GUI's, but rather, need to do heavy duty analytical work.

On the other hand, sometimes embedded systems development is lighter on the analysis, and relies more heavily on sensor polling and on presenting real-time data readouts from sensors to a user. It might be a remote control, home automation gadget, LAN network diagnostic utility, etc. That's when Android shines, because it makes developing a clean GUI a piece of cake. I've been quite impressed as I've learned more and more about Android, over the past few weeks. As I've hacked away at the underlying codebase, I've learned quite a bit about how the developers of Android approached things, and I've been impressed.

The Best Tool for the Job
But that doesn't mean I'm leaving Linux behind... I now have 2 supertools: Linux for industrial and analytical work, and Android for more user-friendly, sensor-heavy apps.

I posted some more pictures up on the flickr page...

Android Hacked onto the BeagleBoard OSHW GadgetPack ... with avengance

The time is 3:27 am on the East Coast as I write this. It's Sunday, I have work tomorrow morning.


I'm happy to say... Android has now officially been cracked onto the Beagle GadgetPack. Chris and I just finished hacking it onto the BeagleBoard, with a fully-integrated touchscreen OLED screen, overlay, and interface at the driver level to the BeagleTouch.

It connects to the internet.
It loads webpages, it runs scripts.
It reads and interfaces to sensors.
The touchscreen supports drag, drag and drop, sliding, scrolling, and gesturing.
It can download and run native Android APK files off of Open APK app stores.
It even runs the SL4A rapid prototyping environment that is scriptable in Perl and Python.


This was no easy task. Nick, Will, Chris, Mike all helped here and there with driver help and ideas for how to compile around the early driver problems. Thanks to the TI guys (esp. Gerald!), and the Google Groups community too for their help... and for the guys at embinux.org for a good starting point reference. And of course some special help from Google themselves (names will remain anonymous because I'd hate to see someone lose their job for supporting a hacker like me)... who came in at the last minute to help me crack open the driver access level, which allowed me to make a user-space display driver to the BeagleTouch... FROM SCRATCH.


Now the most important part of all of this is the question I got from Jake, when I talked to him 3 weeks ago: why?


Because I'm sick of the iPad. Every time you go into Starbucks, you see someone digitally frolicking around on their apps, clickety clacking around with glee, pinching and spinning their fingers around a million times just to do what you used to be able to do with CNTRL-+ or CNTRL-- to zoom in and out just as quickly, all the while being wholly restricted and unable to compile any of their own apps natively, and god forbid trying to access the driver level.
The problem is simple: I am fundamentally against the entire principle and idea of the phrase, "there's an app for that(TM)." (Are you serious?!?! I have to put a "Trademark" on that?!?) I think that little phrase is endemic of everything that's going wrong with the hacker world today. It symbolizes the end of an era. It is the antithesis of open, and the optimum of control and limitation.

I don't want an app for that. I want a programming language and access to some low level OS function for that.

I'm fighting back, and this Android hack is the first step in the war. The problem with the philosophy of "there's an app for that" is that it's training the new up and coming programmers and would-be hackers and developers that if you want some hitherto unavailable functionality for your device, you should go onto a tightly controlled ecosystem of apps (iTunes app store), and pay money for a limited, controlled, censored, channel monitored, Apple-sanctioned little app that took WAY too long to write because the darn specs are undocumented.


No thank you. I want to help teach, train, and motivate a new breed of far more open sourced and efficient hardware hackers...


Apple is going to lose. Because hackers are going to use the platform that is the most extensible, most hackable, and most fun to use. Programming the iPod and iPad and app store-compatible apps is an exercise in painful, torturous sacrifice. You start out development thinking you want to build a simple little functioning app. Then you find out, function by function, that Apple has restricted that functionality to a mere fragment of it's former self. Useless!


Android is where it's at. You get driver control if you need it, you have a multitude of programming languages, an Open Source app distribution channel, and raw sensor channels for interfacing with all kinds of sensors (stay tuned for some hacks on this to come). Android is literally the perfect rapid prototyping platform. It is just high level enough to be efficient, it's just low level enough to enable embedded applications development. And it's Open Source, so if you need to, you can just recompile the whole darn thing from scratch yourself if you want to.
And that's powerful. In the coming weeks, I'm going to do my best to integrate open source hardware and open source software together, using this newly cracked Android Gadget as my platform... bring it on!

Saturday, October 16, 2010

How to turn a Beagle GadgetPack into a digital ASCII bunsen burner

Time for a silly application of modularity... for no intent or purpose, simply demonstrating a Matrix-esque special effect on the front of the BeagleTouch module, running aalib's ridiculously cool aafire app.


Will and Chris put together a pretty cool little auto-loading script, and made sure all the aalib libraries were in place (which they were), and it just worked. The cool part is mostly how fast the demo seems to run...


Now time for the good part... as every hacker knows, the food pyramid contains 3 essential foods:
  1. Red Bull (drink)
  2. Pop Tarts (dessert)
  3. Raman Noodles (entree)
Yes, they are listed in that order because that is roughly how they stack up in order of mass consumed by me per week. I mean seriously,  where would Linux virtual memory, Android's driver subsystem, and Ruby on Rails be, if not for these 3 food groups? I can personally attest to consuming my fair share... not because I particularly like the taste of any of them, but simply because generations of hackers before me have lived on exactly this, and who am I to challenge tradition? (This is getting ridiculous, I know). Many books have been written about programmer and hacker productivity, methods of development, etc. but I might argue that Red Bull, Pop Tarts, and Raman are a radically under-researched productivity tool.


But suffice to say, a digital ASCII blue fire bunsen burner - although non-functional - sure *looks* cool as heck underneath a can of Red Bull, doesn't it? It must be doing something... I swear it tasted better than my not-so-highly scientifically isolated placebo trial.


:-)


Ok, here's how to get it up and running on the Beagle Embedded GadgetPack:


Open up a terminal like xterm using the keyboard connected to the USB port on the side of the GadgetPack.


Then, either download this package onto the SD card, or if you have the Wifi Module or Ethernet Module, you can type this directly onto the command to download aalib:


wget http://sourceforge.net/projects/aa-project/files/aa-lib/1.2/aalib-1.2.tar.gz 

Untar the archive:


tar xvf aalib-1.2.tar.gz 

Move to the directory:

cd aalib-1.2

Run this command to configure:


./configure --host=localhost

Then compile the source code:

make
make install

And then run, sit back, and enjoy the digital fire that neither keeps you warm, *nor* cools you down, so at least it's not a negative fire, or put in other terms, at least the correlation coefficient between this digital bunsen burner and utility is not negative (R is at worst 0, so ha!):

export DISPLAY=:0.0
xterm -fg red -bg black -e "./aafire"


Voila!


For more pictures of the ASCII burner, I've uploaded some high res shots at flickr...

Thursday, October 14, 2010

Maker Faire NYC Debrief

I now live in Boston. I used to live in New York. Which made it all the more ironic when it came time to travel down to NYC to attend Maker Faire with Justin, Francis, Will and Mike. As it turns out, the night before we all headed down there, the construction crews decided to tear up a portion of I-95, which naturally meant some lane closures.

Nothing pumps up the DIY hacker spirit like sitting in traffic for 5 hours staring at this picture from the Main Street Danbury blog:

Hmmm, hmmm... I feel like that red card is a lot like the feeling I get when the bootloader doesn't load on the flash ram chip on the topside of the BeagleBoard OMAP, and I have to solder in my own debug cables to test the signal pins to make sure they work. And that truck is like the weight in my arm after 2 hours of solid soldering... and the right hand lane is the re-routing schematic of envy... yes.


But once we got to Maker Faire, the situation changed dramatically (it did take about a 30 minute detoxing whereby we desensitized to the intense traffic around Brooklyn and Manhattan). And here we were, to the right, and next to Nate from Sparkfun... Here's Mike and Will getting swamped with questions :-)


 I like to try to construct a pyramid of TouchShield Slide boxes just for kicks:


I walked around, and saw a few fun pictures. Like this one, which although looks fun to some, is not really my cup of spinning tea. The whole time I'd be thinking, I really hope those welding points worked on the central axis tower:


 Here was a view from outside the master tent:

I try to show up with as many projects as possible, and here are a few using the BeagleBoard and BeagleTouch:
 
 I want one of these so badly, it's not even funny. I imagine I could do home delivery of DIY kits throughout New England on something like this. Would it be more time intensive and more expensive than UPS or DHL? Yes. Would it be worth it to do spin out donuts in street and driveway on the way to hand delivering a package of Arduino and BeagleBoard modules? Absolutely.

It only occurred to me after that this is a picture of everyone systematically walking away from me. The three folks on the left actually turned around right after this and started walking away too. Must have been something I said...

Here's a picture of Francis showing off a few projects...


I put a few more pictures up on the Flickr page in the original resolution...


Saturday, October 2, 2010

Open Source Hardware Summit Debrief

A week ago I went down to NYC and spent a few hours at the Open Source Hardware Summit. I sat on a panel and discussed with a number of pretty smart individuals, the merits of Open Source legal constructs and what Open Source Hardware is and isn't. A big, heart-felt thank you from me goes out to the organizers, sponsors, and creators of the summit.

Of course, there were so many more thoughts running through my mind than I could possibly share with the group, and I didn't want to monopolize the speaking time, so I took lots of notes. Here are a few of the notes I jotted down:

-What is the relationship between open source rights and intellectual property protection provided by the government?

-Is an open source design patentable? Is it copyrightable? Is it trademarkable?

-Open source hardware designs are getting licensed to hardware builders for rates around 5-10%, yet patented technologies have concepts like compulsory rates of 3%. Does that mean that patented designs might actually be cheaper than open source?

-Does an open source design have to be recursive and/or fractal? Can you have an open source design that uses proprietary integrated circuit chips? Can you use an open source circuit in a proprietary, closed device?

-Many of the successful open source hardware projects have in common that they rigorously protect one aspect of their business: arduino gives away the board but keeps the brand and trademark, beagleboard gives away the design by keeps the chip gate array design, bug labs gives away the schematics but restricts the inter-module snap-connect interface, liquidware gives away the hardware at cost, but keeps the analytical algorithms (e.g. you can buy a "military grade" IXM, but you can't get the code that turns it into a --CLASSIFIED--) Exactly :-)

-What do you use to base an open source hardware license on? Does it start from a contract that restricts freedom to operate, and use, or does it look more like wills and testament document, where it gives away rights and freedoms?

-Is the goal of open source to provide freedoms? If so, why does it need a license or contract to restrict rights?

-What is the relationship between the drivers and motivators of hackers, and the objective of a license? Could you have had open source software without the GNU?

-What came first: the license, or open source code?

-What is the "source" part of open source hardware? Does hardware have a standard "source" (no)? How long will it take to get there (a long time)?

All in all, I think - as always - I'm left with many more questions than answers, but I think that's the point. I don't really know why I do open source hardware, I don't even have to know what it is. But somehow, it feels good to make and produce open electronics, open source code examples that control those electronics, and devices that are in general far more accessible and hackable than previous generations of hardware.

So I'll keep doing "open source hardware" even though I have no idea what it means, whether the term carries any substance, because... it just feels right!