Monday, July 30, 2012

Introducing the BeagleJuice, 2nd Generation: Laptop-Grade Power Management for the BeagleBoard

Last week, I took a trip through some of the battery boards and power management systems we created for the Arduino, BeagleBoard and Amber. The development of the 2nd generation BeagleJuice was inspired mostly by requests for a “standalone Amber backpack”.
image
Sort of…I took a little artistic license with the picture above! The Liquidware Amber power supply and BeagleJuice, 2nd Gen were both built with advanced power management principles in mind.

(Edit: I got a few questions about this - the BeagleJuice, 2nd Gen comes with the standard 5V barrel jack cable to charge any 5V device that fits the jack, like the BeagleBone or PandaBoard. For the adventurous, it's not a huge stretch to wire your own cable to the 2-pin Molex connector...)

The 2nd Generation BeagleJuice is a modern, laptop-grade power supply that implements smart charging technology to manage multiple cells in series to deliver higher charge capacity, as well as high-power output. It’s optimized for 2-cell, 3-cell, and 6-cell configurations to deliver 2800, 4200, or 8400 mAh of capacity.
image
Onboard LEDs provide multiple status readouts as well as charge information. Advanced features can be accessed over I2C pins directly, or via a Zero Insertion Force (ZIF) ribbon connector. Here at the lab, I’ve used the 2nd Gen BeagleJuice as a primary power supply for several BeagleBoard units concurrently – which centralizes the power management system for remote installation clusters. The high-capacity BeagleJuice provides quad 5V outputs via discrete 2-pin Molex connectors.
image
I’ll cover some details on charging cycles in the next blog, but in addition to smart charging and power input management, the heavy-duty power supplies that the BeagleJuice is modeled after also focus on being fault tolerant and providing an added measure of battery preservation. This “safety” logic protects the battery from:
  • over current charge/discharge
  • over temperature charge/discharge
  • over voltage charge/discharge
  • cell charge/discharge imbalances
While no system is perfect, taking these issues into consideration is a big step closer to advanced power management and portable power supplies, useful for hobbyist and embedded prototyping projects with the BeagleBoard alike. Since the BeagleJuice, 2nd Gen comes with 2 5V barrel jacks connectors, it can actually power the PandaBoard and Arduino, as well as my phone with a custom-spliced USB connector. Here’s a quick shot of the new BeagleJuice in action:
This is Part 2 of 3 on portable power management for prototyping embedded systems. The next post will walk through some of the charging algorithms and explain some of the complexity around charge management ICs - justin dot huynh at liquidware dot com

Friday, July 27, 2012

3 Portable Power Management Systems For Development and Prototyping

This post came about when we  asked Keith about the difference between the battery setups we had, and whether it was possible to pull the Amber battery pack off, and use it for other things. [Cue flashback music…]
Lithium Backpack for Arduino
About 4 years ago, we started with the basics of power management: the Lithium Backpack. For that, it was mostly around form factor and simplicity, which was great since the Arduino has both analog and digital capabilities. If it let me take my Arduino project around, I was happy. A single-cell system, it had 4 pins - +5V, +3v3, GND, and Status. Really, the only two that mattered was my positive and my ground. Simple.

BeagleJuice for BeagleBoard
So when we started working with the BeagleBoard, we started with the same concept: a “shield” type battery for the BeagleBoard platform. Just a little more heavy-duty, since the BeagleBoard is an embedded computer in its own right, and much like my smartphone, will run out of juice pretty quickly.

Nevertheless, the BeagleJuice idea was simple – single-cell battery, charging, mounting standoffs, USB-mini trickle charge capability, and an on-off switch. That was 2 years ago.
Laptop Power Management and the Liquidware Amber
In the meantime, a few projects came along where we really had to wrap our heads around portable power supplies, power management for mobile devices, and the like. Thinking about products with lifecycles of 5 years or more also means that we had to consider things like battery longevity and smart charging cycles.
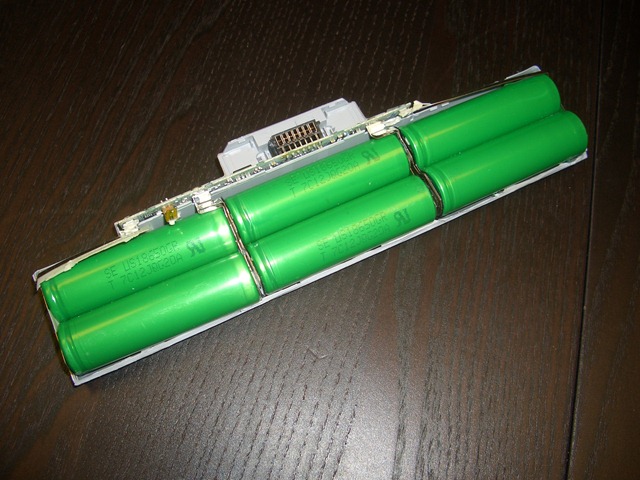
This was a whole new ball game for us, so we started by taking a look at how consumer laptop batteries are put together. Chris’ old Sony laptop became the sacrificial lamb:

CIMG9938CIMG9936image
No big surprise – a PCB controller was attached to 6 rechargeable Lithium-ion battery cells. The real fun was in understanding the power management ICs on board, how they communicated with the computer, and what other information was being provided, since the battery pack had quite a few more pins than our original lithium backpack did!
One of the big takeaways was that we needed to use some more complex power management units in order to provide the complex battery systems people were used to using with laptops and robust embedded systems. So for the Liquidware Amber, we incorporated laptop power management circuitry, which enabled multiple cells in series to provide higher charge capacity as well as high-power output (the Liquidware Amber battery pack delivers 5V at up to 4A for an extended period of time). What does this mean for functionality? A lot of charge and discharge management algorithms that go on behind the scenes, but also the ability to read out current, temperature, and voltage status to the display – something we take for granted on most modern devices, but actually involves quite a bit more complexity than strapping some rechargeable batteries to a board!
This is the first post in a three-part series on portable power management. In the next one, I’ll discuss the specific features and algorithms we considered in building a laptop power management system, and answer Keith’s original question about a standalone Amber battery. Questions, thoughts or projects – email me directly: justin dot huynh at liquidware dot com.

Thursday, July 19, 2012

5 Reasons to Use a Custom Android Tablet

There’s two sides to every coin. In the last post, I talked about instances where I usually recommend that people use an off-the-shelf tablet or smartphone device for their custom applications. The primary principle being keeping things simple, I recommend developing portable apps wherever possible, and avoiding potentially time and cost intensive hardware turns and development. But sometimes a custom (Android) tablet is required, and it’s worth knowing when to recognize these instances, and follow the path of least resistance.

It’s why the Liquidware Amber exists. We designed it for internal use, and use in engineering projects. It saved us a ton of time having that extra level of hardware and firmware customization, without having to start from scratch each time.

1) Sensor specificity and connection interface. In many cases, the end device is driven as much by the sensor as it is by the display. For example, a tablet may serve as the human-machine interface for a medical diagnostic device, but the sensor that is attached to it could be highly complex. Or the sensor required talks over a very specific protocol, such as I2C or SPI.

2) Custom hardware feature set. In many cases, the product calls for integrating more than just sensors to tablet HMI. Kiosks, industrial control terminals, and other large scale machinery come to mind. Nevertheless, the tablet portion doesn’t need to be built from scratch, and a custom tablet like the Amber allows for tight systems integration over several different interfaces.

3) Supply chain management with high volume. Designing a product to be deployed in volume brings other considerations into play. Considering that most consumer devices are built to be sold within a 24-month lifecycle or less, since they’re designed with obsolescence and upgrade paths in mind, the supply chain of these devices can be fickle. This means that in order to incorporate an off-the-shelf device into a product design, it’s probably a good idea to consider buying all the units you think you might need. Upfront. Which can translate to a pretty significant capital investment. A custom tablet enables tight control over the hardware manufacturing, and ensures longevity of the product, to maximize the value of upfront engineering, design, and systems integration work.

4) Custom OS and firmware. If the product is going to require highly customized kernels and special firmware that allows the tablet to integrate with other components of the device, it’s not exactly efficient to root and re-load a custom ROM/kernels on each individual unit. And voiding any sort of warranty in the process.

5) Security. The other (somewhat unexpected) driver of custom hardware requirements has actually been one of security. Understanding exactly what is going into a particular device and having control over all layers of software can help make the device less transparent and less vulnerable than stock devices currently available. For instance, a custom Android tablet include any manufacturer software, and doesn’t have GPS (if you don’t want it) so you’re not inadvertently broadcasting information that you don’t want released.

There are many other considerations, such as form factor and branding, that just might tip the scales in favor of using a custom Android tablet. And as with big questions in embedded systems development, the answers aren’t always obvious.

So if you’re on the fence about which way to take your custom tablet project, feel free to comment below, or get in touch – justin dot huynh at liquidware dot com.

Wednesday, July 18, 2012

5 Reasons to Customize an iPad (or Samsung Galaxy, or any off-the-shelf Android tablet)

Since the Liquidware Amber officially launched back in May, I’ve gotten a few more questions about tablets, that usually go along the lines of:

I’m building a special application for [my company]…can I just use an iPad/Galaxy/off-the-shelf tablet? Or should I use the Amber?

As much as I could be self-serving in answering that question (mwahahaha!), the real answer is that it depends. The more targeted question to ask is:

“If I just build an Android or iOS app, without hardware accessories, does it get the job done?”

There’s a bit of a gray area, and a lot of instances where you really could go one way or the other. But my take boils down to the fact that, if you can avoid building custom hardware, I’d recommend that. But if there’s no way around it, it’s usually worth putting in some effort to make the path as quick and painless as possible.

Embedded development can typically be broken down into three levels:

Application Level. The front-end. Anything that can be downloaded on Apple’s App Store, or Google Play. This is anything that the end-user will interact with, and also constitutes permissions and access to resources within the OS and hardware.

Operating System Level. This involves kernels and ROMs that provide access to functionality on a piece of hardware. With Android on consumer devices, this usually includes rooting the device, then adding functionality or removing OEM restrictions on the hardware.

Hardware Level. On one end of the spectrum, this entails something as “simple” as an accessory device, like Square’s credit card reader:

image

That said, not all accessories are made equal, and when added functionality, higher bandwidth, and larger amounts of data are required, the accessories become increasingly complex. (A common theme is the analog-sensor-to-Android-device project, which gets the Arduino and Amber/Android involved…subject of an upcoming blog post!) The more complex the accessory, the more likely it is to require OS level tweaks as well.

When to use an off-the-shelf tablet:

When it comes to custom applications, I typically recommend Android because of the simplicity in pushing down your own custom .apk file. The off-the-shelf tablet is ideal when…

1) Stock permissions are adequate. If the front-end app can be built without running into OS-level obstacles, that’s a great first sign that maybe going with a portable app that can be run on any consumer device is the way to go.

2) Low-complexity hardware accessories. Similarly, if power and data transfer to the device is simple, it may be easiest to use an existing interface – in most cases, Apple’s 30-pin (soon to be 19-pin?) docking connector, or the micro USB OTG on Android devices. As soon as higher data rates are needed, level shifters come into play and you want to start transmitting across SPI, I2C, and have a million uses for various GPIO…it’s not a bad idea to think about a custom device.

3) Low volume/high speed deployment. If an extremely quick turn is required (say, a weekend-ish) for a prototype solution, and the deployment is pretty limited, supply chain and manufacturing concerns are just going to get in the way. Get an unlocked device and make modifications. There’s no time to burn sifting through custom specifications on potential hardware options. A device in the field is worth a hundred on paper, even if it’s not quite perfect. (One of my personal heroes, Guy Kawasaki, is big on this.)

4) Minor OS Tweaking. In many cases, it’ll be necessary to root a device, and flash a custom Android ROM or kernel. For a few units, it’s not too big a deal, especially if you have some strong Android coders to navigate the low level, or maybe some skilled developers have already taken care of the heavy lifting. Even better if you can get the devices “pre-rooted” or loaded with your custom version of Android.

5) Low-cost Networking/Battery. This weighs in quite heavily for mobile applications that meet all of the above. Aside from the CPU and display, WiFi/Bluetooth/3G/4G and good power management systems drive significant cost in any embedded device, especially in a compact package. Customizing an off-the-shelf device for these purposes takes advantage of the economies of scale of consumer products, and in some cases, subsidies from from cellular providers.

Bonus: Branding. This one has typically been a dealbreaker for many companies based on preference. Sometimes it doesn’t matter if the user knows that this is an off the shelf device, or that it’s running an OS behind the app, but this factor alone has driven teams to search for a fully customizable device.

Stay tuned for Part II on when a custom Android tablet might just fit the bill. In the meantime, if you’re not sure about your project, or want to share your experience, feel free to comment below or email me: justin dot huynh at liquidware dot com.

Friday, July 13, 2012

How to read Arduino sensors with Adobe AIR Flex on Android


Android now supports Adobe AIR / Flex apps. The main benefit to using Flex over Java is that it specifically facilitates rapid story boarding of mobile user experiences. Coding Adobe Flex is similar to the Visual Basic observer design pattern of push-based actions. Add a button, right click to edit the action.

I decided to show how one could access the serial port using the Amber Android handheld, ArduinoAMBI light sensor using Adobe Flex.

Arduino Code

Upload this simple sketch to the Arduino.

void setup() {
    Serial.begin(115200);//setup a serial port with a baud of 115200

    pinMode(18, OUTPUT);
    pinMode(19, OUTPUT);
    digitalWrite(18, HIGH);
    digitalWrite(19, LOW);
}

void loop() {
    int value = analogRead(3); //read arduino analog pin 3 and save it as an int to value
    delay(1000);//delay 1,000ms
    char out[200];//create a 200 integer array

    sprintf(out, "hi\nLight=%d\n", value);//prep the out file
    Serial.print(out);//print the out array
}


Android Java Code

Android must forward serial messages to a local network socket so Adobe flex can handle the data. This is accomplished using the amber-serial app. 

Get the amber-serial source code on github, import this into a new project in Eclipse. Upload to Amber and keep the it running in the background.


Adobe AIR Flex Code

Create a flex app in the Adobe Flex builder through the wizard. Add a button to window and use the following code to read Arduino messages from a local network socket. I used port 8888, but you can use anything you'd like, just make sure to open the port in your firewall with iptables, if used.

socket = new Socket();
socket.addEventListener(Event.CONNECT, onConnect);
socket.addEventListener(ProgressEvent.SOCKET_DATA, onSocketData);
socket.connect("127.0.0.1", 8888);

private function onConnect(e:Event):void {
textarea1.text = textarea1.text + "Connected to server";
}

private function onSocketData(event:ProgressEvent):void
{
textarea1.text = textarea1.text + "[" + event.type + "] " + socket.readUTF();
}


App design tools have come a long way, now you can rapid prototype low-level sensors all the way up to the UI design.