Showing posts with label Rapid Prototyping. Show all posts

Monday, August 6, 2012

How to build a high-tech prototype faster than it takes to build a 30-story hotel

I stumbled across a video recently that I thought was pretty amazing. It’s a time-lapse video of a 30-story hotel that was built in 15 days.

Mind you, this wasn’t a shoddy structure. It’s designed to withstand a 9.0 earthquake, along cutting-edge energy efficiency features. How’d they do it? (The longer story from Businessweek is here)

We make 93 percent of the building in our factory. The basic block, a “main board,” is 3.9 meters by 15.6 meters (12.8 feet by 51.2 feet) and includes everything from water pipes and ventilation shafts down to floor tiles, lights, even toilets and the kitchen sink.

Building blocks. The principles of “prefabrication”, or prefab, for short, have been around for a while now, especially in the realm of architecture and construction. This project just took it to a whole new level. Everything in the building was modularized, trucked out, and assembled. These blocks were strategically unfinished, designed to be connected to other blocks to form the completed structure.

What can hardware and embedded systems design learn from this?

The modular hardware ecosystem has continued to grown, becoming more accessible to an ever-expanding base of developers. With the Arduino, Raspberry Pi, BeagleBone, BeagleBoard, and others, there’s an incredible amount of processing capability out there, in an easy to integrate, easy to program, modular form factor.

image

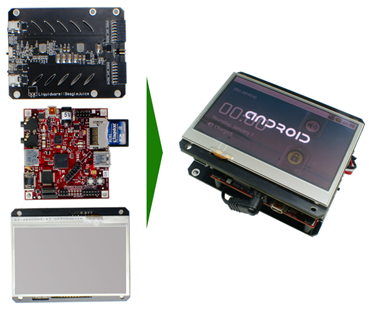
Prefabbed building blocks exist for the Arduino in the form of shields, BeagleBone in the form of capes, and the BeagleBoard in the form of modules. These all make the integration process extremely low overhead – with hot-swappable operating systems bootable from removable media.

image

David Blaza, Vice President of UBM Electronics (the wonderful folks who bring us the Embedded Systems Conference and EETimes) recapped this growing trend in development. Interestingly, it doesn’t even have to happen in this particular order anymore…and just about anyone can do it:

1) Outline the concept (5-10 hours). A lot of startups, entrepreneurs, hobbyists, and engineers already have this part nailed down really well. Napkin sketches or Visio flowcharts, the concept is something that comes naturally to inventive minds. It’s just useful to whittle down features and ideas to focus the very first prototype.

2) Raise financing – or not (2-3 hours to craft and setup a campaign). This is an optional step these days, but crowdfunding sites Kickstarter and Indiegogo, or peer-to-peer financing sites like Prosper provide an easy, accessible way for individuals to raise money and publicize their projects on the cheap.

3) Pick a hardware platform (3 hours). For me, it’s typically come down to a couple main hardware drivers. If I need analog sensors, I’m probably going to involve an Arduino along the way. Then it’s a question of what screen size (4.3-inch or 7-inch are common) I’ll need, CPU speed, and connectivity. If I know it’s going to be fairly integrated (as all the folks asking for a custom tablet are aware), I’ve usually selected something like the Liquidware Amber.

4) Pick a software platform (3 hours). Linux or Android? Being more open than other operating systems, it’s a little easier to get a stack going and piggyback off code, kernels and drivers that are out there.

5) Buy it (1-3 days). First I usually buy the mainboard (like a BeagleBoard or Pandaboard), along with any complementary modules I’ll need for that platform. It’s worth doing a little planning ahead to buy some spare cables, too, since there’s nothing more frustrating than sitting around with hardware, and not having that USB or HDMI micro cable to test things out.

6) Build it (5 days). Hardware “assembly” should be fairly straightforward, with clear, standardized pinouts (as attested to by the Arduino pin-spacing hullabahoo of late 2009). I find that USB is pretty versatile and ideal for easy connectivity, but that’s the subject of a different post.

If all goes well, assembling the hardware should be a 1-2 hour activity – max! Getting the OS running the way you want it to shouldn’t take too long, but it depends on how customized your kernel has to be.

Then it’s time to develop the app. Bringing out data over serial is a favorite activity (Android Ambrosia tutorial here), as is building a GUI. Adobe AIR is also excellent for simulating application mockups for a presentation.

7) Tell the world (4 hours). Ready for the big screen? Like Step 1, this final step comes naturally to most entrepreneurs – between blogging, emailing well-connected folks, posting to Twitter and Facebook, the evangelizing is usually everyone’s favorite part.

Building a complex prototype has never been easier or more accessible. What’s your experience with modular development? Post thoughts and questions to comments, or just email me at justin dot huynh at liquidware dot com

Friday, July 27, 2012

3 Portable Power Management Systems For Development and Prototyping

This post came about when we  asked Keith about the difference between the battery setups we had, and whether it was possible to pull the Amber battery pack off, and use it for other things. [Cue flashback music…]
Lithium Backpack for Arduino
About 4 years ago, we started with the basics of power management: the Lithium Backpack. For that, it was mostly around form factor and simplicity, which was great since the Arduino has both analog and digital capabilities. If it let me take my Arduino project around, I was happy. A single-cell system, it had 4 pins - +5V, +3v3, GND, and Status. Really, the only two that mattered was my positive and my ground. Simple.

BeagleJuice for BeagleBoard
So when we started working with the BeagleBoard, we started with the same concept: a “shield” type battery for the BeagleBoard platform. Just a little more heavy-duty, since the BeagleBoard is an embedded computer in its own right, and much like my smartphone, will run out of juice pretty quickly.

Nevertheless, the BeagleJuice idea was simple – single-cell battery, charging, mounting standoffs, USB-mini trickle charge capability, and an on-off switch. That was 2 years ago.
Laptop Power Management and the Liquidware Amber
In the meantime, a few projects came along where we really had to wrap our heads around portable power supplies, power management for mobile devices, and the like. Thinking about products with lifecycles of 5 years or more also means that we had to consider things like battery longevity and smart charging cycles.
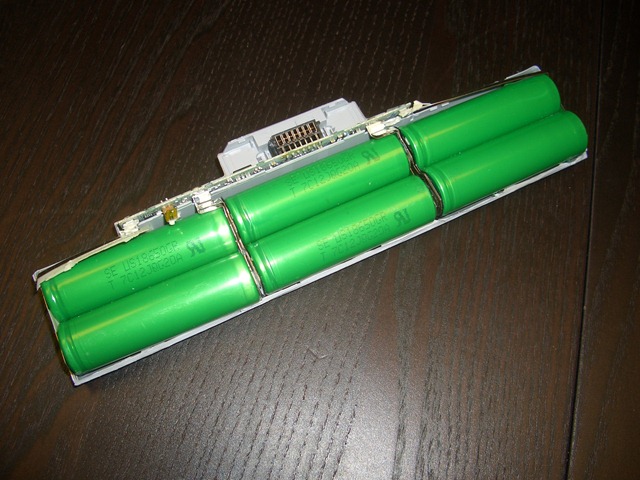
This was a whole new ball game for us, so we started by taking a look at how consumer laptop batteries are put together. Chris’ old Sony laptop became the sacrificial lamb:

CIMG9938CIMG9936image
No big surprise – a PCB controller was attached to 6 rechargeable Lithium-ion battery cells. The real fun was in understanding the power management ICs on board, how they communicated with the computer, and what other information was being provided, since the battery pack had quite a few more pins than our original lithium backpack did!
One of the big takeaways was that we needed to use some more complex power management units in order to provide the complex battery systems people were used to using with laptops and robust embedded systems. So for the Liquidware Amber, we incorporated laptop power management circuitry, which enabled multiple cells in series to provide higher charge capacity as well as high-power output (the Liquidware Amber battery pack delivers 5V at up to 4A for an extended period of time). What does this mean for functionality? A lot of charge and discharge management algorithms that go on behind the scenes, but also the ability to read out current, temperature, and voltage status to the display – something we take for granted on most modern devices, but actually involves quite a bit more complexity than strapping some rechargeable batteries to a board!
This is the first post in a three-part series on portable power management. In the next one, I’ll discuss the specific features and algorithms we considered in building a laptop power management system, and answer Keith’s original question about a standalone Amber battery. Questions, thoughts or projects – email me directly: justin dot huynh at liquidware dot com.

Thursday, July 19, 2012

5 Reasons to Use a Custom Android Tablet

There’s two sides to every coin. In the last post, I talked about instances where I usually recommend that people use an off-the-shelf tablet or smartphone device for their custom applications. The primary principle being keeping things simple, I recommend developing portable apps wherever possible, and avoiding potentially time and cost intensive hardware turns and development. But sometimes a custom (Android) tablet is required, and it’s worth knowing when to recognize these instances, and follow the path of least resistance.

It’s why the Liquidware Amber exists. We designed it for internal use, and use in engineering projects. It saved us a ton of time having that extra level of hardware and firmware customization, without having to start from scratch each time.

1) Sensor specificity and connection interface. In many cases, the end device is driven as much by the sensor as it is by the display. For example, a tablet may serve as the human-machine interface for a medical diagnostic device, but the sensor that is attached to it could be highly complex. Or the sensor required talks over a very specific protocol, such as I2C or SPI.

2) Custom hardware feature set. In many cases, the product calls for integrating more than just sensors to tablet HMI. Kiosks, industrial control terminals, and other large scale machinery come to mind. Nevertheless, the tablet portion doesn’t need to be built from scratch, and a custom tablet like the Amber allows for tight systems integration over several different interfaces.

3) Supply chain management with high volume. Designing a product to be deployed in volume brings other considerations into play. Considering that most consumer devices are built to be sold within a 24-month lifecycle or less, since they’re designed with obsolescence and upgrade paths in mind, the supply chain of these devices can be fickle. This means that in order to incorporate an off-the-shelf device into a product design, it’s probably a good idea to consider buying all the units you think you might need. Upfront. Which can translate to a pretty significant capital investment. A custom tablet enables tight control over the hardware manufacturing, and ensures longevity of the product, to maximize the value of upfront engineering, design, and systems integration work.

4) Custom OS and firmware. If the product is going to require highly customized kernels and special firmware that allows the tablet to integrate with other components of the device, it’s not exactly efficient to root and re-load a custom ROM/kernels on each individual unit. And voiding any sort of warranty in the process.

5) Security. The other (somewhat unexpected) driver of custom hardware requirements has actually been one of security. Understanding exactly what is going into a particular device and having control over all layers of software can help make the device less transparent and less vulnerable than stock devices currently available. For instance, a custom Android tablet include any manufacturer software, and doesn’t have GPS (if you don’t want it) so you’re not inadvertently broadcasting information that you don’t want released.

There are many other considerations, such as form factor and branding, that just might tip the scales in favor of using a custom Android tablet. And as with big questions in embedded systems development, the answers aren’t always obvious.

So if you’re on the fence about which way to take your custom tablet project, feel free to comment below, or get in touch – justin dot huynh at liquidware dot com.

Tuesday, May 15, 2012

Two ways to accelerate embedded development and build your application faster

Intel’s Core 2 Duo was one of the first mainstream desktop uses of a dual-core microprocessor (2005-6), and Nvidia’s Tegra 2 was an early dual-core appearance in mobile devices (2010).

Embedded development typically follows the progression of mainstream computing, with an approximate 5 year lag. Approximate, because dual-core ARM Cortexes (Cortices?) and Intel Core 2 Duos are quite different, and designed for different applications.

Even 5 years ago, though, personal desktop computers were quite powerful, and that power is now available for an incredible variety of dedicated or mobile applications.


As embedded technology becomes increasingly powerful, development efforts have had to accelerate to take advantage of these advances before they become obsolete.


Reconfigurable Computing

“Reconfigurable” can mean a couple different things. In one sense, you can talk about reconfigurable processor architecture – at the silicon level. National Instruments recently published its 2012 Embedded Systems Outlook, which presents the spectrum of silicon available to embedded systems developers:

image

However, “reconfigurable” can also refer to the design components involved. At the microcontroller level, Parallax and Arduino play host to a number of functional, modular components – reconfigurable for any variety of applications. With Texas Instruments’ line of high-performance embedded OMAP-family of microprocessors, the BeagleBoard platform provides a single-board computer base for assembling a custom handheld prototype.

The idea is off-the-shelf hardware is designed in such a way that the work is shifted to integration, and piecing the parts together – rather than building everything from scratch (more on that next time).


Toolchain Consolidation

Anyone who designs and develops embedded systems can tell you what its like at the start of a new project. Which version of which OS do we need to be compatible with? Is there anything from the lower levels that we’ll need access to in the final application? I happen to do a lot of work with Android, and getting each of these pieces in line for a new project is an effort in itself!


During the early design and prototyping stages, there’s also a great deal of component selection, each of which has its own drivers that probably need to be integrated into your kernel. And if you’re starting from a clean machine, get ready to spend a few days installing your favorite Linux packages, editors, compare programs, and kernels.

Much like the LAMP stack that goes into building a web server, I’ve built my own stack that comes in very handy when I start developing, then I saved it onto a VMWare slice that runs off an external hard drive (also known as the Android V-IDE). It’s similar to this, but I’ll update it every month or so with any new or useful packages that make my life easier. For the Windows users out there (I’ll confess I’m still hanging on), the other hack is to have a dedicated Linux netbook sitting around. Everything gets compiled on a remote server, but for testing different versions of an Android APK, it’s invaluable.

What are some of your favorite strategies to hit the ground running? Post a comment or e-mail me – justin at liquidware dot com