Monday, October 26, 2009

Updates to the Antipasto Arduino IDE: Frickin's, Fixes, and Features

Matt mentioned a few of the issues with Apple and Java, so I thought it might be helpful to add a little technical detail on what's happening and why. The fixes are all part of the latest Antipasto Arduino IDE I uploaded last night, which can be downloaded here.

And given the situation, I chose to express myself through a series of F-words: Frickin's, Fixes, and Features.

Frickin's 1: Apple Breaks Java

Here's the bad news from Apple that was posted to a mailing list regarding Jan's broken Java app:
On Jun 16, 2009, at 7:23 AM, Jan Andersson wrote:

After the latest upgrade starting several of my Java-based applications fails
(when I have changed the plist to say 1.6+). This includes IntelliJ, Install4J
and DbVisualizer.

This is part of a change to the double-clickable app launching policy (which we explained in detail in the developer preview release notes). To enabled the Finder's "Run in 32-bit mode" checkbox for Java apps, and to make the transition to 64-bit by default easier, we've modified the JavaApplicationLauncher.framework to only launch application's in the architectures they have present in their JavaApplicationStub.

The thinking is that if you haven't rebundled, you likely haven't ever considered that you'd be run in 64-bit mode (and when users have dragged Java SE 6 to the top of their Java Preferences, they found that some of their applications stopped working). By preventing apps from being launched in 64-bit if they haven't rebundled, we can maintain the widest compatibility, with a minor impact on developers (and actually let them have a say in what their version and architecture requirements are).


Hope this explains what you are seeing,
Mike Swingler
Java Runtime Engineer
Apple Inc.


Apple Translation:
We don't care if we break all the Java applications out there...that's your problem, not ours.

So in response to this, Matt and I (and a few others - thanks esp. to Nick!) worked really hard to re-bundle the Arduino IDE as a 64-bit bit native. You're probably asking, why not just check the box in the Get Info window to run in 32-bit mode? Well, that was my first thought too, but the check box mysteriously disappeared, so that wasn't an option any more. Dang.

In any case, that means we needed to ensure everything is 64-bit compatible, including all the contributed libraries the IDE heavily depends on. Especially the infamous librxtxSerial library that provides serial connectivity to the boards. So when everything came together, I recompiled everything for 64-bit.

Fixes: Now the Arduino IDE runs on Mac OS X with Java 1.6+, as a 64-bit native application.


Frickin's 2: Apple PackageMaker Relocation Bugs

Aside from the Java issue, have you ever installed an application on your system and the .app file mysteriously disappears? If you have, like me, you've probably been the victim of a bug with Apple's PackageMaker utility that comes standard in OS X.

As it turns out, when building an installer package inside of a relative directory, like the Arduino IDE needs to, PackageMaker thinks I'm trying to relocate the installed Application on the target computer to a random directory. Installation result due to this bug: A full Arduino IDE installation with a missing Arduino.app file. Not a pleasant surprise.

The fix is more of a hack, and it's to scan for and manually strip out any XML in the packager maker build files that point to obscure package relocation settings.

Fixes: Now the Arduino IDE should always have an Arduino.app file in the Applications/Arduino directory.


Features: TouchShield Core Consolidation

A positive outcome of the getting back into IDE development was updates to the TouchShield core. The biggest thing is that the Stealth and Slide libraries have now been consolidated into a single core. This allows for easier code maintenance and allows for contributed libraries to run on both boards. As it turns out, this is the only thing I can indirectly thank Apple for breaking Java for.

Features: Reference Panel Added

I like to be able to browse reference docs, even when I don't have an internet connection. To see it, click Help Menu->Reference.

Features: Libraries and Reference Docs are now Core-Specific

Thanks to Andrew for suggesting this one. He was creating graphics libraries for Slide, which don't run on the Arduino. With this update, core-specific libraries like those can be dropped into to the following directory: hardware/cores/*/src/components/library

Each core also has its own reference html docs. These show up in the right-hand reference panel (see above). The reference html docs for each core exist in the following directory: hardware/cores/*/reference

Features: Compile and Upload is Now Non-blocking


Greg asked about making edits to my sketches while uploading or compiling, so now the IDE allows that to happen.

This is just a start, and hopefully it tackles a few of the issues that I've been getting emails about. I've put the IDE up here. Feel free to give it a spin and let me know if there's anything else I should take care of, or if you've got a chunk of code to include as well.

A very bad week for Open Source Hardware

This has been a very bad week for Open Source Hardware. First Sparkfun gets served up by Sun for sounding like SPARC processors. Guess what? No one in the WORLD would ever have made that connection. NO ONE except a set of trigger-happy lawyers whose sole goal is to increase the percentage of GDP in the US dedicated to legal transaction costs. Then, the Creative Commons tells GOSH to buzz off because they don’t want to help make an Open Source Hardware-specific license, instead they basically said, “hey guys, go learn about patents.” And now, Apple’s 64 bit update java dev team conveniently decided it was time to refactor the library base for 64 bit, leaving anyone who had coded an app for 32 bit hanging in the dark.

Basically, Apple just announced to any Open Source 32 bit coder like me and Chris: “Get lost!”

I have just spent 35 hours that I will never get back. Chris and I have been killing ourselves trying to understand what Apple has done to their installation of Java, and why it suddenly broke Antipasto Arduino IDE.

Apple is migrating to 64 bit hardware, and they don’t want to look back. I guess I don’t blame them. Apparently, that means anyone with a 32 bit application out there that relies on hardware API service calls, you’re left hanging. I guess Apple learned from their transition from 68k to PowerPC that backwards compatibility really doesn’t mean anything, because community developer’s time is free and cheap and no one cares about the community. I’m one of those community developers, and apparently Apple doesn’t care about my time… they’re ok to just say, “whatever, your fault, just recode your entire application for 64 bit Java if you want anyone to care.”

I guess it’s easier to tell the community “go build an app for that and get out of my face.”

Well, to whomever is responsible for making this decision, I HATE YOU.

Here’s what happened so far:

-Apple decides at some point that 64 bit java support is all they need

-Apple released version 1.6.0_15 of Java, switching everything around for 64 bit, rather than 32 bits http://news.techworld.com/security/3201055/apple-patches-critical-java-bugs/

-Antipasto Arduino IDE’s use serial libraries and serial drivers to control the FTDI comm. link, which is more stable in 32 bit land

-Apple doesn’t care, so they rearranged the lib tree structure and object files, and decided they’d let us developers figure it out for ourselves. A couple other people have noticed http://lists.apple.com/archives/java-dev/2009/Aug/msg00115.html

http://www.chemaxon.com/forum/ftopic5319.html

http://forums.java.net/jive/thread.jspa?messageID=366935

http://forums.sun.com/thread.jspa?threadID=5405279

-On October 21st, http://twitter.com/LiquidWare madaerodog was the first to notice it was broken, and twittered all about it

-Chris and I started reverse engineering the problem once we figured out what java version he and I were running and why it worked on one and not the other

-Chris and I (and Nick) just pulled a 35 hour coding and debugging marathon trying to recompile all of the serial dependencies for the 64 bit java 1.6.0_15

Hey Apple! Next time you decide to refactor your platform-specific installation of Java in an effort to not support backwards compatibility, here’s a tip:

Don’t.

This is not going to be an overnight fix… but Chris posted up the most recent update to the Antipasto Arduino IDE. If you want to help, and you have a Mac, maybe you can try this version out, and let me know if it works - inthebitz at gmail…

Tuesday, October 20, 2009

What would Richard Stallman do?

It’s been a while since I talked about open source theory, but it comes up now and again because it’s pretty much a part of everything I’ve been working on lately. There’s been the open source Illuminato X Machina project (schematics, gerbers and software here), the Open Source Hardware Bank (and the Open Source Hardware that was produced as a result). But before I wax philosophic (perhaps something for later this week), I decided to try applying open source to a current problem.

Folks have been picking up the Portable Megapalm for one reason or another, where a touchscreen and buttonpad come in handy. But John and Glenn made an excellent point – why not have some handheld/mobile computing type software running on it? Maybe even some form of Linux? In any case, this could really go one step closer towards a truly customizable, open source, handheld/mobile computing device.

Then Matt and I looked at each other and asked “WWRSD?”, or “What would Richard Stallman do?” The phrase works just as well with Linus Torvalds, or your favorite open source hero :-)

Well, the conventional, closed-source solution would be to spend $1000’s (if not more) paying for full-time coders to develop proprietary software for such a project.

The open source solution would be to turn it around to a community of talented coders, passionate about driving their own projects and bringing open source devices one notch up versus closed source alternatives.

Nevertheless, Richard Stallman might mention something about the open source battle cry “free as in speech, not as in beer”. The classical gratis vs. libre distinction suggests that everyone is free to modify, reuse and contribute – but this does not necessarily equate to zero-cost. In the case of software with little marginal cost, however, open source has tended to mean both gratis and libre.

Despite the fact that many coders on open source project spend time on a project out of personal interest in a cause, it doesn’t mean that they couldn’t use some extra pocket cash.

It’s not the first time that someone is offering a little bit of money to help light the spark for an open source software project, though. My beloved New York City just launched an initiative called NYC BigApps, seeking software developers to create the best applications to analyze NYC’s open data sets and help improve the system, offering a $20K prize and a dinner with the Mayor.

Github launched something similar to improve its functionality. They offered up a nice ~$70 bottle of liquor in a friendly competition to solve a problem and get some new ideas and recommendations.

So I talked to Stephen, a staunch supporter of OS, and asked him what he thought of the situation. He said that he’d even redirect his I-bills towards getting some functional software written on the Slide and Portable Megapalm, on the condition that it was written collaboratively, and in an open source fashion.

Here’s what he was thinking in terms of stuff for the Portable Megapalm, all of which is open to thoughts and comments:

$1000 in funds towards folks who could develop a PDF reader
$500 in funds towards those who can get a quick JPG viewer up
$500 in funds towards functionality, features, or projects that the community votes on and is interested in seeing

Of course, it’s open source and collaborative, and shouldn’t be a hardcore competition! Hence I say “funds”, as it will be distributed across the top 5 or so contributors to each project.

What do you think? If you’re interested, or have an idea on how it could be better structured, feel free to send me a note or comment: jhuynh at gmail

On Friday, I’ll wrap up a few of the feedback that I get and kick it off next week. Looking forward to it!

Tuesday, October 6, 2009

New Haven Maker Meetup Recap

Thanks to the makers and hackers that came out to the Eli Whitney Museum last week for the inaugural New Haven Maker Meetup. There turned out to be quite a variety of projects and discussion, which is always a great source of inspiration.

Growing up in New York (and not CT), I didn’t have a chance to experience the Eli Whitney Museum as a child, so I was in for a real treat. The museum serves as a workshop for all sorts of hands-on projects, in addition to having a lot of neat historic relics. All-in-all, a great place to spend some time.

Museum Director Bill Brown kicked off the evening with a brief history the museum and the art of “making” as it existed in a different age. While the materials, medium and projects may be different, the ingenuity, curiosity, and pure interest in tinkering is timeless.

Bill ended his talk by making a favorite project of his own, on the spot: the rubber band powered car, and setting it off to the races! A shaky, full motion shot, was only fitting :-)
image
Here’s what they usually look like fully finished and decorated:image
We had a few neat demonstrations from Alex, Mike, and Rob. Alex brought in and talked about his crackerbox amp, which he built from parts that he salvaged from an old TV!
image
Mike talked a little about his experience tinkering and building the boards over in the Liquidware shop, and Rob (below) gave a demo of the Drawdio project (as well as a box full of other projects!).
image
image
Then we all split up into a mingling/project show-and-tell session, which is part of what makes meetups so much fun, and is usually where I get a lot of ideas for new stuff to work on.
image
And I just thought this one was really cool to see live - the RC Carduino that Raj set up on his own server:
image
All good, fun stuff, and a great excuse to hang out with other makers! If you’re in the area and want to be a part of the next one (tentatively for November 11), let me know and I’ll be sure to send you a reminder when it gets closer – jhuynh at gmail

Wednesday, September 30, 2009

Computational Structures

I just got my letter confirming my invitation to the LACSS Conference at Los Alamos National Labs!


Their hypercube logo reminded me of my Illuminato X Machina representation of what could be considered for a 4-way mesh topology.

The physical connection in my cube is made by bending a few intercellular matrix headers at right angles.


I'm testing Matt's gradient stealer sketch, which is running on each Illuminato X Machina cell, looking speedups due to the cube architecture.

In this 3D mesh configuration, the network architecture allows more nodes to communicate simultaneously, and with shorter hops back to the source, which was my PC.

Up next: Performance speedups by using Oracle bits, and exhibiting quantum acceleration of non-quantum computing, by jumping the mesh.

Tuesday, September 29, 2009

Digital Venus Flytrap on my TouchShield Slide

When I was at the Maker Faire in Providence, Justin remembered that Matt had a Venus flytrap with him that he was going to do some sort of project with. Way back at the end of May, at the Maker Faire in San Mateo, Matt had picked up a Venus flytrap on the way to the airport. It's the little plastic canister right next to his laptop bag.
[003+Matts+luggage.jpg]
Here it was on their Maker Faire table getting some air time.
[004+Liquidware+kits+and+toys+on+the+table.jpg]

The whole reason was so Matt could snap a bunch of hi-speed images of the flytrap in action. But somehow in the hustle and bustle of the Faire, that never happened. I'm not sure what ever happened to that Venus flytrap, but I thought it might be a fun little app, so I put one together.

The artificial, hack way, I did this (since that's really the only way I do anything :-) was to search Youtube and take some screenshots. I searched for "Venus flytrap closing" and just looked for a video that seemed right.

For screenshots, I like to use zscreen, which is free and open source, and I had to crop some of them using GIMP, but it was pretty simple. I took only 4 shots, and these are by no means the hi-speed shots that Matt was going to take. But I'd just sample more if I wanted the transition to look a little smoother.

I saved these shots as bitmaps, which I then uploaded to the EEPROM on my TouchShield Slide:

When I touch the Slide, the flytrap closes...
Short and sweet, and the project finally comes full circle four months later. I uploaded the code over on the App Store here, in gadget format for the Antipasto IDE.

Here's a video of me (safely) poking my Slide Flytrap with my "stylus"...as a disclaimer, I wouldn't recommend poking a real one!


Monday, September 28, 2009

The Illuminato X Machina on Linux: Up & Running

Last Saturday Chris and I got the Illuminato X Machina IDE (pre-build binaries here, source code here) working on Gentoo Linux. Most users can just install the IDE and start hacking, but if you don't see a device in the IDE menu and your terminal board is powered up, here are some detailed instructions for setting up Linux properly.

Kernel Modules & Devices

The IXM Red Terminal Programmer is a usb-serial device. On my 2.6.28 kernel, the programmer will show up at /dev/ttyUSB0 (or 1, 2, etc.). This device is provided by the usbserial driver in the kernel. You can check for the module easily:
$ sudo modprobe -l|grep -i usb\/serial
/lib/modules/2.6.28-tuxonice-r10/kernel/drivers/usb/serial/usbserial.ko
/lib/modules/2.6.28-tuxonice-r10/kernel/drivers/usb/serial/ftdi_sio.ko
$
Your distro may have the module built into the kernel instead (that's why you should just try the IDE first). If you need to build the module, you can configure your kernel as follows:
  • Check off: Device Drivers > USB Support
  • As module: Device Drivers > USB Support > USB Serial Converter support
  • Check off: Device Drivers > USB Support > USB Serial Converter support > USB Generic Serial Driver
  • As module: Device Drivers > USB Support > USB Serial Converter support > USB FTDI Single Port Serial Driver
After building the module, simply sudo modprobe ftdi_sio. You can check to see if the module is loaded with sudo lsmod. Modern Linux distros use udev, which means the device node should be created when you plug a terminal board in. If not you can look at the kernel documentation for usbserial for more information about device nodes.

That's it!

Friday, September 25, 2009

Embedded Systems Confrence Boston

This year I was lucky enough to sneak out to the Embedded Systems Conference at the Hynes Convention Center in Boston!
This was my first time going to a big event like this with so many embedded systems engineers.
After I got my badge, I saw a great presentation by Robert Brunner from Ammunition to start out my day!
Then I headed to the Exhibit Hall where lots people were showing off their stuff.After that I learned a little about Windows Embedded... they seem to be focusing a lot on a distributed cloud architecture.

I finally got a chance to talk to real NXP team members (from my experience, they are imposable to reach via phone unless you are buying infinity processors). The NXP team knew their products, and were very helpful... they even gave me a free development stick!After that, I headed back to the Exhibit Hall to finish what i started.
I grabbed a quick lunch and went to hang out with the guys from Texas Instruments, and they put on a fascinating demo of their Beagle Board, and how they hacked Ant and Make files to get a Linux kernel running on the board.
The day ended for me with a discussion on power optimization for embedded system operating systems...
Can't wait till ESC Boston 2010!

Thursday, September 24, 2009

Maker Faire RI Recap

While Matt, Chris, and Matt B were down in NYC hacking away with Bre at MakerBot, Mike and I went the other way, up to Providence for Maker Faire Rhode Island.

This one was definitely a lot easier to get to than the last Maker Faire out in San Mateo, so we loaded up the Geo Metro and drove off with a few projects and a couple Illuminato X Machina boards. Between MakerBot and Maker Faire RI, this was the first time the Illuminato X Machina boards have really been "out in the wild" :-)

Here's an interesting perspective shot that JB took (thanks!):

It was also pretty neat to see a lot of very different types of projects (e.g., those that don't involve circuit boards) like these reclining, front-pedal bikes that Paul built himself, which mixed household hardware like door hinges with titanium rods used in aircraft structural support.

I wasn't able to make it to Defcon out in Las Vegas this year, so I was thrilled to find out that there's a local and very active community (DC401) right in Providence, and they're hosting QuahogCon in the spring. Notice the interesting life-sized creature in the background. A performance group called BIG NAZO designs, constructs and paints these foam suits in their studios.

As it got dark, the gorgeous Waterfire exhibit lit up the Providence River, drawing crowds to a delicious street fair nearby.

There are plenty more pics in a Maker Faire RI Flickr pool as well. All in all, a wonderful way to meet a lot of New England makers and hackers, and special thanks to Brian, Kipp and everyone else who made the day perfect! I'm hoping this will become a tradition...

Tuesday, September 22, 2009

Bringing the Cloud Closer: Ruby and the Illuminato X Machina

Cloud processing is all the rage, but everything from privacy concerns to large datasets can be a hinderance. Enter the Illuminato X Machina and the new Ruby LibIXM.

The Illuminato X Machina platform can scale processes to multiple modular segments on the fly. These units are local hardware, not slow remote servers, so IO is cheap. With a library for communication to the host machine, the community can start building powerful libraries.

Those on the Illuminato X Machina mailing list are familiar with the packet interface David Ackley has already written in C++. A partner in that system is the sfbprog binary. sfbprog is meant to auto-program IXMs with new sketches, but through a simple hack can create a packet-based terminal to the Illuminato X Machina hardware:
sfbprog -n /dev/ttyUSB0 -S - -t 0 -f /tmp/old_sketch.hex
old_sketch.hex needs to have an older timestamp than the code currently running on your IXMs. Flavor the device and .hex file to taste, and you've got a real-time packet interface to the Illuminato X Machina hardware.

LibIXM and Ruby

The sfbprog terminal is a simple solution, but not something you want to build on top of. Building a Ruby library gives the Illuminato X Machina's community a toe-hold on the desktop machines connected to IXM hardware. LibIXM for Ruby has two levels of abstraction:
  • Adapters: hardware compatibility layers.
  • Interfaces: software behavior models.
Currently, the adapter layer is limited to a wrapper around sfbprog. That means all communications with the Illuminato X Machina go over the packet interface, guaranteeing a level of consistency.

The basic interface supported by this first release is Simple. This interface is based off a callback pattern, similar to the Body.reflex already available in the IXM core API.

So Happy Together

Enough talk, let's see some code. This sketch is a basic packet-level echo for the Illuminato X Machina hardware:
void yowl(u8 * packet) {
facePrintf(packetSource(packet), "You sent me a '%#p'\n", packet);
}

void setup() {
Body.otherwise(yowl);
}

void loop() {}
And this is a Ruby LibIXM "yodler" built off the sketch:
require File.join( File.dirname(__FILE__), '..', 'libixm' )

ixm = LibIXM.new()

# Build a reflex for our packet
responded = false

ixm.attach_reflex( /yodel/ ) do |packet|
puts "IXM yodeled: #{packet}"
responded = true
end

# Send a packet.
ixm << "yodel yo momma ha"

# Wait for the response.
loop { break if responded }
With the default Simple interface you get the method of attach_reflex. Richer interfaces should follow in the future!

LibIXM should be available as a gem from Github, but Github is having yet another epic FAIL this week. You can install it as a gem:
wget http://www.liquidware.com/system/0000/2752/libixm-0.1.0.gem
sudo gem install ./libixm-0.1.0.gem
Or pull the source via git at http://github.com/mixonic/libixm. This takes "throwing hardware at a problem" to a whole new level! Go grab yourself an Illuminato X Machina and IXM Red Terminal Programmer and start pushing some work off your desktop's processor.

** Update **

Github just caught up and built the gem, so now you can install with:

gem sources -a http://gems.github.com
sudo gem install mixonic-libixm

New Haven Maker Meetup Tomorrow

I'll be at the Eli Whitney Museum (named for inventor and uber-maker Eli Whitney, depicted above) tomorrow evening for the inaugural New Haven Maker Meetup.

What: New Haven Maker Meetup
When: Wednesday, September 23, 7:30 pm - 9:30 pm

Where:
Eli Whitney Museum (directions)
915 Whitney Avenue
Hamden, CT 06517
(203) 777-1833

How Much: Free
RSVP (preferred): kl@eliwhitney.org

Feel free bring some friends, projects and toys to hack with or show off. It's part demo, part show and tell, and part workshop. Hope to see you there!

Let me know if you have questions: jhuynh at gmail

Monday, September 21, 2009

IXM and Self-Discovering Topology

The Illuminato X Machina's are modular, which means they can be connected to each other to distribute tasks and to adapt to their environment (or ecosystem, if you will). This is a little blog about how I wrote a sketch that makes all the IXM's act like a team to generate a network map representation of how they're connected to each other.

That way, something like this (note a 3d printed model of the Empire State building that Bre printed):


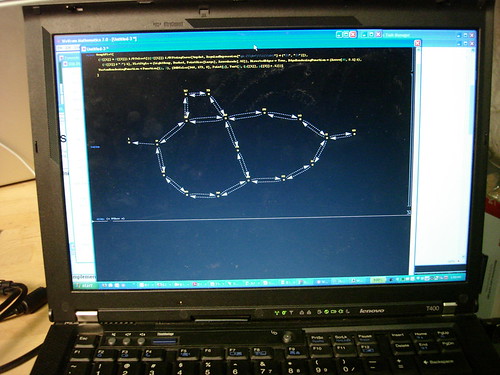
Turns into a representation on the computer like this:


Here's an up-close screenshot that I made with Mathematica (I wish I knew Octave or SciPy better, but I taught myself Mathematica a long time ago for some math homework in school, and I don't even think SciPy existed back then):


Here's a video of me YELLING REALLY LOUD BECAUSE I DIDN'T REALIZE how well the junky little video recorder I have could pick up my talking with the music right near me (ps thanks a lot, sony for making me carry around your stupid proprietary upload cable everywhere):


This is probably my favorite video ever, because it shows the Gradient auto-discovering topology sketch gradually figuring itself out, and updating as it gets new packets in real time:


So basically, if I had gray hair, and was born in the 1930's and worked at Los Alamos National Labs building supercomputers all the time, I would probably call this something like a "self-discovering topologically ambivalent computer achitecture with peer-to-peer team-based self-discovery." But I'm not, I don't, I didn't and so instead this is just "a simple little sketch that let's you connect the IXM's in any configuration, and it prints on the screen a network map version of the physical arrangement of the IXM nodes."

How I did it...

I adapted the packet gradient sketch (more on that to come, but if you're on the illuminato@googlegroups.com mailing list, you probably saw me post it a week or two ago), and I made a simple packet system that does the following:

  • "qz0" - reset the grid
  • "t0" - establish a gradient back to the PC
  • "i0" - hey, every IXM cell go generate a random number between 1-1000 and store it
  • "qzN" - tell me (the PC) what the cell ID is for the IXM connected directly to me (PC)
  • "qn0" - ok, now every IXM cell in the grid, exchange id's with any neighboring grids you're connected to
  • "ndN1" - I'm the PC, so my id is '1', and I'm at your North edge
  • "qp0" - ok, now everyone report up which id's you're connected to in the format of E123|456, where 123 is your id and 456 is the id of the IXM cell to the East of you
  • "qz0" - reset all your id's and get ready for the next thing I want you to do, which is probably go generate another edgelist and send it back up the gradient after I changed your layout by reconnecting you all in a different way
These are actually just typed into the Arduino-Illuminato IDE in the serial terminal, or even just with hyperterminal. But you can see from the mathematica files that I used a modified version of what someone wrote up on the Arduino playground for how to talk over serial using Mathematica.

I then get this whole set of edgelist pairs back over the PC serial port, and I used this little bit of Mathematica code to make it prettyful:


dat = ((FromCharacterCode[#]) & /@ {GetPort[1]})[[1]];

datpack = StringSplit[dat, "\n"];

tmpdat = Select[datpack, (Length[StringCases[#, "|"]] > 0) &];

Select[((#[[1]]) & /@
StringCases[tmpdat,
RegularExpression["qr.(\\d+?)\\|(\\d+)"] -> {"$1", "$2"}]),
(#[[2]] != "0") &];

GraphPlot[
(#[[1]] -> #[[2]]) & /@
Select[((#[[1]]) & /@
StringCases[tmpdat,
RegularExpression["qr.(\\d+?)\\|(\\d+)"] -> {"$1", "$2"}]),
(#[[2]] != "0") &],
PlotStyle -> {LightGray, Dashed, PointSize[Large], Arrowheads[.02]},
DirectedEdges -> True, EdgeRenderingFunction -> (Arrow[#1, 0.1] &),
VertexRenderingFunction ->
Function[{p, l}, {RGBColor[240, 173, 0], Point[p],
Text[l, {p[[1]], p[[2]] + .1}]}]
]


I've uploaded the sketch file up to the Liquidware "app store" over here, and I made a new icon for any app that I write for the IXM:


And here are some more screenshots of different topologies Chris, Matt, and I were experimenting with on a desk at Makerbot:


The "magic" all happens in the sketch with this code right here, which shows off the packet functions that Dave wrote overnight in his sleep :-)


//expect to parse packet of "qxN\n" for send me your id, or "qn0\n" for get your neighbors' id's
//or "qd4214\n" for the actual id, or "qs123\n" to set your id to the number specified
//or "qp0\n" for send all your neighbor info packets back
//or "qz\n" for reset
void doNeighborIdentify(u8 * packet) {
u32 sourceface, thispacketmyngen, thispacketmypgen, thispacketmyrgen;
int tempface;
long tempnid;
u8 t;

if (packetLength(packet) < 2) return;
sourceface = Body.source();

//reset gradient signal tokens
if (packet[1] == 'z') {
thispacketmyrgen = packet[2] - 48;
if (thispacketmyrgen <>=1000)) {
//only run request on the first packet i get with lowest n
//or if a second has ellapsed
myrgen = thispacketmyrgen;
last_millis_reset_packet = millis();
myidgen = MAXNBYNSIZE;
myngen = MAXNBYNSIZE;
mypgen = MAXNBYNSIZE;
//myrgen = MAXNBYNSIZE;
deus_terminus_hop[DEUSNORTH]=MAXNBYNSIZE;
deus_terminus_hop[DEUSSOUTH]=MAXNBYNSIZE;
deus_terminus_hop[DEUSEAST] =MAXNBYNSIZE;
deus_terminus_hop[DEUSWEST] =MAXNBYNSIZE;
neighbor_ids[DEUSNORTH]=0; neighbor_ids[DEUSSOUTH]=0; neighbor_ids[DEUSEAST]=0; neighbor_ids[DEUSWEST]=0;

//myidgen, myngen, mypgen, myrgen
//println("qz");
if(sourceface != NORTH) { facePrint(NORTH,"qz"); facePrint(NORTH,myngen+48+1); facePrintln(NORTH); };
if(sourceface != SOUTH) { facePrint(SOUTH,"qz"); facePrint(SOUTH,myngen+48+1); facePrintln(SOUTH); };
if(sourceface != EAST) { facePrint(EAST,"qz"); facePrint(EAST,myngen+48+1); facePrintln(EAST); };
if(sourceface != WEST) { facePrint(WEST,"qz"); facePrint(WEST,myngen+48+1); facePrintln(WEST); };
}
}
//send me your id in a packet of "qdN4214\n" for example
if (packet[1] == 'x') {
facePrint(sourceface,"qd");
if (packet[2]=='N') facePrint(sourceface,"N");
if (packet[2]=='S') facePrint(sourceface,"S");
if (packet[2]=='E') facePrint(sourceface,"E");
if (packet[2]=='W') facePrint(sourceface,"W");
facePrint(sourceface,myid); facePrintln(sourceface);
}
//set my id to the number you specified
if (packet[1] == 's') {
packetScanf(packet,"qs%d\n",&myid);
}
//set my neighbor_id's array to the id's of my neighbors
if (packet[1] == 'd') {
packetScanf(packet,"qd%c%d\n",&t,&tempnid);
if (packet[2]=='N') neighbor_ids[DEUSNORTH] = tempnid;
if (packet[2]=='S') neighbor_ids[DEUSSOUTH] = tempnid;
if (packet[2]=='E') neighbor_ids[DEUSEAST] = tempnid;
if (packet[2]=='W') neighbor_ids[DEUSWEST] = tempnid;
}
//query my neighbors, then propagate the requst outwards
if (packet[1] == 'n') {
thispacketmyngen = packet[2] - 48;
if (thispacketmyngen < myngen ) {//only run requst on the first packet i get with lowest n
myngen = thispacketmyngen;
//query my neighbors
facePrint(NORTH,"qxN");facePrintln(NORTH);
facePrint(SOUTH,"qxS");facePrintln(SOUTH);
facePrint(EAST,"qxE");facePrintln(EAST);
facePrint(WEST,"qxW");facePrintln(WEST);
//propagate the request outwards
if(sourceface != NORTH) {
facePrint(NORTH,"qn"); facePrint(NORTH,myngen+48+1); facePrintln(NORTH);
}
if(sourceface != SOUTH) {
facePrint(SOUTH,"qn"); facePrint(SOUTH,myngen+48+1); facePrintln(SOUTH);
}
if(sourceface != EAST) {
facePrint(EAST,"qn"); facePrint(EAST,myngen+48+1); facePrintln(EAST);
}
if(sourceface != WEST) {
facePrint(WEST,"qn"); facePrint(WEST,myngen+48+1); facePrintln(WEST);
}

}
}
//send neighbor packet pairs back
if (packet[1] == 'p') {
thispacketmypgen = packet[2] - 48;
if (thispacketmypgen < mypgen ) {
mypgen = thispacketmypgen;
//print up my report-outs
ledOff(redPin); ledOff(bluePin); ledOn(greenPin);
if (neighbor_ids[DEUSNORTH] != 0) facePrintf(sourceface,"qrN%d|%d\n",myid,neighbor_ids[DEUSNORTH]);
if (neighbor_ids[DEUSSOUTH] != 0) facePrintf(sourceface,"qrS%d|%d\n",myid,neighbor_ids[DEUSSOUTH]);
if (neighbor_ids[DEUSEAST] != 0) facePrintf(sourceface,"qrE%d|%d\n",myid,neighbor_ids[DEUSEAST]);
if (neighbor_ids[DEUSWEST] != 0) facePrintf(sourceface,"qrW%d|%d\n",myid,neighbor_ids[DEUSWEST]);
//propagate the request outwards
if(sourceface != NORTH) {
facePrint(NORTH,"qp"); facePrint(NORTH,mypgen+48+1); facePrintln(NORTH);
}
if(sourceface != SOUTH) {
facePrint(SOUTH,"qp"); facePrint(SOUTH,mypgen+48+1); facePrintln(SOUTH);
}
if(sourceface != EAST) {
facePrint(EAST,"qp"); facePrint(EAST,mypgen+48+1); facePrintln(EAST);
}
if(sourceface != WEST) {
facePrint(WEST,"qp"); facePrint(WEST,mypgen+48+1); facePrintln(WEST);
}
}
}
//i got a report-out packet, send it back to the path of the deus, least-hop gradient
if (packet[1] == 'r') {
tempface = getDeusMinHopDir(); //direction of upstream gradient
facePrintf(tempface,"%p\n",packet);
}


}


Just in case, here is a link to more Flickr pictures, and some other videos I took while at Makerbot.

A video of me spreading new code through the IXM grid like an infection

A video of the gradient sketch

A really simple gradient sketch video

Enjoy :) And thanks again Bre for letting Chris, Matt, and me hang out at Makerbot on Saturday!