What would you get if you crossed 7 minute abs with DIY and Open Source and a retro gaming tutorial? I don't know, but it sounded a lot better when Chris and I were talking about project ideas last week... we were reminiscing about how in middle school I bought a bunch of books filled with hollow promises that claimed to be able to teach game programming in 1 hour, 12 minutes and 22 seconds. Flat. No one ever learns game programming this way.
I think you learn game programming by taking something open source, and tweaking the settings around until you get more and more comfortable with the concepts. I like to think this is like physical computing meets programming. I learn a lot better by taking apart than by building, so this guide is intentionally written backwards. Instead of building from the "ground up," by learning all the painful parts of programming slooooowly, the steps are written by getting quickly to the end, and then "tearing it apart top down" like the way a reverse engineering hacker would think about it. I don't know, I just think better that way. Maybe I don't have the attention span to write line by line of code following a 500 page book. Thiiiiiiiis iiiiiiis hooooow yoooou maaaake an intttttteeeeggggerrrrrrr hellllllllloooooooo wooooooorrrrlllllllddddd (like whale speak from Finding Nemo).
So here goes my annotated tutorial on how to build your own DIY Handheld Asteroids Game.
Here's a little video and picture of the finished product:

Step 1: Assemble the Hardware
The nice thing about Arduino's, are that they interface to just about anything. You can make buttons out a pieces of wire, potentiometers, or whatever. Sometimes, you just want something quick and dirty, other times you want lots of features. I like features. So I used a Arduino GamePack for this project:
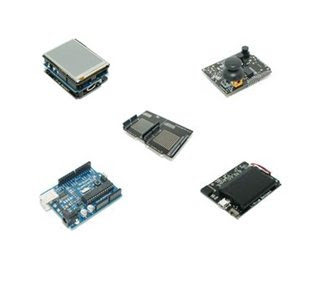 I could also use the MegaPalm (which is like the GamePack but uses the Arduino Mega instead):
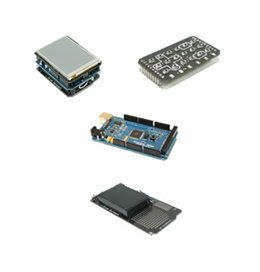 For the sake of simplicity, the code samples and such are going to use these parts. But once you get the hang of it, the circuit could easily be adapted to use any other open source hardware you wanted, naturally...
Step 2: Get everything up and running
Connect the hardware together to make the physical device. In this case, that means connecting the Arduino and Lithium Backpack to the backside of the ExtenderShield, and then popping the TouchShield Slide and InputShield onto the top of the ExtenderShield.
What do all the parts do?
The game code runs on the TouchShield Slide. The TouchShield is like a graphics card and display for Arduino-based gadgets. It runs a small program that is written in the Processing graphics programming language.
The InputShield has a joystick and some buttons. When you press them, they shield changes the digital and analog pins on the bottom of the shield to different values, so you can read them with an Arduino and tell which direction the joystick is pointing, and which buttons are being pressed.
The Arduino constantly polls and reads the joystick and button's values, and determines which direction the joystick is being pressed or which buttons are being held.
The ExtenderShield connects the Arduino, TouchShield, and InputShield together. It replicates the pins so you can connect the shields together.
The Lithium Backpack provides power to the gadget so that it's portable.
How to program it?
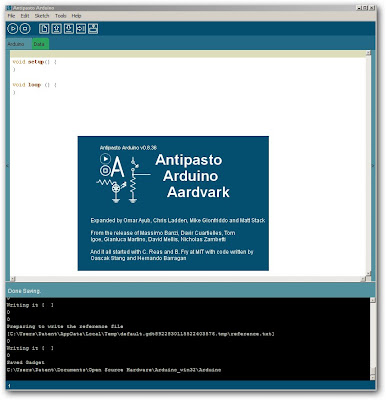
Make sure you have the latest version of the Antipasto Arduino IDE for Windows or Mac (email me for linux), which is downloadable from the Open Source app store.
 Use File menu -> New Gadget, name the gadget "Asteroids", and then click save:
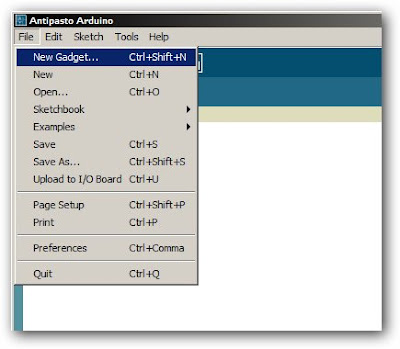 The gadget file let's you program different Arduino shields and modules at the same time quickly, all in one place. It's a branch of the main Arduino IDE. Now, add the Arduino module and the TouchShield module by clicking the plus sign in the pop-out drawer on the left side:
 Click the Arduino, and then copy and paste this code, and program it to the Arduino:
#include <afsoftserial.h>
#include <inputshield.h>
#define RX_PIN 3 /* TouchShield's Tx Pin */
#define TX_PIN 2 /* TouchShield's Rx Pin */
/* Create a serial connection to the TouchShield */
AFSoftSerial mySerial = AFSoftSerial(RX_PIN, TX_PIN);
/* Create InputShield on modes A and pass it software serial */
InputShield inputShield = InputShield(0, mySerial);
void setup() {
}
void loop() {
inputShield.SendHardwareState(mySerial);
delay(100);
}
Then, click the TouchShield icon on the left, and copy and paste the code in the file called "MegaAsteroids_TouchShield_Code.txt" in the file downloadable here, and program it to the TouchShield Slide:
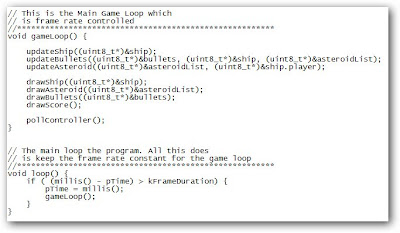 Then turn the power on and off to the GamePack by flipping the power switch on the Lithium Backpack, and the game is up and running...
Step 3: Tear the code down into its main parts
Ok. Clearly, all the fun happens in the TouchShield Slide code section, and it's written in Processing. If you're not familiar with Processing, here's a great overview of all the graphics functions available. Mark has pretty systematically ported almost all of the graphics functions onto the TouchShield...
So the code has a few major functions that matter:
gameLoop() - the function that updates and draws the ship, bullets and asteroids on the screen. It just calls other functions that do all the work, and just sits around looping, hence the name "loop".
readInputShield() - this function grabs all the code from the Arduino and InputShield. You don't have to worry about this one, it just works.
setup() - configure the background of the screen.
updateAsteroid() - a psycho-crazy function that updates all the asteroids' locations based on their locations.
drawAsteroid() - actually draw the asteroids, drawing all of them
updateShip() - a cool function that updates the ship, and takes into account which way it's facing, and which way it should turn based on values from the InputShield
drawShip() - this function actually draws the ship
updateBullets() - a function to update the position and location of the bullets that shoot at the asteroids.
drawBullets() - a simple little that erases old bullets and draws new ones elsewhere
There are 3 main things in the Asteroids game: asteroids (duh), a ship (naturally), and bullets (a lot of people forget that these are their own thing). Each has a function to update the position, and draw or update the drawing of each.
If you're just starting out, each of these functions might be a little over your head. In my opinion, that's at least a lot better than being placated with stupid little hello world programs that leave you scratching your head wondering, "great, why did I buy this book again?"
Step 4: Find the Important Pieces of Code
The trick to learning how to change code's behavior is actually first in learning where to spot the fun parts of the code. Great programmers (e.g. not me) that I know can just pop open a massive source code file, and skim through it and immediately know where all the cool functions and critical variables are going to be. It's almost like a 6th sense.
Where are the cool parts of code that are going to help you change the behavior? Here are some..
This is the header section, where global variables get defined - it's usually at the top:
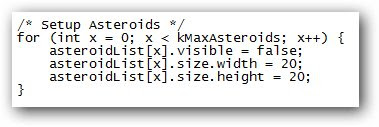
 This code initializes the asteroids and sets how they are:
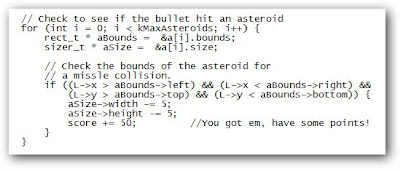
 This is the collision code that checks for whether the asteroid got hit by a bullet:
 Here's the code that draws the ship:
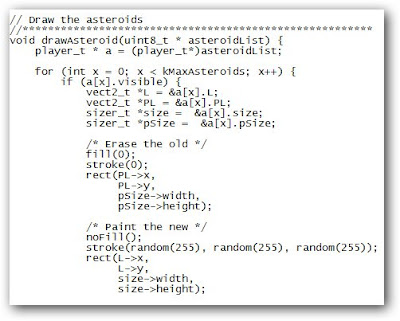
 ...and the asteroids:
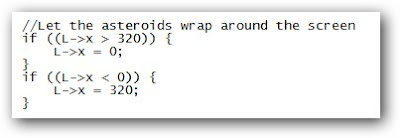
 This code makes the asteroid wrap around the screen:
Step 5: Change the behavior of the game
Once you've figured out the cool parts of the code, now you're ready to change the behavior of little parts of the program, one at a time. Every time you change a feature, you get more and more comfortable with how the game works. Change the feature, recompile the code, send it down to the TouchShield, and see how it affects the game play.
For instance, kMaxAsteroids is the maximum number of asteroids to have in the game. It's currently set to 10. What happens if you set if to 5? Or 7?
 What if you change the width to 40, and height to 10?
 Now, let's do comparisons. This code checks for what happens when a bullet is within the bounds of the box formed by the asteroid. The part that matters is the if ((L->X > aBounds->left... part:
 Try deleting or commenting out all the code from everything inside the if statement, like so:
//aSize->width -= 5;
//aSize-%gt;height -= 5;
//score += 50;
Now, when you shoot an asteroid, nothing happens. Ok, now for some fun, put those lines back in, but this time, change them to += 5 instead of -= 5:
aSize->width += 5;
aSize-%gt;height += 5;
score += 50;
Now, when you shoot the asteroids, they get bigger, not smaller... ok, you just learned variable setting and comparisons, and incrementors, and all kinds of stuff that has long names that don't matter as long as you know how to change the size of asteroids now :-)
Now, try changing the color of the ship. Instead of stroke(255), which is white, make it stroke(255,0,0), which is red:
 You can do the same thing here, too, and the color of the asteroids could be changed to stroke(0,0,255) to make them blue.
 Finally, here's the code again for the asteroid wrap-around-the-screen effect:
 Instead of making the asteroid wrap, make it adopt a new random direction, which will make asteroids freak out every time they hit the edge of the screen (which is fun).
Replace:
L->x = 0;
with:
a[x].rotation = random(50,130);
...and replace:
L->x = 320;
with:
a[x].rotation = random(50,130);
Step 6: Build your first cheat code patch!
Let's be realistic. The real reason anyone first learns how to program is to hack their favorite game so they can get a higher score and be "that guy" in math class and at lunch with the highest score. Anyway, this may be the first official ARDUINO CHEAT CODEZ!!!!111 ever. This is a proud day for all Arduino hackers...
 See that little line there that says score += 50. What happens if you change it to 5,173 instead of 50. Why 5,173, you ask? Because if you set the score incrementer to a big whole number like 5,000, it'll be obvious as you're playing that you're cheating the score. But if you make it a fancy number like 5,173, no one will notice, and it'll look like your score is going up naturally, just really fast. Clever :-)
Conclusion
So there you have it. An Open Source Asteroids game for the Arduino, written in Processing, and a short tutorial that teaches game hacking. This is the guide I wish someone had written for me when I was first learning programming. All I wanted was a step by step guide for how to hack games, and play around with them.
Arduino TouchShield Slide Asteroids from Matt Bitz on Vimeo.
2 comments:
Would this work on the TouchShield Stealth? Would probably need to make adjustments for screen size... but otherwise, is there a difference between the Slide screen and the Stealth screen?
not too many changes, actually, it would just be a matter of tweaking the screen width and height dimensions... otherwise, everything else should work out of the box,...
Post a Comment