Monday, January 11, 2010

A Digg Button for the Arduino

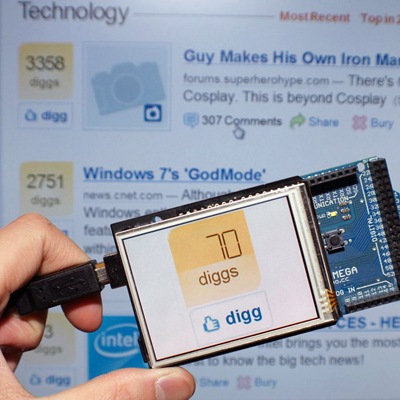
After Chris uploaded the TButton library, he and I got to talking about what other button apps would be neat to pull together for the Slide. With a little inspiration from Ladyada’s Digg Button (thanks Limor!), Chris and I started writing an Arduino-based Digg Button for the TouchShield.

Digg button kit - Click Image to Close

I guess it’s a little ironic that a completely virtual, digital button on a website became a distinct physical button on a dedicated device…and now I’m turning that physical button back to a virtual one- but still on a dedicated device. Well, here goes!

SONY DSC

Mark, Thom, and Alain all used image-based icons as buttons, which is the first thing I decided to do. So I went over to Digg

image

…zoomed in, and used WinSnap to grab the screenshots of the iconic Digg button into a bitmap for the counter:

digg1

and the “digg button” itself:

digg2

These are the exact bitmaps I used, so they’ll work perfectly when placed in the same folder as the Gadget file, or where the code is located.

Using the latest Antipasto Arduino IDE, I coded the following and uploaded it onto the TouchShield Slide.
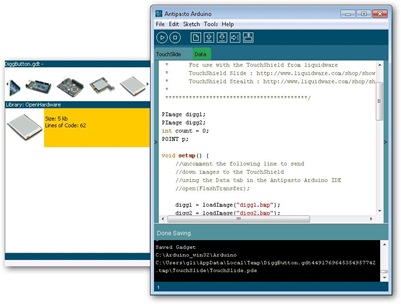
Antipasto Arduino Slide Digg Button Code

The first chunk uploads the two images to the slide, and sets the rest of the background to white:

PImage digg1;
PImage digg2;
int count = 0;
POINT p;

void setup() {
    digg1 = loadImage("digg1.bmp");
    digg2 = loadImage("digg2.bmp");

    background(255);
    image(digg1,80,0);
    image(digg2,80,160);
    drawNumber(count, 120, 35);
}

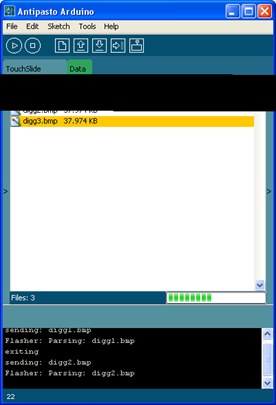
Here’s what it should look like when the pictures are uploading correctly: DiggButton_IDE_Screenshot_uploading_images
Then I added a few lines to pick up the button presses, and have that increment the counter accordingly.

void loop() {
  if (touch_get_cursor(&p)) {
    count++;
    drawNumber(count, 120, 35);
    delay(50);
  }
}

Finally, the last part of the code reads out the state of the counter in 7-segment font.

void drawNumber(int number, int xPos, int yPos) {
  int counter;
  int16_t h,t,o;

    h = number / 100;
    t = (number - (h*100) ) / 10;
    o = number - (h*100) - (t*10);
    stroke(115, 105, 38);
    fill(255,241,159);
    if (h) {
       Display7SegmentDigit(xPos,yPos,h,25);
    }
    if (t) {
    Display7SegmentDigit(xPos+32,yPos,t,25);
    }
    Display7SegmentDigit(xPos+32+32,yPos,o,25); 
}

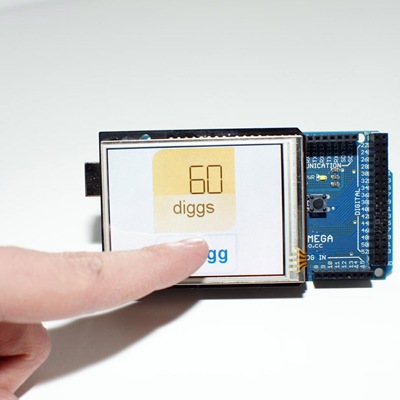
The finished project looks something like this:
SONY DSCSONY DSC

And here’s a video of the whole thing in action:
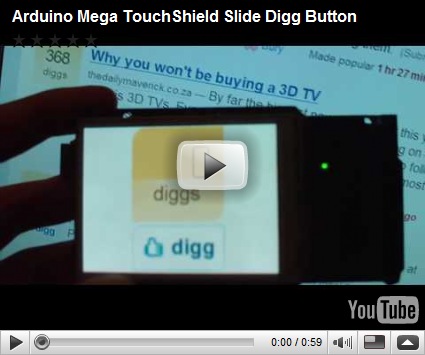
It’s a simple project to get started on using images as buttons on the Slide. The full code can be downloaded over at the App Store.

Friday, January 8, 2010

Open Source Hardware Book Volume 2 - Table of Contents Sneak Peek

Justin, Tristan, Paul and I have been writing up our notes from our interviews and coffee discussion over the past couple of weeks. I think we've finally settled on an official table of contents that covers all of the topics we've heard and talked about.

I tried my best to schedule discussions over the phone, and when that didn't work, over email, with as many people as I could find who had interests in Open Source business, economics, intellectual property, and theoretical experience. This included people in small and large companies, educational institutions, academic research and think tanks, and even some government strategists. Justin's been talking to people around the world, almost all day long for the past 2 weeks straight.

I didn't expect there to be so many people thinking about Open Source Hardware, but I was wrong. It's funny how little gets captured on the web sometimes, despite the vast numbers of blogs, wikis, and forums. In the Internet era, I can vouch first hand for the fact that a lot of the best thought on Open Source Hardware (on economics and business models) is offline, off the web, and off blogs. I've had to really dig around to collect it all together in one place.

That's where the book comes in.

The first volume, titled "Open Source Hardware Volume 1" was about introducing projects people could do when they first picked up an Arduino and wanted to learn how to program and code it. It taught about transparency, openness, modularity, and re-usability of hardware components. "Open Source Hardware Volume 2" is a different kind of book. While there are many books out there that examine and dissect the nature of the software and tools that allow people to build Open Source Hardware, there hasn't been nearly as much discussion about the fact that hardware and tinkering in the "real world" with real components costs "real" money. So this volume is about the economics side of Open Source Hardware, and about the "business models" people are experimenting with.


The book isn't for everyone. It likely isn't going to teach anyone Justin or I interviewed a tremendous amount they didn't already know. Instead, the book is meant for all those new folks coming on the field, or people who are really interested in the theory and concepts behind Open Source Hardware. It's also meant for anyone who's trying to build and distribute Open Source Hardware to the community.


Without further ado, here's the table of contents. If you think there's something missing, please email me, and Justin, Tristan, and I will try to incorporate some materials into the book, or readjust the chapters... (it's structured like a 5-act play, or opera). First, here's the high level book structure:

Overture: The Backdrop
Act I: Cast of Characters
Act II: Open Source Strategy
Interlude: A Day in the Life of a Hardware Hacker
Act III: A Hacker in King Arthur’s Court
Act IV: The Macro Economic Time Machine
Act V: Deus Ex Machina
Curtain Bows: The Future of Open Source Hardware

...and here's the full set of subchapters and subsections...

Overture: The Backdrop
About this Book
What is Open Source?
Open Source Software vs. Hardware
The 9 Schools of Open Source Hardware
Open Source and Intellectual Property
The Limitations of Intellectual Property
Enforcing Open Source Rights

Act I: Cast of Characters
Let’s Meet the Soprano
Introducing the Chorus
The Tangible Man Month
The Great Economic Divide
Does Open Source Hardware Scale?
A Grand Unifying Theory of Information Rights
Not All Licenses Are Created Equal
Open Source Hardware Business Models
Innovation and Open Source

Act II: Open Source Strategy
Enablement and Open Source Hardware
Shaping the Landscape 1 Project At a Time
Herding Cats and Hackers
Where is Silicon Valley Hiding?

Interlude:
A Day in the Life of a Hardware Hacker

Act III: A Hacker in King Arthur’s Court
The DIY Budget and the Quantity Monopoly
Capital Expenditure and Inventory Challenges
Marketing Open Source Hardware
Non-Zero Cost of Replication

Act IV: The Macro Economic Time Machine
Innovation and Openness
Open Source and its Discontents
Open Source, the Unknown Ideal
The Economic Commons

Act V: Deus Ex Machina
Capital Experiments and the Invisible Hand
Freetarded: Why Free Hardware Isn’t the Answer
Open Source Hardware Strategy and Strategies
The Silicon Generation Meets the Web Generation
The Role (or not) for Venture Capital
Micro Competition

Curtain Bows: The Future of Open Source Hardware
Challenges and Threats to Open Source Hardware
A Roadmap of Open Problems: Where are the Tools?
The Future of Open Source Hardware

Now that that's out there, it's time to get back to writing... right now, the book is one target to be over 200 pages... and climbing.

Oh and one more thing, if you want to be the first to know when the book is done, just email me at inthebitz at gmail.

Thursday, January 7, 2010

Antipasto Arduino 0.8.38 Released with Slide Button Library

I just released the latest Antipasto Arduino for Windows, Linux, and Mac OS X x86. The IDE is available for download on illuminatolabs.

Along with a number of code "housekeeping" updates, there were a couple larger changes:

The antipasto_arduino repository is located on github.

Chris added the TButton library after several people asked about projects that use the TouchShield Slide as a menu system. Writing code for custom touchscreen buttons was part of what made the TouchShield so useful (instead of having real buttons), and it was actually something that came up quite some time ago. Actually, Matt and I remixed the original BitDJ code to create a TouchShield app to make breakfast.

clip_image002

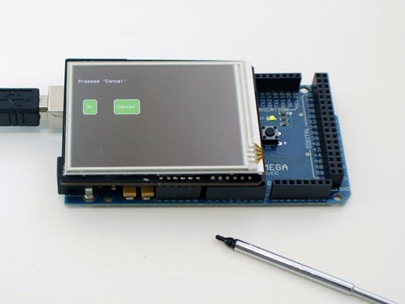
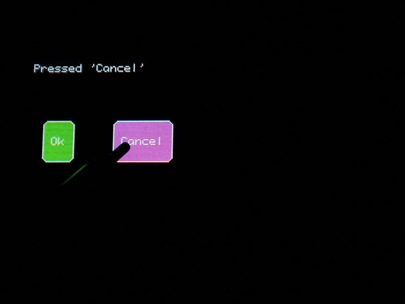
Here’s the simple ButtonDialog example I’ve included:

SONY DSC

SONY DSC

And this is the code:

#include <TButton.h>

TButton ok = TButton("Ok",20,80);
TButton cancel = TButton("Cancel",80,80);

void setup() {
  ok.Paint();
  cancel.Paint();
}

void loop() {

  if (ok.GetTouch()) {
    stroke(255);
    fill(0);
    text("Pressed 'Ok'    ", 10, 30);
  }

  if (cancel.GetTouch()) {
    stroke(255);
    fill(0);
    text("Pressed 'Cancel'", 10, 30);
  }

}

Of course, TButton is just a basic library to make it easier to get started with menus. I think the next step is to make it easier to crop and upload images as buttons, much like Alain’s ArdTouch project that mimics an iPhone interface. I’d love to check out other cool Slide menu projects and code too – jhuynh at gmail

SN3B0101.jpg

DSC05647.JPG

Tuesday, January 5, 2010

How OLEDs work ... optically speaking

I got the funniest question a couple of days ago from a tech science teacher who is using the TouchShield Slide with her classes to teach about how technology works. Actually, for the actual class she uses a demo kit from the OpenBerry pack, with some custom code I wrote for her that says funny messages about her classroom.

She told me that some of her students asked how different colors worked on the TouchShield, like how does it display 1000's or millions of colors? Funny you should ask :-)

I just so happen to have a microscope at my day job that I can borrow and use from time to time, so I did... and this is what you see underneath it:

That's a start... this is a passage from the bible, actually (I know, I'm not too religious personally, but she teaches at a Cristian middle school so I figure it's appropriate, plus Tim Tebow is religious so that makes everything ok because he's ridiculous... but I digress). For the more agnostically-inclined, here's a picture under the microscope of "Hello World" in blue too:

From here, everything clearly looks bluish in color. Actually, this is a picture of the TouchShield Stealth (since the full Slide wouldn't fit under the microscope).

Now, if I zoom in to the "world" part, all the fun happens:


Here you can see clearly the different segments for Red light, Green light, and Blue light.

Everyone always says "RGB" and I used to wonder why... well, here you can see how and why: because each single pixel is actually 3 little bars of organic substance that glows when electrical current is passed through to it. Those three little bars are made in 3 colors: red, green, and blue.

Why those 3 colors? A couple of reasons, as far as I can tell. First, because those colors are the fundamental colors of the light wheel which basically says you can create any color through a combination of reg, green, and blue lights):


There is a much better writeup on that concept over here so I won't try to recreate the wheel... the "color" wheel if you will... buh dump chhh.... ehhhhh I know...

Back to the point, those 3 segments form red, green, and blue light, and better yet, they're controllable. There's a tiny circuit underlying each little colored bar that controls how much current gets to the light cell. A really good color display has 256 stages of brightness increments that can be controlled programmatically.

Math time... so if there are 3 bars of light, and each bar of light can be controlled to one of 256 stages of brightness (actually, 255 stages of brightness levels plus 1 level for "off"), how many different combinations of brightness can be achieved?

256*256*256 = 16,777,216 different colors

Most people just abbreviate this as "16M" of colors for 16 million colors, even though technically there are more than that. On the old Mac OS's, they used to just call this "millions" of colors, because no one wants to be "that guy" who's like "errr... technically there are 777,216 more that you're forgetting about".

Coincidentally, that what HTML is designed to support, and that also what the Processing language is designed to support, with functions like fill() and stroke() that are set to take an RGB value, like so:

fill(255,0,0)

This makes red, because it says, "set red to full brightness level 255 and set green to 0 brightness (aka off) and set blue to 0 brightness (aka off)"

stroke(0,255,0)

This makes green.

fill(0,0,255)

Blue.

Why 256 colors (255 plus 1 for off)? I don't know. Technically, it's convenient because 255 is 2^8. And 8 is the number of bits in a byte. Technical guys don't like to say 8 bytes, they like to say "24 bits of color" to sound more impressive, but it's the same thing. Which means an RGB color can be stored in just 3 bytes. When web coders write:

#33FF00;

...to represent a color, they're actually saying, "33 in hex is 51 so set red to brightness level 51, FF in hex is 255 so set green to brightness level 255, and 00 in hex is 0 so turn off blue."

And sure enough, there's even an online color wheel that I've always used when writing TouchShield and Arduino gadget apps, perhaps because it updates instantly... it's over here:

And that's a really really simple, abbreviated version of how the TouchShield Stealth and Slide make tons of different colors on their OLED displays, in case anyone besides a student taking this class is wondering... and had about 15 minutes of time to spare :-)


Monday, January 4, 2010

Open Source Hardware, Gadgets, and a StickyNote App

I promised that I'd have more time than normal this past week, and it turned out to be true. I've been making lots of progress writing up my notes from my interviews on Open Source Hardware, and more importantly, I've had time to write some new code... like this blog here...

If Open Source Hardware is to succeed, it's going to be because it allows everyday hackers to build things, like gadgets, faster and cheaper than they could the "traditional" way. By traditional way, I mean the sell-your-soul-to-a-large-company-by-signing-up-for-a-crappy-2-year-contract-thinking-that-there'd-be-an-app-for-that-only-to-realize-that-the-apps-are-all-closed-source-you-can't-run-your-own-code-without-violating-the-warranty-and-the-AT&T-network-is-slow-and-sucks.

There are problems with the old model. One problem is that closed and proprietary are meant to protect the average consumer from screwing up their devices, invalidating their warranties, and costing companies $$$ in tech support fees. That may have been the case 15 years ago, but is it still the case today?

I just came from visiting my family, and the elders were talking about CDMA vs. G3, the children were scrambling around the tree looking for properly set voltage wall-warts, and the mothers are talking about how BluRay format is sharper but the density of the media suffers, and even the family toddler was crawling around with a blackberry that he pressed to make the screen glow.

The "average" is definitely getting more tech savvy.

Here's a very specific example: my cousin is 12. She has jailbroken her iPhone because "all her friends at school are doing it." A 12 year old girl is breaking the law, because it's socially acceptable to be a hardware/firmware hacker. Of course she probably wouldn't call herself a "hardware hacker", but the point is:

Jailbreaking an iPhone is a gateway drug to Open Source Hardware.

One minute you're thinking, "I wish I could make this device work differently," and the next minute, you're thinking, "I wish I could make it run different code, I wish I could put another button on it, I wish I could put a bigger storage drive on it, I wish it had a different wireless protocol with longer range."

Well, it's not going to happen instantaneously, but I think we're getting there. I tried a little experiment... I've always wanted to make myself a desktop digital sticky-note application, but never had the right parts lying around to pull it off. I timed myself in trying to figure out two different ways to do it:

1) Use Open Source Hardware and Software modules based on the Arduino (e.g. what I'm used to)
2) What it would take to write the same program on my^D^Da jailbroken iPhone

It didn't take long to figure out that the easiest way to go is with the commercial SDK. The jailbroken way is really messy, and would take months. Meanwhile, I took some of Chris' old code, and made my Arduino-based stickynote program in 2 hours and 15 seconds, flat.

Now someone else could take the code, and since it's open source, they could tweak anything they wanted in seconds, and have a perfectly customized Arduino-based StickyNote app :-)

Here's a picture of all the modules, including an Arduino, a TouchShield Slide, a ButtonShield, an ExtenderShield, and a Lithium Backpack:


This is a picture of me holding the finished gadget:

I color-matched the StickyNote app to perfectly match the Arduino IDE:

Here's a shot of the StickyNote app with the lights turned off, so that the OLED is illuminated:

I've uploaded all the code to the Open Source "App Store" over here. The major function is the part where the key presses get translated from the ButtonShield to the Slide, with this code:


if ((pTime-lTime)>300) { //"debounce", e.g. wait a little bit

if (myButt == 0) {
sprintf(out,"",myButt);
} else if (myButt == 61) {//newline
lTime = pTime;
pouty += 1;
poutx = 1;
} else if (myButt == 63) {//space
lTime = pTime;
poutx += 1;
} else if (myButt == 62) {//popup keyboard display
lTime = pTime;
if (keyout) {//hide the keyboard
fill(33,104,134);
stroke(33,104,134);
rect(1,190,320,190);
maxrows = 24;
keyout = 0;
} else { //display the keyboard
fill(4,79,111);
stroke(4,79,111);
line(0,190,320,190);
rect(0,190,320,190);
maxrows = 18;
stroke(0,0,0);
for (int i = 97; i<123; keyout =" 1;" ltime =" pTime;">
Here's a video walkthrough:


Friday, January 1, 2010

2 DIY Cases for the Arduino and TouchShield

Mark has a writeup over at his website about some serious hacking on the TouchShield Slide API. He's been hacking it for a while now, and has optimized and recoded the original API that Chris and I wrote a long time ago.

DIY Hard Case

The funny thing is, at the bottom of Mark's page, he also has a line of pictures of a 3D printed case for the Portable MegaPalm, and Mark calls his project the HackBerry. It's printed with a special printer that takes a CAD file, and generates a complete enclosure for the MegaPalm.

These pictures show the MegaPalm HackBerry with Mark's mac operating system icons... incidentally the screen is rotated 90 degrees which I still need to ask him about, because the last time I saw these screenshots, the screen was rotated lengthwise.


This picture is probably my favorite, because it shows the MegaPalm HackBerry with the matrix code running down it:


DIY Soft case

I don't know whether I should be proud of this fact, or not, but for Christmas I got a sewing machine. This has caused me a great deal of introspection over the past few days as I ask myself, "am I ok being a guy who owns a sewing machine?"

I think the answer is yes.

But I think I also need a few more weeks for it to settle in... I will probably only selectively disclose to my friends the fact that I own a sewing machine.

Naturally, when someone has a sewing machine and a bunch of Arduino's and TouchShield Slides laying around, the first thing one does is try to make a sleek looking leather case. So I did the following steps:
  • I found an old leather jacket from high school that I got as a present but it never fit, so it's stayed in my parent's closet ever since
  • Trace out a set of squares onto the back of the jacket
  • Cut out the back with scissors
  • Dissect a USB hard drive case long enough to figure out how they made that thing a zipper case (and determine that I don't own the proper zipper raw materials)
  • Go to an old JoAnn's fabrics store (I was the only male in the store at the time) and buy a set of sew-in zippers
  • Spend hours at a sewing machine trying to replicate the stitching
The end result looks like this - here's a picture of me holding the end result against a brown leather background (you can actually see in the upper left my first attempt using canvas that didn't turn out so well):

Here's a picture of the case sitting on my laptop's keyboard, about 15 minutes after being finished... it's flipped inside out, because that's how I had to make it. You can see the little square I cut out in the middle of the case, and sewed back to frame the TouchShield Slide:

The case is about the size of my palm:

Here's the TouchShield Slide sitting inside the zipper case:

Here's a "glamor" shot of the case resting on the cutting mat I used to cut and trim the leather pieces:

And here's the finished product:

And here's a picture of the case sitting on top of my pile of Make magazine back-issues that Phil gave me (thanks, Phil!):


Ok, I don't mean to make excuses or anything, but this thing took me like a solid 3 hours to make. One case. I learned quite a few things while making this case:

-You can sew thin leather without breaking a needle (I thought you could only sew cloth)

-Sewing machines are loud obnoxious pieces of machinery that need to come in other colors besides white with baby blue trim. If there was a "manly" sewing machine in black and silver, with dark colors, I would swap it for mine any day

-Red thread on black leather looks cool

-As an aside, I also now have serious respect now for anyone who works in a sweatshop building clothes and cases on sewing machines all day... that's some seriously hard stuff...

Ok... now back to my new year's resolution list :-)

Tuesday, December 29, 2009

The First 10 Things Everyone Does with their New Arduino

A lot of people got Arduinos for Christmas (and holiday) presents. Welcome to the world of Open Source Hardware, DIY electronic tinkering, and learning physical computing and programming... it's a long journey, and I started on it about 2 years ago, and it's been a pretty fun adventure.

As an aside, this is my favorite week of the year, because I have just enough time off from the day job to do some serious hacking. And that's what I'll be doing over the next couple days, getting ready for some serious fun in January.

I don't usually write beginner's guides, because I'm not that good at it, and also because I try to do harder and harder stuff with my Arduino every time, and try to push the limits. There are lots of Arduino tutorials and startup and setup guides, but most of them assume the read has tons of wires, sensors, and - most importantly - a few years of programming experience and are comfortable doing some DIY tinkering. Few of them assume you just have an Arduino, just the Arduino, and only the Arduino... which is what lots of people get and give as Christmas presents (if this past couple of weeks is any indication!)...

So this is my top ten list of fun things to do with a newly-acquired Arduino - I do quite a bit of tinkering with the Arduino, Arduino MEGA, and Illuminato Genesis boards, in fact these days I carry them in my travel bag pretty much everywhere I go, just to play around. The Arduino is like my swiss army knife of electronics, and the Illuminato Genesis is my favorite board for when I want to hack devices, reverse engineer protocols, or do generally "hackier" things.


1 - Make it blink

This one is pretty obvious... just download the Arduino IDE (or the Antipasto Arduino Aardvark IDE for Windows or Mac if you want to play around with some extra features), and then download this code into the main section, run it, and download it to the Arduino board.


2 - Make it blink faster (or slower)

This is almost universally the first thing anyone tries to do immediately after the blinky sketch is up and running... get comfortable with the settings by screwing around with the blink settings, by tampering around with the delay and timer settings. Whenever I'm teaching someone or showing someone else how to use an Arduino, I always suggest changing the timing, or copying and pasting the digitalWrite() and delay() lines several times to get comfortable with the programming language, and to see your code reflected in real time instantly...


3 - Make a function to make the Arduino blink

This is almost like the step above, except that now you're getting comfortable with putting your blink inside a real C function wrapper. The major difference is that I made the void myBlink( void) function. As soon as people get the hang of functions, usually a light goes off in their heads as they figure out the power of modern programming languages: code modularity (a fancy term for little chunks of reusable code):


4 - Send stuff over the serial port from the Arduino to your PC

You can blink an LED, and you can put code inside functions. That means you've now mastered about 90% of the hardest parts of using an Arduino. Now, you want to have the Arduino communicate with the computer. This is a tiny little program that sets a variable, called "counter", sets it to the number 0, then prints a little message "Hello over Serial" from the Arduino to the PC, and then loops the counter from 1 to 25, printing the number over the serial connection. Just type this code into the Arduino IDE window, download it to the Arduino, and then open up the Serial Monitor (that's one of the little blue buttons underneath the menu bar):


5 - Merge the LED blinking with the Serial

I think it's pretty cool how quickly things can add up when you have the basics down. This is basically the same thing as the previous sketches, only added together. Every time the counter reaches past 25 and resets to 0, it calls the blink-LED function, which is the same one we wrote up above - so the functions really are re-usable...


6 - Send something from the computer to the Arduino... and back...

Now we want to send something from the PC to the Arduino. Put this code onto the Arduino, then open the Serial Monitor again, and this time in the little box next to the send button that shows up, type a character, and press the Send button. The character will get echoed back. For instance if you type and send "a", you'll see the "> a" come back. This is literally the same thing as the serial read example except with no comments, which get in the way. By the way, I also encourage anyone new to Arduino to type this out by hand, instead of just copying and pasting, because it seems to give a better idea for what each line of code does.


7 - Combine the Serial sending with blinking

This time, we'll add the code function for the LED blinking, and a couple lines of code that basically say, if the character we sent from the PC to the Arduino is the letter "a", then blink the LED light in the myBlink() function:


8 - Put everything together in one big mega program - count, blink, echo, and blink again

This one's pretty self-explanatory. Now, we've just added all the components together. All the variables get defined up at the top, the serial connection gets initialized in the setup() function, the counter cycles from 1-25 over the serial connection, blinks every time it reaches the top, checks to see if the PC sent a character, if we did, the Arduino will echo the character back to the PC, and if that character is the letter "a", the Arduino will blink again.


9 - Copy and paste the following code:

The Arduino is all about copying and pasting code. This is hugely helpful, because it speeds up hacking, but it's kind of like how word-checker is destroying my abaility to spell words :-) If you always just copy and paste stuff, it's no fun because half of feeling comfortable programming and hacking with the Arduino is feeling comfortable pulling code out of thin air, and experimenting with the syntax... but that's just my opinion!

int counter = 0;
int ledPin = 13;
int incomingByte = 0;

void setup() {
Serial.begin(9600); delay(100);
}

void loop()
{
counter++;
Serial.println(counter);
if(counter == 25) { counter = 0; myBlink(); };

if (Serial.available() > 0) {
incomingByte = Serial.read();
Serial.print("> ");
Serial.println(incomingByte,BYTE);
if (incomingByte == 'a') { myBlink(); };
}

delay(100);
}

void myBlink( void) {
digitalWrite(ledPin, HIGH); delay(500);
digitalWrite(ledPin, LOW); delay(500);
}


10 - Meet people on the web who use Arduinos

Arduino is about the interweb, and forums, and chat rooms, and blogs, and twitters, and youtube instructables and vimeo facebook wallposts and all kinds of "social media" that I have no idea how to use, but am trying to learn.

It's also about being an open community, and instead of so many types of technologies and new things that are inaccessible and hard to learn, Arduino is about sharing and hacking with other people. So in that spirit, please email me, or twitter me, or whatever!

2010 is going to be a year filled with Arduino hacking for me, and my goal is to meet as many other fellow hackers as possible, and to show off more cool Arduino hacks :-)

inthebitz at gmail

Thursday, December 24, 2009

Smart grid meets ... cake?

Dave sent me a photo of the coolest cake I've ever seen. Of course I'm partial. This is a DIY hand-made cake (something that if far beyond my abilities), made in the form of an Illuminato X Machina.

The resemblance is ridiculously amazing. The details, even down to the exposed solder pads that hold the advanced "weapons-grade" power sensory chips, has been replicated. Using large slabs of chocolate, the chef of this cake replicated the quad connectors too.

Totally ridiculous. Dave is checking with the chef to see who it is that I can give proper attrition (nutrition? ha) to for this work of art.


Wow.

Sunday, December 13, 2009

Open Source Licenses and Business Models

Recently, I’ve been a bit disturbed by the quality of discussion on Open Source Hardware, and I want to do something about it. I want to up the ante :-) I’ve seen people who aren’t lawyers, and who aren’t experts in law, making comments about Open Source licenses, and I’ve seen a handful of people who don’t run businesses and don’t understand business models writing about Open Source business models. This is funny to me. I want to try things that are different, but I want to be thoughtful about them, because if Open Source Hardware is really going to become something new, and if it really stands for something different and creative, then it should be treated that way! I’m not trying to be discouraging, actually I think it’s great that people write and do Open Source Hardware. Instead, I want to address people like consultants and writers who make money by following trends rather than contributing to them – Open Source Hardware means something important to me, and I don’t want it to be trivialized by some newspaper editor looking to boost his struggling paper’s sales... oh well, I guess everyone needs a good rant from time to time :-)

So here’s what I’m going to do about it:

Over the next couple of months, I’m going to interview friends of mine that are lawyers, especially intellectual property and contract lawyers, and I’m going to talk to professors of law and business here in Boston. My goal will be to understand, really, what the issues are behind Open Source Hardware as far as intellectual property and legal strategy are concerned. On the business side, I’m going to try to categorize and model, analytically, the economic and business operating models that have sprung up for Open Source Hardware. That way, I’ll be able to compare and contrast Open Source Hardware business models with traditional ones, to understand what, if anything, is the same or different about them.

I did something like this last time, and it turned into the Open Source Hardware Bank project, which currently has over $90,000 "invested" in various Open Source hardware projects (a lot more than I ever expected!) And all but one of those projects came from the internet, from people reading about the Open Source Hardware Bank, and who liked that Justin and I were trying to think about really new models for financing a small set of Open Source hardware products, especially in the middle of the Great Depression 2.0.

I’m going to try to follow the Socratic process, and ask questions as I go. Like all my research projects, I'm going to start with a list of questions, and expand them and develop them over time. This is definitely not a definitive list, but a starting point. I want to address questions like:

Open Source Hardware Licenses

  • What is an Open Source Hardware license?
  • What licenses are people currently using, what are they trying to protect, what are they giving away?
  • What are the major components of an Open Source Hardware license?
  • How is it similar and different from Open Source Software, or from traditional hardware licenses?
  • What is the relationship between Open Source Hardware and intellectual property? Patents?
  • How would the District Court and Supreme Court rule if they found someone Infringing an Open Source Hardware license?
  • How would a legal team establish precedent for OSHW violations and protections?
  • What are the community and internet expectations for an Open Source Hardware license?
  • Which freedoms and liberties in usage of OSHW projects and products previously protected or covered by other forms of intellectual property protection, e.g. “trademark”, “copyright” law?
  • What are the major trends in intellectual property protection, and how do they apply to the sharing of tangible projects online?

Open Source Hardware Business Models

  • How are people making money in Open Source Hardware today?
  • What’s the market size for Open Source Hardware?
  • Who’s participating in Open Source Hardware?
  • What is the role for companies vs. individuals in the OSHW “market”?
  • What are the major OSHW platforms and how are they different?
  • When is a business’ products Open Source Hardware?
  • What is the relationship between today’s Open Source Hardware movement and the traditional electronics and semiconductor industry?
  • Where does Open Source Hardware profit come from, how is it generated, what mispricing is it taking advantage of?
  • Do traditional business strategy concepts apply to Open Source Hardware?
  • Innovation in business models is a term thrown around often, how do those concepts apply to hardware?
  • What are the major trends in hardware production business models? Especially in the internet age of advertising and link and connection-based payment models?
  • Does Open Source Hardware work best on or off the internet? Who are the companies or entities most threatened by Open Source Hardware? Who is most advantaged?

This is an Open Source research project, and I want to involve as many people as I can. I’m going to start with interviews, then do some analysis and research of my own, and finally publish everything in a report in the new year. If you want to be a part of the research project, just let me know at inthebitz at gmail…

Also, if you want to add questions to my list, just shoot me an email!

Here goes nothing :-)