It's been a long past few days for me and Matt, but I think we've finally figured it out (special thanks to Omar, Mark, T, and the guys at AVR for all the help). As it turns out, the avr gcc version packaged with the Arduino IDE actually isn't patched up to date, so it generates the wrong binary/hex file on the Mac and Vista when it tries to compile programs for the TouchShield Slide (that's because the Slide has a bigger processor than the Stealth, so it uses different AVR compile-time settings). The funny thing is that it went completely undetected for the past few weeks because Matt and I wrote most of the programs on Windows, but last week I got a new Macbook, and Matt put Vista on his laptop, and we discovered the problem almost at the same time.
I've wrapped up all of the code into one place - a patched version of the Arduino IDE (based on the most recent version), that compiles code properly on Macs and newer Windows machines. Thanks to Omar, who helped me wrap everything into an actual installer for Mac and Windows, since there are so many different gcc files it has to manage.
So that means that from now on, no one should ever have to use the up and running in 5 minutes post any more, because I've already included all of the cores and files into the installer (I'm going to keep the post up, but Matt's going to put a comment up that it's out of date).
In the meantime, Mark has volunteered to take over the SubProcessing library on the Stealth and the Slide, and is cleaning up all of the graphics functions. He's an insanely good programmer, and has coded 10,000's of lines of C and assembly in previous projects! We met the other day in New Haven, and he literally blew me away with some of the code he's written for the TouchShield Slide (when he sends it over, I'll throw it up on the App Store).
From now on, just grab the installer package to use the
TouchShield Stealth and Slide on Mac and Windows.
Make sure you remove any other copies of the Arduino IDE on your system just in case.
Coding:
Launch the Arduino from the Applications folder (OS X) or the Start Menu (Windows).
Selecting the Slide:
Select Tools -> Boards -> TouchShield Slide
Write some code:
Then touch the programming button on Slide before uploading code to it.
Click Upload in Arduino.
Programming Arduino,
Select Tools -> Boards -> Arduino Diecimila
Write some code:
Click Upload in Arduino.
Chris
Monday, December 29, 2008
Wednesday, December 24, 2008
Upgrade to My Mom's Christmas Tree (using my Arduino :o)
I went over my mom's house yesterday to have some holiday dinner. While I was there, I upgraded her Chrismas tree.
Me: Hi Mom
Mom: Mike! why are you bringing all these wires into my house?
Me: It is just my Arduino
Mom: Arrrr what?
Me: It is my Arduino and my Relay Squid
Mom: SQUID! I ALREADY MADE SQUID!
Me: Where is your tree?
Mom: Oh it's in the living room, come see.
Me: Yes! Yes! this will be perfect!
Ingredients:
An Arduino
A couple spot lights with Red and Green Bulbs
A Relay Squid
Some Wire

And...
A tree with lights

First I distracted my mom
Then I stripped some wire

I used some tape to fasten my Arduino to my Relay Squid

I connected the wires:
Arduino "Gnd" -> Squid "G"
Arduino "5V" -> Squid "V"
Arduino "1" -> Squid "1"
Arduino "2" -> Squid "2"
Arduino "3" -> Squid "3"
Arduino "4" -> Squid "4"

Me: Hi Mom
Mom: Mike! why are you bringing all these wires into my house?
Me: It is just my Arduino
Mom: Arrrr what?
Me: It is my Arduino and my Relay Squid
Mom: SQUID! I ALREADY MADE SQUID!
Me: Where is your tree?
Mom: Oh it's in the living room, come see.
Me: Yes! Yes! this will be perfect!
Ingredients:
An Arduino
A couple spot lights with Red and Green Bulbs
A Relay Squid
Some Wire
And...
A tree with lights
First I distracted my mom
Then I stripped some wire
I used some tape to fasten my Arduino to my Relay Squid
I connected the wires:
Arduino "Gnd" -> Squid "G"
Arduino "5V" -> Squid "V"
Arduino "1" -> Squid "1"
Arduino "2" -> Squid "2"
Arduino "3" -> Squid "3"
Arduino "4" -> Squid "4"
I plugged in the lights into the Relay Squid and plugged the Relay Squid into the wall

I wrote a few lines of code:
#define MULTITREE 1 //Multi color lights wrapped around the tree
#define WHITETREE 2 //White lights wrapped around the tree
#define REDSPOT 3 //Red spotlight shining on the tree
#define GREENSPOT 4 //Green spotlght shining on the tree
void setup()
{
pinMode(MULTITREE, OUTPUT); // set all the pins to outputs
pinMode(WHITETREE, OUTPUT);
pinMode(REDSPOT, OUTPUT);
pinMode(GREENSPOT, OUTPUT);
digitalWrite(MULTITREE, LOW);
digitalWrite(WHITETREE, LOW);
digitalWrite(REDSPOT, LOW);
digitalWrite(GREENSPOT, LOW);
}
void loop()
{
digitalWrite(MULTITREE, HIGH);
delay(500);
digitalWrite(MULTITREE, LOW);
delay(50);
digitalWrite(WHITETREE, HIGH);
delay(500);
digitalWrite(WHITETREE, LOW);
delay(50);
digitalWrite(REDSPOT, HIGH);
digitalWrite(GREENSPOT, HIGH);
delay(500);
digitalWrite(REDSPOT, LOW);
digitalWrite(GREENSPOT, LOW);
delay(50);
}
It only took me 10 minutes...
Tuesday, December 23, 2008
TouchShield Not Working
I just started using Chris and Matt's TouchShield Slide...
I started by using the reference wiki on the Invention Lab
I used a couple of the basic functions to create a sketch program on my Slide and my Stealth.
I put the code into the wiki; it was about 5 lines of code!
I tried doing the same thing with a square instead of a rectangle, but it didn't work quite right :o(
So I posted some notes on the rectangle function instructions.
I also tried using these functions with my TouchShield Stealth... but the gettouch() function didn't work well on the small touch screen. I also made some bug notes on the gettouch function wiki.
I will be working with Chris and Matt nonstop till I get these bugs fixed and more features added.
Sorry for anyone else who's having trouble (please feel free to shoot me an e-mail if you have any questions).
I hope you enjoy my drawing program.
Mac AVR-GCC part 1
On a Mac, the deck is almost always stacked against you. This is especially true for compiling mega2560 code using avr-gcc.
What I'm finding is that if you don't configure, compile, and build your own AVR GCC compiler, then you can't be sure all the correct patches are applied for your processor.
Scanning through the bug lists for the avr-libc, I can see some bugs fixes for the mega2560,
http://www.nongnu.org/avr-libc/NEWS.txt
and another bug here,
http://sourceware.org/bugzilla/show_bug.cgi?id=5523
and it's scary to think that gcc 4.4 support for the mega2560 was only recently added because I noticed this comment here,
http://savannah.nongnu.org/task/?3693#comment12
To make things worse, I'm still have issues compiling gcc from scratch on Mac. From a post here,
http://www.mail-archive.com/avr-gcc-list@nongnu.org/msg05281.html
I should be able to compile this using,
It's probably something I'm doing wrong, but this just won't work on my Mac!
I really hope Santa can bring my present early this year and that's why I'm chatting with Christian from obdev.net who maintains the most complete mac avr-gcc packages to date. We're trying to spot how the assembly code is generated differently and why it breaks interrupts.
Chris
What I'm finding is that if you don't configure, compile, and build your own AVR GCC compiler, then you can't be sure all the correct patches are applied for your processor.
Scanning through the bug lists for the avr-libc, I can see some bugs fixes for the mega2560,
http://www.nongnu.org/avr-libc/NEWS.txt
and another bug here,
http://sourceware.org/bugzilla/show_bug.cgi?id=5523
and it's scary to think that gcc 4.4 support for the mega2560 was only recently added because I noticed this comment here,
http://savannah.nongnu.org/task/?3693#comment12
To make things worse, I'm still have issues compiling gcc from scratch on Mac. From a post here,
http://www.mail-archive.com/avr-gcc-list@nongnu.org/msg05281.html
I should be able to compile this using,
> - Compile binutils (go into the binutils top directory):
>
> $ ./configure --target=avr --prefix=/home/avr
> $ make maybe-configure-bfd
> $ pushd bfd
> $ make headers
> $ popd
> $ make all install
>
> - Compile GCC (go into the gcc top directory):
>
> $ mkdir obj
> $ cd obj
> $ ../configure --target=avr --prefix=/home/avr --disable-nls
> --enable-languages=c
> $ make
> $ make install
>
> - Compile avr-libc (go into the top avr-libc directory):
>
> $ ./configure --build=`./config.guess` --host=avr --prefix=/home/avr
> $ make
> $ make install
>
> - Compile avrdude (go into the top avrdude directory):
>
> $ ./configure --prefix=/home/avr
> $ make

> $ make install
It's probably something I'm doing wrong, but this just won't work on my Mac!
I really hope Santa can bring my present early this year and that's why I'm chatting with Christian from obdev.net who maintains the most complete mac avr-gcc packages to date. We're trying to spot how the assembly code is generated differently and why it breaks interrupts.
Chris
Monday, December 22, 2008
How would you change the Arduino? Part 2
The schematics are ready! The schematics are ready! (Well, at least ready to share... I'm sure I'll find something wrong with them) So here goes nothing... this feels a bit like telling someone at work you're scared of spiders (somehow I feel oddly "exposed" by sharing my schematics - ha).
So, I've just finished the first set of schematics for the unofficial Arduino board I'm trying to make, for now I guess I'll just call it the "Antipasto Illuminato". At least until David and I figure out how to make this a real "Arduino." Hmmm... Antipasto Arduino? Antipasto Board? Or maybe the Arduino Illuminato (my favorite)?
"Arduino Illuminato"
Now that just sounds cool :)
Anyway, funny thing is, I think the easiest part of the "open source hardware" process is done. It was just a question of finding a chip with enough I/O, and then pinning it out. I've gotten quite a few emails about wanting to help out, ... well, I could definitely use some help double-checking the USB circuitry, especially before I send it to the PCB company. Also, the original Arduino is clever about its serial triggers, in that when DTR goes low, the Arduino resets, and that forms the backbone of how the Arduino IDE can download code to the board. Anyway, I'm sure I got the capacitor trick wrong...
I really want to treat this thing like a work of art, so I think I'm going to try something fancy on the top of the board's circuit. I've been scouring the web looking for examples of weird looking PCBs for inspiration.
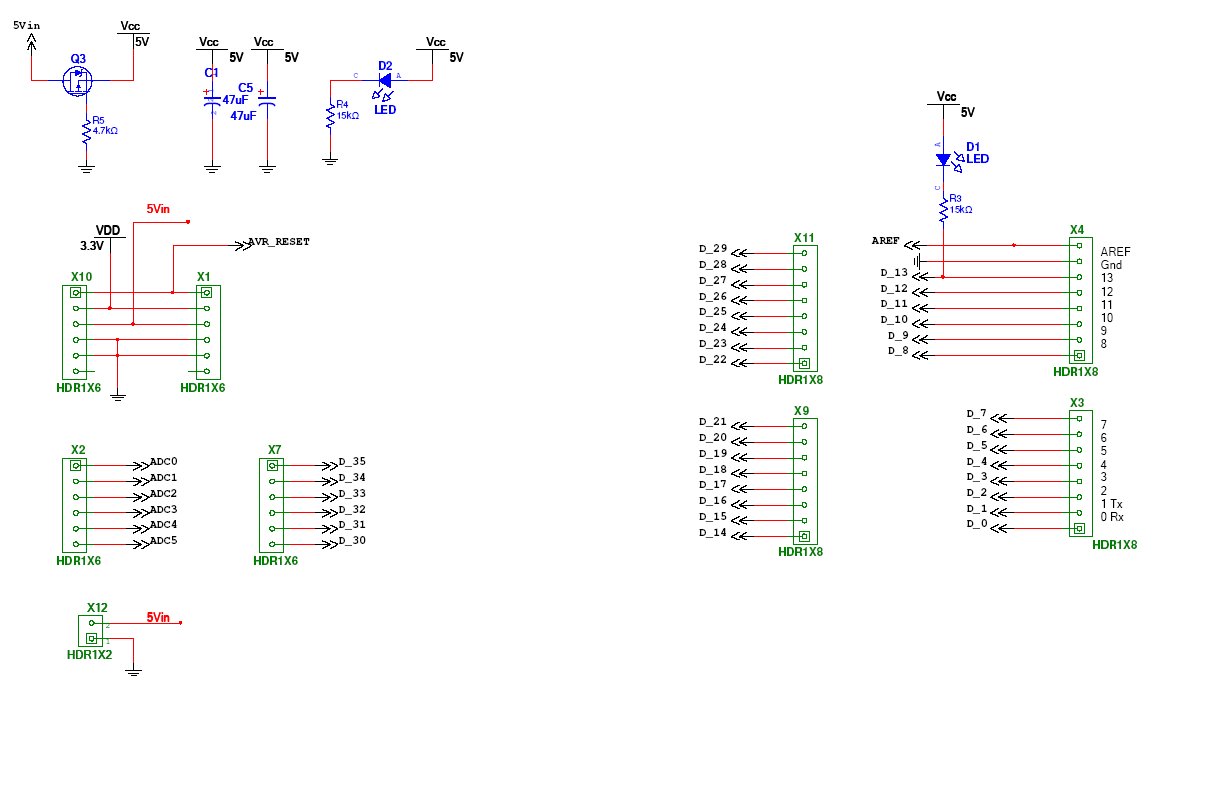


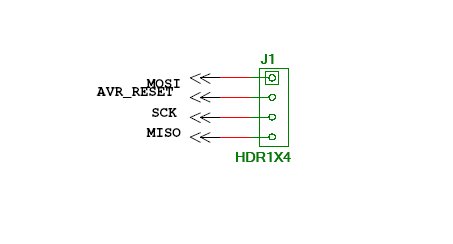
So, that said,... if you look closely at the circuit board files in the link, maybe you can see why I want to call it the "illuminato"? :)
In any case, this is definitely the first time I've used Flickr as a repository for circuitry... I've uploaded the full images are over here.
So, I've just finished the first set of schematics for the unofficial Arduino board I'm trying to make, for now I guess I'll just call it the "Antipasto Illuminato". At least until David and I figure out how to make this a real "Arduino." Hmmm... Antipasto Arduino? Antipasto Board? Or maybe the Arduino Illuminato (my favorite)?
"Arduino Illuminato"
Now that just sounds cool :)
Anyway, funny thing is, I think the easiest part of the "open source hardware" process is done. It was just a question of finding a chip with enough I/O, and then pinning it out. I've gotten quite a few emails about wanting to help out, ... well, I could definitely use some help double-checking the USB circuitry, especially before I send it to the PCB company. Also, the original Arduino is clever about its serial triggers, in that when DTR goes low, the Arduino resets, and that forms the backbone of how the Arduino IDE can download code to the board. Anyway, I'm sure I got the capacitor trick wrong...
I really want to treat this thing like a work of art, so I think I'm going to try something fancy on the top of the board's circuit. I've been scouring the web looking for examples of weird looking PCBs for inspiration.
So, that said,... if you look closely at the circuit board files in the link, maybe you can see why I want to call it the "illuminato"? :)
In any case, this is definitely the first time I've used Flickr as a repository for circuitry... I've uploaded the full images are over here.
Three Easy Pieces: 3 different ways to program the TouchShield
This past weekend, I met up with a friend of mine who is one of those I'm-an-engineer-at-heart-but-like-memorizing-integrals-too-much-so-I-studied-physics-instead kind of guys :) He let me borrow a copy of his CD collection of Richard Feyman's lectures on audio. To be honest, if everything I learned in undergrad had been taught like that, I think we'd probably have a lot more people studying engineering. Anyway, I've gotten a couple of emails since Chris and I wrote the new core, so I thought I'd try to explain a little more how the new TouchShield core is different that the old one...
The new core changes a lot... but it can also be confusing, so I hope this blog post helps a little. There are three ways to write programs on the TouchShield:

1) Beginner - this is pretty much the easiest way to program the TouchShield. It puts the TouchShield into Canvas mode, so that the Arduino just sends out commands to it over the serial connection. If you write a new program, you just change whatever program was running on the Arduino, and you never really change the TouchShield code. In the Linux world, the equivalent is the X server. X is the graphics server that accepts drawing commands from applications, and displays buttons, lines, windows, and pictures on the screen. The final touch is that programs written on the Arduino can use the same functions that are used in the Processing graphics language (or a subset at least).
This works like by putting this on the TouchShield:
void setup(void) {
}
void loop(void) {
beginCanvas();
}
And then by using functions on the Arduino like:
drawcircle(), drawrect()
2) Intermediate - this was the old way to progam the TouchShield, and the way most of the examples are written over at liquidware.com to date. In this setup, you write one program for the Arduino, and one program for the TouchShield. This setup meant you had to use tricks like this http://antipastohw.blogspot.com/2008/12/passing-large-values-between-arduino-to.html to send data between the Arduino and TouchShield. These programs are still possible to write, but the new core simplifies a lot of the cross-talk.
This works like by putting this on the TouchShield:
void setup(void){
Serial.begin(9600);
}
void loop(void){
buttonValue = Serial.read();
if (buttonValue) rect(10,10,25,25);
}
And then by using functions on the Arduino like:
AFSoftSerial mySerial = AFSoftSerial(RXPIN, TXPIN);
void setup(void){
mySerial.begin(9600);
}
void loop(void){
serial_sendDigital(getInputShieldButton(1));
}
3) Advanced - actually, I just created this category for Cathedrow and Josh, since they're insane. In this setup, you can actually access the low level functions of the TouchShield's OLED to do things like bitmap testing, bulk blitting, scanlining, and a whole slew of things that are usually only tricks known to game programmers. In fact, the only reason the Arduino is there is to provide power to the TouchShield, especially if the goal is to try to optimize the speed of the code (and you don't want to spend time communicating with the Arduino).
If you're coding this way, you probably are using lots of lines like:
#ifndef _CLTS_DEFINES_
#define _CLTS_DEFINES_
LCD_CTRL_PORT &= ~(1 << LCD_DC);
LCD_CTRL_PORT |= ((1 << LCD_CS) | (1 << LCD_RD));
The new core changes a lot... but it can also be confusing, so I hope this blog post helps a little. There are three ways to write programs on the TouchShield:
1) Beginner - this is pretty much the easiest way to program the TouchShield. It puts the TouchShield into Canvas mode, so that the Arduino just sends out commands to it over the serial connection. If you write a new program, you just change whatever program was running on the Arduino, and you never really change the TouchShield code. In the Linux world, the equivalent is the X server. X is the graphics server that accepts drawing commands from applications, and displays buttons, lines, windows, and pictures on the screen. The final touch is that programs written on the Arduino can use the same functions that are used in the Processing graphics language (or a subset at least).
This works like by putting this on the TouchShield:
void setup(void) {
}
void loop(void) {
beginCanvas();
}
And then by using functions on the Arduino like:
drawcircle(), drawrect()
2) Intermediate - this was the old way to progam the TouchShield, and the way most of the examples are written over at liquidware.com to date. In this setup, you write one program for the Arduino, and one program for the TouchShield. This setup meant you had to use tricks like this http://antipastohw.blogspot.com/2008/12/passing-large-values-between-arduino-to.html to send data between the Arduino and TouchShield. These programs are still possible to write, but the new core simplifies a lot of the cross-talk.
This works like by putting this on the TouchShield:
void setup(void){
Serial.begin(9600);
}
void loop(void){
buttonValue = Serial.read();
if (buttonValue) rect(10,10,25,25);
}
And then by using functions on the Arduino like:
AFSoftSerial mySerial = AFSoftSerial(RXPIN, TXPIN);
void setup(void){
mySerial.begin(9600);
}
void loop(void){
serial_sendDigital(getInputShieldButton(1));
}
3) Advanced - actually, I just created this category for Cathedrow and Josh, since they're insane. In this setup, you can actually access the low level functions of the TouchShield's OLED to do things like bitmap testing, bulk blitting, scanlining, and a whole slew of things that are usually only tricks known to game programmers. In fact, the only reason the Arduino is there is to provide power to the TouchShield, especially if the goal is to try to optimize the speed of the code (and you don't want to spend time communicating with the Arduino).
If you're coding this way, you probably are using lots of lines like:
#ifndef _CLTS_DEFINES_
#define _CLTS_DEFINES_
LCD_CTRL_PORT &= ~(1 << LCD_DC);
LCD_CTRL_PORT |= ((1 << LCD_CS) | (1 << LCD_RD));
Thursday, December 18, 2008
Up and running on the TouchShield Stealth and Slide in 5 minutes
EDIT: Chris has posted a new version of this article that fixes a lot of the issues that we found... specifically with the AVR compiler that ships with the Arduino IDE. Check it out in the new post here.
------------------
Preamble
Chris and I have been pretty busy the past month or so, and the TouchShield Stealth (128 x 128 pixels) and TouchShield Slide (320 x 240 pixels) are now both ready for a major "firmware" upgrade. Thank you to everyone who sent back code optimizations on the graphics routines (especially Sheldon and Omar, although technically it's not fair - you're actually real game programmers). The old TouchShield ran in the low 10-15 frames per second, but with this core now runs closer to 30-40 frames per second! Also, ever since my little project a few weeks back, I've had a lot of encouraging email support from the Processing community, and with a little bit of help, now both the Stealth and Slide both run SubProcessing (a subset of the Processing language). That means that programs can be written on the Arduino, and you can literally hot swap the Stealth and Slide in real time and the program works simultaneously, and even scales the graphics accordingly... (I'll definitely take some videos later this week).
In the meantime, there are a few things that Chris and I am still working on, namely picture uploading. Although the TouchShield Stealth image uploader still works, the upgraded chip in the TouchShield Slide means that I have to rewrite the application. This time, I'm going to write it in Java so the same program works on Mac, Windows, and Linux! I'm hoping to have that wrapped up before next week. Without further ado, here we go! (and if you set a playlist to William Tell's Overture, you'll definitely be done before it completes...)
This is the new TouchShield Core, version 0.9. You can click here, and download it on the "app store." It's all GNU GPL'd.
Act 1: Overture
The first step, is to make sure you're running the latest version of the Arduino IDE application, which as of December 12th, 2008, is version 0012. You can grab the latest version over at the arduino.cc website, here.
Please install version 0012 or greater (because David and team upgraded the AVR compiler, to a more efficient version, so that now it works a lot better!). Once the file is downloaded, unzip it to a new place on your hard-drive, and proceed to step 2...
Act 2: Legato
The next step is to install the "core" files into the new installation of the Arduino IDE. This means copying the touchStealth and touchSlide folders into the following folder:
arduino-0012/hardware/cores/
After this step, (and on my hard drive), the cores folder includes 5 folders:
touchStealth/
touchSlide/
blank/
atmega8/
arduino/
Now that the folders are installed, you just need to make sure that the Arduino IDE program knows about the folders. To do this, open the following file:
arduino-0012/hardware/boards.txt
This file contains a description of all of the Arduino cores and compilers, that the IDE can recognize. At the end of this file, just add the lines below (or, you can copy over the version of the boards.txt file that I've included). Before you edit the boards.txt file, make sure that all versions of the Arduino IDE are closed, and you don't have any running on your computer. If you do, it might not save the changes to the boards.txt file correct. So just close and exit from any versions of the program you might have running, just to be safe!
##############################################################
stealth.name=TouchShield Stealth
stealth.upload.protocol=butterfly
stealth.upload.maximum_size=57342
stealth.upload.speed=57600
stealth.bootloader.low_fuses=0xFF
stealth.bootloader.high_fuses=0x98
stealth.bootloader.extended_fuses=0xFB
stealth.bootloader.path=TouchShield
stealth.bootloader.file=TouchShield_boot.hex
stealth.bootloader.unlock_bits=0xFF
stealth.bootloader.lock_bits=0xFF
stealth.build.mcu=atmega645
stealth.build.f_cpu=16000000L
stealth.build.core=touchStealth
##############################################################
slide.name=TouchShield Slide
slide.upload.protocol=butterfly
slide.upload.maximum_size=258048
slide.upload.speed=57600
slide.bootloader.low_fuses=0xFF
slide.bootloader.high_fuses=0x98
slide.bootloader.extended_fuses=0xFB
slide.bootloader.path=TouchShield
slide.bootloader.file=TouchShield_boot.hex
slide.bootloader.unlock_bits=0xFF
slide.bootloader.lock_bits=0xFF
slide.build.mcu=atmega2560
slide.build.f_cpu=16000000L
slide.build.core=touchSlide
##############################################################
Now, you're ready to move onto step 3!
Act 3: Autumn
The TouchShield Stealth and TouchShield Slide communicate with the Arduino using pins 2 and 3. That means it uses Software Serial, not the built-in hardware serial. In order to get Software Serial working properly, then, we're going to copy over the AFSoftSerial libraries into the appropriate location (thanks Limor!). While we're at it, we're also going to copy over the library Chris and I've written to display large numbers on the screen, in case you want to play around and make big timers or countdown clocks...
Just go to the folder:
arduino-0012/hardware/libraries
Now copy into this folder the two folders, touchLargeNums and AFSoftSerial.
On my computer, the libraries folder now has 12 folders in it:
Stepper/
Sprite/
SoftwareSerial/
Servo/
Matrix/
LiquidCrystal/
Firmata/
Ethernet/
EEPROM/
AFSoftSerial/
touchLargeNums/
Wire/
Voila!
Now, ready to move onto step 4...
Act 4: Allegro Moderato
You open the door. You walk through the door, you roll a die. A dwarf appears. Press 1 to use your magic wand. Press 2 to cast a spell. Press 3 to.... Ok, now it's time to boot everything up!
Open the newly installed and upgraded version of the Arduino IDE. This is the file in the arduino-0012/ folder called "arduino.exe" or "arduino", depending on what operating system you're using.
Place the TouchShield Stealth or TouchShield Slide on top of the Arduino. If this is the first time you're connecting your Arduino to your computer, you'll want to make sure you also install the FTDI drivers. The guys at arduino.cc have great tutorials for installing the drivers properly, over here:
http://arduino.cc/en/Guide/Windows
http://arduino.cc/en/Guide/MacOSX
http://www.arduino.cc/playground/Learning/Linux
Once the drivers are installed, or if you've already installed them before, connect the Arduino to the computer using a USB cable.
The Arduino IDE will take a few seconds, and then it will recognize the Arduino. The next step is to program the TouchShield and the Arduino with the appropriate programs. The TouchShield will run the SubProcessing library, which is a little version of the Processing Graphics library, written just for the TouchShield. From now on, any program written for the TouchShield Stealth will work on the Slide and vice versa, as well as being cross-compatible with any version of Processing you might have installed on your computer. This means I can prototype graphics on my PC, and then flash it down to the Arduino, and it'll look the same!
So the first step is to program the TouchShield. From December 18th, 2008 and onward, every TouchShield that gets mailed out will come pre-loaded with the latest version of the SubProcessing software as of that date, so if this is the first time you're using it, you can skip this step. Otherwise, continue to update the TouchShield's firmware:
Open up the TouchShield.txt file. It contains a small little program that puts the TouchShield into "canvas" mode. This means it sits there, waiting for display commands from the Arduino. That code looks like this:
void setup(void) {
}
void loop(void) {
beginCanvas();
}
Copy and paste this code into the Arduino IDE main window. Then, select the appropriate Serial port from the Tools->Serial Port menu. On my computer, it's serial port 18. Then, select the right board from the Tools->Board menu (either TouchShield Stealth or TouchShield Slide).
Click the compile (or play) button to compile the code. Now, press the reset button on the TouchShield. On the Stealth and the Slide, it's the button right next to the USB connector on the Arduino. This puts the TouchShield into reset mode, waiting for a program from the Arduino IDE.
Now press the program button, or "upload to I/O board". The LEDs will blink as the program is downloaded to the board, and then it'll finish. Done!
The final step is to load a program onto the Arduino.
Open the Arduino.txt file, and copy and paste this into a new program in the Arduino IDE window. Now, select "Arduino" from the Tools->Boards menu. Press play to compile, and then press the "upload to IO board" button to send the program to the Arduino. Done!
In about a second or two, the Arduino will reset, and will start sending commands to the TouchShield. The program is pretty simple, it just displays a little red square that you can drag around the screen. If you happen to have a Slide and a Stealth, you can hot-swap the two shields one after the other, and they'll both start displaying whatever the Arduino sends to them. In some cases, it might help to cycle the power on the Arduino and TouchShield, by reseting or re-plugging in the USB or Lithium Backpack.
If you have any questions, or want any help writing some code, or if anything at all doesn't work, or if you're just looking for someone to bounce ideas or talk to, just drop me an email!
Matt and Chris
(and Limor and Sheldon and Omar - thanks!)
Wednesday, December 17, 2008
A silly little Twilight Game
There are some days I go to sleep after a long, hard day, and I think to myself, today... I really accomplished something, and that makes me happy and I fall asleep content.
Then there are days like today, where I'm just confused... but I suppose it was for a good cause. Brian, a friend of mine who got one of the first GamePacks ever, emailed me asking how hard would it be for me to build the shell of a game for his kids. He wanted the theme of the game to be the movie Twilight. (Un?)fortunately I haven't gotten a chance to see that movie in theatres yet...
So, while this is not my proudest accomplishment ever, if it makes his kids happy, I suppose I can justify the effort (and at worst, it refreshed my memory about how hard it is to do object collision detection for games, even if it is just Edward's head vs. rotating pictures of bad vampires. Ugh. I can't believe I just wrote that. I think a little piece of me deep down inside just died a little bit...). But I digress:


Here's the game, written for the GamePack and the InputShield. I've uploaded the source code for it all over at the "app store" (which is really becoming more and more just a place to throw source code so I can at least stay a little organized). The Arduino runs a continuous polling algorithm on the InputShield to read the dual potentiometers (which are set to mode A), and then sends the bytes up to the TouchShield. The TouchShield, in turn, interprets the commands, and moves a little picture (sprite) of Bella's head around the screen. Meanwhile, Edward's head moves around too, and tries to avoid the bad vampire heads.
Although technicaaaaaallly...
If my quick scan of the character summary over at Rotten Tomatoes serves me correctly, Edward doesn't shy away from confronting these bad guys in the movie. Oh well.
In my version, he randomly selects an opposing direction, and flees in either the inverse X, inverse Y, or some combination of those directions. On a collision with the vampire head, the vampire then iteratively selects whether to flee in the inverse x or y direction... or do nothing and continue charging ahead (dun dun dun). The suspense is already killing me :)
Here's a picture of it sitting on my computer. You can see the paper on the left side, which actually has the math and logic for the sprite collision checking algorithm. There must be a more optimized way to do it besides 8 ands, 16 compares, and 8 additions?

Probably the hardest part to code was the Edward vs. vampires collision detection and randomized scatter function:
All of the source code is released under the GNU GPL over in a zip file, with the images and everything, over here.
Enjoy!
Then there are days like today, where I'm just confused... but I suppose it was for a good cause. Brian, a friend of mine who got one of the first GamePacks ever, emailed me asking how hard would it be for me to build the shell of a game for his kids. He wanted the theme of the game to be the movie Twilight. (Un?)fortunately I haven't gotten a chance to see that movie in theatres yet...
So, while this is not my proudest accomplishment ever, if it makes his kids happy, I suppose I can justify the effort (and at worst, it refreshed my memory about how hard it is to do object collision detection for games, even if it is just Edward's head vs. rotating pictures of bad vampires. Ugh. I can't believe I just wrote that. I think a little piece of me deep down inside just died a little bit...). But I digress:


Here's the game, written for the GamePack and the InputShield. I've uploaded the source code for it all over at the "app store" (which is really becoming more and more just a place to throw source code so I can at least stay a little organized). The Arduino runs a continuous polling algorithm on the InputShield to read the dual potentiometers (which are set to mode A), and then sends the bytes up to the TouchShield. The TouchShield, in turn, interprets the commands, and moves a little picture (sprite) of Bella's head around the screen. Meanwhile, Edward's head moves around too, and tries to avoid the bad vampire heads.
Although technicaaaaaallly...
If my quick scan of the character summary over at Rotten Tomatoes serves me correctly, Edward doesn't shy away from confronting these bad guys in the movie. Oh well.
In my version, he randomly selects an opposing direction, and flees in either the inverse X, inverse Y, or some combination of those directions. On a collision with the vampire head, the vampire then iteratively selects whether to flee in the inverse x or y direction... or do nothing and continue charging ahead (dun dun dun). The suspense is already killing me :)
Here's a picture of it sitting on my computer. You can see the paper on the left side, which actually has the math and logic for the sprite collision checking algorithm. There must be a more optimized way to do it besides 8 ands, 16 compares, and 8 additions?

Probably the hardest part to code was the Edward vs. vampires collision detection and randomized scatter function:
if ( ((xPos > xmet && xPos<xmet+i) && (yPos>ymet && yPos<ymet+i)) ||
((xPos+i>xmet && xPos+i<xmet+i) && (yPos>ymet && yPos<ymet+i)) ||
(
(xPos>xmet && xPos<xmet+i) && (yPos+i>ymet && yPos+i<ymet+i)) ||
((xPos+i>xmet && xPos+i<xmet+i) && (yPos+i>ymet && yPos+i<ymet+i)))
{
dirx2*=-1;diry2*=-1;
if (choicedir) {
  dirx1*=-1;
} else {
  diry1*=-1;
}
if (choicedir++ > 4) {
choicedir = 0;
}
xme += 2 * dirx2;
yme += 2 * diry2;
}
All of the source code is released under the GNU GPL over in a zip file, with the images and everything, over here.
Enjoy!
Tuesday, December 16, 2008
How would you change the Arduino?
Talk about Merry Christmas!
I just got back from meeting up with a former professor of mine here in New York City (the one who taught me signals and systems back in undergrad - ugh), and he told me that he's been using the Arduino in his class now for about a year. But, his students keep running out of I/O and memory for their projects, and assignments. Sooo... (drum roll) he was wondering if I'd be willing to make a few modifications for him (like finding a way to fit in more IO pins, for starters). But here's the best part yet... he's going to use part of his grant to help fund it all... Thanks!
Anyway, it's only fair to give back to the open source hardware community, so in the next few weeks, over my Christmas vacation, I'm going to be laying out a whole new board, hopefully in time for the first week or two of 2009, to usher in the new year with a new board. Chris, Justin, Mike, and I learned a lot about about the little details with AVR back when we first built the TouchShield, so hopefully that will all come in handy this time around.
Here's the catch. The whole thing, literally everything down to parts lists and schematics and you name it, is going to be Open Source. As in GNU and Creative Commons and Free Software Foundation Open Source. As in real, true, 100% USDA prime "open source hardware". In fact, everything I build and code will go straight to David Mellis from the Arduino team, and maybe it'll even make its way into future Arduino releases (fingers crossed).
Anyway, if you have any special requests, just let me know, and I'll try my best to include it in the design! :)
Thursday, December 11, 2008
Riding a bike is cool... but riding a unicycle is really cool
I was checking out the Arduino forums to get some ideas for my next project... and that's when it hit me. An RGB LED (Red, Green, Blue Light Emitting Diode)... in my last project I used a TouchShield to change colors depending on my mood
RED = Angry
Blue = Hungry
Magenta = Tired
Black = Sleeping
White = Excited
Orange = Happy
Yellow = Worried
etc.
The TouchShield is an OLED (Organic LED) screen with a total of 49,152 LEDs.
16,384 Red LEDs
16,384 Green LEDs
16,384 Blue LEDs
I thought I was soooo cool with my LED Matrix... but as it turns out, people are having just as much fun with one LED as I was with forty-nine thousand of them.
How?
RGB Lamp Test from Mike Mc on Vimeo.
I rest my case.
Monday, December 8, 2008
Processing, meet Tom Duff
My girlfriend has turned me on to Taste Spotting, so I gave it whirl with chicken parmesan. The pictures are so enticing that I immediately started rifeling through the fridge, pushing leftover containers aside desperately searching for the ingredients. I knew they were in there somewhere, but it occurred to me that if there was a way to get rid of all those leftover containers faster, then I could get to my tasty meal that much sooner.
This reminded me of the pin register trick I wrote about in a previous post, but this trick starts to become really interesting when used with the concept of loop unrolling for hard-core code optimization.

Thanks to Tom Duff and his cleverly named "Duff Device", we can show this optimization technique in C and not assembler.
This code listing takes a variable length loop action and unrolls it into batches of 8 sequential actions. What a clever exploit of the switch statement!
Thanks Tom, and now it's possible to enhance many of the low-level drawing routines of Matt's Sub-Processing library on the TouchShield to support screen painting at 60 frames per second. Not too shabby for an 8-bit device.
Chris
This reminded me of the pin register trick I wrote about in a previous post, but this trick starts to become really interesting when used with the concept of loop unrolling for hard-core code optimization.
Thanks to Tom Duff and his cleverly named "Duff Device", we can show this optimization technique in C and not assembler.
/* A Duff Device
   antipastohw.blogspot.com */
#define DUFF_DEVICE_8(aCount, aAction) \
    do { \ int count_ = (aCount); \
        int times_ = (count_ + 7) >> 3; \
            switch (count_ & 7){\
            case 0: do { aAction; \
            case 7: aAction; \
            case 6: aAction; \
            case 5: aAction; \
            case 4: aAction; \
            case 3: aAction; \
            case 2: aAction; \
            case 1: aAction; \
    } while (--times_ > 0); \ } \ } while (0)
Thanks Tom, and now it's possible to enhance many of the low-level drawing routines of Matt's Sub-Processing library on the TouchShield to support screen painting at 60 frames per second. Not too shabby for an 8-bit device.
Chris
Ruby on Rails vs. Arduino Processing
Firstly, I'll just put it out there: yes, these two languages are meant to do two entirely, completely different things, and therefore cannot be directly compared with each other. But analogy and comparison are powerful (and fun) tools, so I'm going to use them today :)
I've gotten several emails over the past few weeks, asking if I could post the source code to the programs I've written in a zip file format, since blogspot tends to mess up the ampersands, greater, and less than signs in my Arduino sketches when I just copy and paste. Despite my attempts to try to fix each snippet I post, some inevitably mess up, so I decided to take a whirl at learning Ruby on Rails and made an open source "app store" (sort of like Apple, but 100% not really). All the app source code snippets I've posted ever are GNU licensed open source, and are now zipped into little packages over here. I'll try to do this from now on, too! Anyway, doing this made me learn a lot about the language underpinnings of Rails.
It was an odd juxtaposition: I had a chance to write Ruby code for the website, and in between functions I'd make some more progress on my Processing on Arduino app. Flipping back and forth between Rails and Arduino Processing was actually harder than I thought...
What is Ruby on Rails?
Arduino Processing
So, onto the list of similarities:
5) Isolation - Both languages and environments operate on the principle of isolation. That is, complexity in other parts of the environment are obscured when you're coding. In Rails, when you're writing a database model for one feature, you don't really care about or see the code for other database models. You just build the functionality you want there on the spot. In Arduino, you don't have to wrestle the complexity of the Atmega CPU, you just focus on the C functionality and hit compile.
4) Portability - Sketches written in Arduino Processing are typically just a single file, and only the most complex ones will be several files. That means that sharing code is as simple as a little copy and paste (though not onto a blog on blogspot, apparently). There's almost no configuration or customization necessary to go from one platform or computer to the next (only what serial port are you using). On Rails, pretty much the only thing you have to configure when porting an app from one computer to the next is the database.yml file (the one that stores your local database username and password). After that, it pretty much runs as configured, which is amazing considering all those sad, long nights in PHP world that I'll never get back :(
3) Universality - A few simple functions work everywhere, on anything. Arduino's print functions almost mirror the simplicity of the to_s() and related typecasters in Ruby. That way, you don't have to spend all your time worrying about data types and formats (yeck)
2) Code compression - On the Arduino, a 5 line program will get you up and running, blinking an LED, and that's it. On Rails, a 5 line edit to a data model could mean adding validations to every form on your entire website. So both languages are made to compress a lot of meaning into short syntax.
1) "Lite" programming - Previous languages and development environments seemed focused on exposing all the bells and whistles to the programmer. That meant huge learning curves too, as every developer was forced to learn huge lists of functions before writing useful code. This is a lot like my experience with old school Code Warrior from Metrowerks on the Mac (and some Programming the Macintosh Pascal books). Both Ruby/Rails and Arduino operate on a completely different principle, almost like "light" programming. You're given a few constructs first, into which you can make small tweaks that have significant affects on the behavior of the program, and only later - as you learn more - are you encouraged to learn more complex functions.
And now the differences:
5) Object orientation - This one's obvious, so I'll start out with it. Arduino Processing is based on Java, so it could use the object oriented methods like ::, embedded functions, objects, etc. But in general, those are confusing to learn for programming beginners, so it doesn't force them on you. Instead, it's based primarily on a linear functional programming style with functions calling other functions directly, not through objects. Ruby and Rails, on the other hand, is completely object oriented. So much so that at times it feels like it's getting a little carried away (maybe that's because I still miss the goto function from my BASIC days - ha).
4) Longevity - Ruby on Rails programs are forever (don't sue me, please, diamond company that rhymes with "endears"). Rails programs always run, and are meant to sit on servers somewhere churning away like workhorses. Arduino programs are more fleeting. Even the name, "sketch" implies a quickly written thingy that runs lightly, does one thing, for a period of time, and then gets replaced with another sketch. Arduino sketches are a bit like constantly evolving, dynamic modules.
3) Learning curves - On the Arduino, the learning curve is tightly managed by the Arduino founders. David Mellis and Tom Igoe frequently debate on the mailing lists and forums whether certain functions are worthy additions to the Arduino core language. The argument typically says (and I agree) that you leave the core language simple, strong, and generalizable. Then as guys master the base language, they can expand as they grow. So the first activity you do when you get an Arduino is download code and make LEDs blink. By comparison, on Rails, the API and programming metaphor *is* the language, and so you have to learn it first. Otherwise, you don't know where files are, where functions are supposed to go (is the function a data manipulation, data extraction, or visual presentation function?), or where to find things. While learning Rails, I spent 75% of my time just opening and closing files, saying to myself, "nope that function isn't in there, is in there, nope, oh there it is." So the first activity you do when you get Rails running is reading... books ... full of functions and block charts ... to understand where things are.
2) Programming path - The tech guys would call this "tool chain" but I always tend to think power tools, and that can be intimidating so I avoid anything that's named a tool chain (and instead opt for something like a beginners package). Arduino has a simple programming path; write code, click verify (compile or spit out errors), click download, done, led blinks, yey. By comparison, Ruby on Rails feels like a zoo. Gems, plugins, and migrations sometimes seem to fight with each other for metaphorical dominance during programming. Which ones are right? Which ones are primary? Script server to run but script generate to build? It's all very close together and tightly knit, so it can get a bit confusing.
1) Hardware / software stack - Rails is purely a web construct. It's 100% software that runs on other software, that sits in generic computer boxes. It's born as information, and remains information based for the rest of its useful life. By comparison, Arduino starts out as software, but then makes a jump to hardware. This allows physical computing to happen, because source code bits can now change real life physical stuff. To me, that's what makes Arduino so much more fulfilling, line-for-line, than Ruby on Rails.
So there you have it, my little reflection on 3 weeks of intense Ruby on Rails and Arduino Processing coding!
I've gotten several emails over the past few weeks, asking if I could post the source code to the programs I've written in a zip file format, since blogspot tends to mess up the ampersands, greater, and less than signs in my Arduino sketches when I just copy and paste. Despite my attempts to try to fix each snippet I post, some inevitably mess up, so I decided to take a whirl at learning Ruby on Rails and made an open source "app store" (sort of like Apple, but 100% not really). All the app source code snippets I've posted ever are GNU licensed open source, and are now zipped into little packages over here. I'll try to do this from now on, too! Anyway, doing this made me learn a lot about the language underpinnings of Rails.
It was an odd juxtaposition: I had a chance to write Ruby code for the website, and in between functions I'd make some more progress on my Processing on Arduino app. Flipping back and forth between Rails and Arduino Processing was actually harder than I thought...
What is Ruby on Rails?
- A script-based, runtime compiled, object oriented language called Ruby extended with a development framework called Rails
- It's used for a lot of websites these days because of how easy it is to manage prototype, deploy, manage backend changes, etc.
- It's lead users are all those spritely web coders running all over the place these days (and since everyone kept making such a big deal about it, I figured I'd try to learn it)
Arduino Processing
- A narrow subset of Java (close to C and C++) called Processing compiled to bytecode to run on an embedded machine, within a development framework called "Arduino"
- It's used for teaching electronics, creating art, making open gadgets and electronics
- It's lead users are all those guys that post furiously over at arduino.cc (and a bunch of fellow Italian guys!)
So, onto the list of similarities:
5) Isolation - Both languages and environments operate on the principle of isolation. That is, complexity in other parts of the environment are obscured when you're coding. In Rails, when you're writing a database model for one feature, you don't really care about or see the code for other database models. You just build the functionality you want there on the spot. In Arduino, you don't have to wrestle the complexity of the Atmega CPU, you just focus on the C functionality and hit compile.
4) Portability - Sketches written in Arduino Processing are typically just a single file, and only the most complex ones will be several files. That means that sharing code is as simple as a little copy and paste (though not onto a blog on blogspot, apparently). There's almost no configuration or customization necessary to go from one platform or computer to the next (only what serial port are you using). On Rails, pretty much the only thing you have to configure when porting an app from one computer to the next is the database.yml file (the one that stores your local database username and password). After that, it pretty much runs as configured, which is amazing considering all those sad, long nights in PHP world that I'll never get back :(
3) Universality - A few simple functions work everywhere, on anything. Arduino's print functions almost mirror the simplicity of the to_s() and related typecasters in Ruby. That way, you don't have to spend all your time worrying about data types and formats (yeck)
2) Code compression - On the Arduino, a 5 line program will get you up and running, blinking an LED, and that's it. On Rails, a 5 line edit to a data model could mean adding validations to every form on your entire website. So both languages are made to compress a lot of meaning into short syntax.
1) "Lite" programming - Previous languages and development environments seemed focused on exposing all the bells and whistles to the programmer. That meant huge learning curves too, as every developer was forced to learn huge lists of functions before writing useful code. This is a lot like my experience with old school Code Warrior from Metrowerks on the Mac (and some Programming the Macintosh Pascal books). Both Ruby/Rails and Arduino operate on a completely different principle, almost like "light" programming. You're given a few constructs first, into which you can make small tweaks that have significant affects on the behavior of the program, and only later - as you learn more - are you encouraged to learn more complex functions.
And now the differences:
5) Object orientation - This one's obvious, so I'll start out with it. Arduino Processing is based on Java, so it could use the object oriented methods like ::, embedded functions, objects, etc. But in general, those are confusing to learn for programming beginners, so it doesn't force them on you. Instead, it's based primarily on a linear functional programming style with functions calling other functions directly, not through objects. Ruby and Rails, on the other hand, is completely object oriented. So much so that at times it feels like it's getting a little carried away (maybe that's because I still miss the goto function from my BASIC days - ha).
4) Longevity - Ruby on Rails programs are forever (don't sue me, please, diamond company that rhymes with "endears"). Rails programs always run, and are meant to sit on servers somewhere churning away like workhorses. Arduino programs are more fleeting. Even the name, "sketch" implies a quickly written thingy that runs lightly, does one thing, for a period of time, and then gets replaced with another sketch. Arduino sketches are a bit like constantly evolving, dynamic modules.
3) Learning curves - On the Arduino, the learning curve is tightly managed by the Arduino founders. David Mellis and Tom Igoe frequently debate on the mailing lists and forums whether certain functions are worthy additions to the Arduino core language. The argument typically says (and I agree) that you leave the core language simple, strong, and generalizable. Then as guys master the base language, they can expand as they grow. So the first activity you do when you get an Arduino is download code and make LEDs blink. By comparison, on Rails, the API and programming metaphor *is* the language, and so you have to learn it first. Otherwise, you don't know where files are, where functions are supposed to go (is the function a data manipulation, data extraction, or visual presentation function?), or where to find things. While learning Rails, I spent 75% of my time just opening and closing files, saying to myself, "nope that function isn't in there, is in there, nope, oh there it is." So the first activity you do when you get Rails running is reading... books ... full of functions and block charts ... to understand where things are.
2) Programming path - The tech guys would call this "tool chain" but I always tend to think power tools, and that can be intimidating so I avoid anything that's named a tool chain (and instead opt for something like a beginners package). Arduino has a simple programming path; write code, click verify (compile or spit out errors), click download, done, led blinks, yey. By comparison, Ruby on Rails feels like a zoo. Gems, plugins, and migrations sometimes seem to fight with each other for metaphorical dominance during programming. Which ones are right? Which ones are primary? Script server to run but script generate to build? It's all very close together and tightly knit, so it can get a bit confusing.
1) Hardware / software stack - Rails is purely a web construct. It's 100% software that runs on other software, that sits in generic computer boxes. It's born as information, and remains information based for the rest of its useful life. By comparison, Arduino starts out as software, but then makes a jump to hardware. This allows physical computing to happen, because source code bits can now change real life physical stuff. To me, that's what makes Arduino so much more fulfilling, line-for-line, than Ruby on Rails.
So there you have it, my little reflection on 3 weeks of intense Ruby on Rails and Arduino Processing coding!
Friday, December 5, 2008
Atmel's Clever Pin Register
When browsing through the datasheets of the ATmega processors, most of the time my eyes just glaze over this diagram. I never really put much thought into it.

But zooming in, you'll notice a special feature of the Atmel's Pin register...
First, you start by finding the PORT flip-flop which is the PORTxn symbol directly above the RESET signal in the diagram above. Notice that it's output is on the left and it's flipped and fed back into itself on the right?
That's not really that exciting, right?
Wrong! Because if you write a 1 to the Pin register WPx (input to the AND gate), you'll be able to toggle the output state of the port!
So why is this interesting? It's interesting because you can now toggle the I/O pins at blazing fast, single instruction speeds :-)
The code to toggle PORTB 7 might look something like this:
DDRB = 0b10000000;
PINB = (1 << 7);
Chris

But zooming in, you'll notice a special feature of the Atmel's Pin register...

First, you start by finding the PORT flip-flop which is the PORTxn symbol directly above the RESET signal in the diagram above. Notice that it's output is on the left and it's flipped and fed back into itself on the right?
That's not really that exciting, right?
Wrong! Because if you write a 1 to the Pin register WPx (input to the AND gate), you'll be able to toggle the output state of the port!
So why is this interesting? It's interesting because you can now toggle the I/O pins at blazing fast, single instruction speeds :-)
The code to toggle PORTB 7 might look something like this:
DDRB = 0b10000000;
PINB = (1 << 7);
Chris
Thursday, December 4, 2008
Passing large values between the Arduino to the TouchShield
(I've gotten a couple of questions about this, especially since I posted the Processing on a TouchShield post, so here's a little tutorial on how to pass large values, like integers between the Arduino and TouchShield ... it's a slightly modified version of what I posted on the arduino.cc forum.)
Communicating from the Arduino to the TouchShield is a bit of a manual process, largely because there are so many different ways someone might want to communicate that it's tough to plan for all of them ahead of time. It's easy to pass unsigned chars one at a time, because the serial.read() function grabs one char at a time, which is one byte. The catch is that integers (ints) are 2 bytes long, so if you try to just use serial.print() and serial.read(), it only sends one byte, or 8 bits, and then you lose the other part of your number!
So in order to send a full int from the arduino, you have to send each byte of the 2-byte integer separately, and then reconstruct it back into the full two-byte value. Chris figured out how to get this working in the Pin Visualizer project, and I've adapted it for the Processing graphics library code too.
On the TouchShield, I use this code:
int getValue = Serial.read();
getValue = (getValue < < 8) + Serial.read();
This first calls Serial.read() to get the high bit. The " < < 8" means bit shift the byte up (to the left) 8 bits. Then, it calls Serial.read() again to get the low byte. And finally it adds both together. It kind of looks like this:
First get byte 1, the high byte:
0000000010101010
Shift it left 8 bits
1010101000000000
Then get byte 2, the low byte:
11111111
Add that to the left-shifted byte:
1010101011111111
And on the Arduino, I'll use this code:
unsigned char lowByte, highByte;
unsigned int val;
//set val to something
lowByte = (unsigned char)val;
highByte = (unsigned char)(val > > 8);
mySerial.print(highByte);
delay(1);
mySerial.print(lowByte);
delay(1);
That kind of does the inverse behavior. First it take val, and sets lowByte to only the lower or rightmost 8 bits. Then, it sets highByte to the upper or leftmost 8 bits (by bitshifting it down 8 bits first). Then, it prints the high byte, followed by the low byte. I throw a delay(1) in between just to give the Arduino and TouchShield time to separate the two sends from each other.
So if val looks like:
1010101011111111
It sets lowByte to:
11111111
It then shifts val to the right by 8 bits to get:
0000000010101010
Which it then grabs only the lower 8 bits of:
10101010
Which get stored as highByte
Because I send highByte first, and the send lowByte, that means the TouchShield has to know that the first thing it gets will be the highByte. So that's why the first byte the TouchShield gets is shifted left by 8 bits... the "circle of life" is now complete :-)
Phew. That was really long... On the plus side, this also happens to be a convenient way to pass large values between two Arduinos over a two-wire Rx/Tx serial connection, or between the Arduino and a custom program on the PC. I know they tend not to be used in too many apps or sketches, but bit shifts really do come in handy sometimes. And if you still want some more help, just send me some code to look at, and I'll try my best!
Wednesday, December 3, 2008
What is Open Source Hardware, really? Part 2 and the CoreBoard
Somehow it didn't feel right to spend all that time thinking about Open Source over the last few days, only to make another file using Microsoft's very, very proprietary Powerpoint file and format :(
Anyway, thanks Limor (p.s. can I come over and use your laser etcher?!) and especially Phil for the ideas and comments (they've definitely thought long and hard about this). So I spent some time last night and today reading up on the huge threads over at OpenCollector, Slashdot and Opencores.org, where there are some really interesting ideas too. I tried to summarize everything I read, and some of my thoughts as well into "What is Open Source Hardware - Part 2".
Incidentally, it's funny that folks don't feel comfortable writing comments on a blog, and prefer to send emails instead, but whatever works :) I think I'm the same way on other blogs too...
Also, since I thought it was a good example of the licensing issues, I figured I might as well talk about my CoreBoard project. It was originally something I just built for myself, and I was kind of embarassed to release it because it technically doesn't work with the Arduino IDE (instead, you have to use either something from here, or from here on Linux).


It's a little Basic STAMP carrier board that converts all of my old STAMPS that I had lying around from the pre-Arduino days. It's shaped just like an Arduino, but colored black, and it has a little ZIF socket in the middle that's perfectly shaped for all kinds of 24-pin STAMP varieties floating around out there (like ARM, Java, or PIC-based ones). I also pinned out all of the Basic Stamp's I/O to the Arduino female pin header rows, so writing code for it wouldn't be too hard. I wanted to be able to use the shields like the TouchShield or wave shield with them.

Here's some open source code to make the CoreBoard blink LED 15 - I'm releasing this code snippet under the GNU GPL license :-)
' {$STAMP BS2e}
' {$PBASIC 2.5}
' {$PORT COM21}
LED PIN 15
IsOn CON 0
IsOff CON 1
Setup:
OUTPUT LED
Main:
DO
LED = IsOn
PAUSE 500
LED = IsOff
PAUSE 500
LOOP
I've release all the schematics, diagrams, bill-of-materials, parts list, and gerbers under the Creative Commons license so have fun ... And now that I've written a blog article about it, I've also thrown it over at liquidware.com. If you buy one, I'll assemble and solder it for you!
Subscribe to:
Posts (Atom)