I've heard a lot about this magical "Cyber Monday" effect, and never really believed it until today. I've sold almost as much Android hardware in the past 3 days - including today - than I have in the previous MONTH. And the day isn't even over... I can't figure out where all the traffic is coming from...
It's like the Slashdot Effect met the Digg and Reddit Effect, and got in a three-way love triangle. And then the bastard child grew up and wanted to program Android. I guess on the one hand, I'm happy that a lot of people like the kits I'm building, and on the other hand I'm thinking to myself,... I have a lot of work to do.
It's only 2 pm, and for the first time in a long time, I'm low on almost all of the inventory and products I stock at Liquidware... but especially on the Android hardware development kits. For those that don't know, this is a big deal because all of the kits are hand made, hand soldered, and hand packaged by Will, Chris, Matt and me. I usually like to keep enough kits built up so I can hack on a few of them myself, but today, I'm so low that I've had to cancel most of my plans for the next week so I can catch up (sorry Nick!)...
The next 10-14 days are going to be ridiculous, but I will do the best I can to ensure that I don't go out of stock on anything for too long. Here's my plan:
-I'm going to spend all day soldering and building
-I'm going to spend all night programming
-I'm going to spend all "meta-night" packaging
"Meta-night" is my name for that time of the night when you really ought to be asleep, but aren't, because the program isn't compiling for some reason, and you really want to get it done before the next day. Also known as 1 am - 5 am.
I guess all I can say is, thanks for supporting Liquidware, and for supporting Open Source, the Open Source Hardware movement, hardware hacking, Arduino, and Android.
Now it's my turn to work my ass off to make sure everything gets out in time!
Monday, November 29, 2010
Saturday, November 13, 2010
Tron on Android Gadget Pack
Reliving my childhood/young adulthood for just one minute, the only movie that even held a candle to Sneakers and Hackers was Tron. Fantasies of flying through the motherboard in search of missing ROM addresses and hexdumping around with light racing motorcycles is pretty much what gets me by some late nights while hacking. It sure romanticized the reality of actual programming experience, which typically consisted of gcc-make-vi-pico-repeat-success-segfault.
So when I found out that the new Tron movie was coming out, and that it had motorcycles, and modern interpretations of the flying-saucers-of-death meets-American-Gladiator game, I got excited. In fact, I think all the guys and I at Liquidware are going to take a full half day off just to see the movie together (ps if you're in the Boston/Cambridge area, and want to come along, just shoot me an email at inthebitz at gmail).
 Anyway, I'm anxious. I think the movie is going to rock. And even if it doesn't, I'm going to see it anyway because of how influential it was to me, and many guys I know.
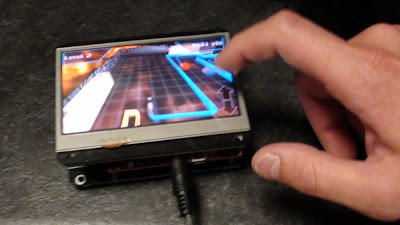
And in honor of that great movie, Will and Chris and I found an interpretation of Tron, called "Light Racer 3D", and got it running on the Liquidware Android Gadget Pack, running Android on the Beagleboard... enjoy!
 Here's a video of it running on the Android-Beagleboard-BeagleTouch combination. It's surprisingly fast and snappy for a portable device like this - at first, I couldn't really believe that the 3D graphics were so fluid...
All of the modules and components are available at the liquidware shop, and some more pictures are up on the Flickr page. Enjoy!
So when I found out that the new Tron movie was coming out, and that it had motorcycles, and modern interpretations of the flying-saucers-of-death meets-American-Gladiator game, I got excited. In fact, I think all the guys and I at Liquidware are going to take a full half day off just to see the movie together (ps if you're in the Boston/Cambridge area, and want to come along, just shoot me an email at inthebitz at gmail).

And in honor of that great movie, Will and Chris and I found an interpretation of Tron, called "Light Racer 3D", and got it running on the Liquidware Android Gadget Pack, running Android on the Beagleboard... enjoy!

All of the modules and components are available at the liquidware shop, and some more pictures are up on the Flickr page. Enjoy!
Friday, November 12, 2010
Simultaneous Quad Charging Lithium Batteries
In the past week, I've gotten a number of emails from people asking about the BeagleJuice module, and how you charge it. The BeagleJuice is a lithium ion rechargeable battery that snaps to the back of a Beagleboard, and let's you power it and any circuits or other modules like the BeagleTouch that you might have snapped on top of it for 4-6 hours depending on how much drain. If it's just the Beagleboard, it's about 6.5 hours.
Well, this is how *I* charge it - I typically charge 3-4 of them at once, running off of a USB "charging station", which is really just a 4-port USB hub that I've gutted, and wired up. The power is enough from this one USB hub to power 4 BeagleJuice's at a time.

Well, this is how *I* charge it - I typically charge 3-4 of them at once, running off of a USB "charging station", which is really just a 4-port USB hub that I've gutted, and wired up. The power is enough from this one USB hub to power 4 BeagleJuice's at a time.

Here's a video showing off my personal setup:
Wednesday, November 10, 2010
Arduino Uno launched and connected to the TouchShield Slide
Hallelujah! Finally, an Arduino edition with a sufficiently Anglicized name that I can actually pronounce!
Introducing the Arduino Uno. Uno. Pronounced: "ooo-no"
Not "doooehmillahnoevuh" like the previous version of the Arduino. Just Arduino Uno. Arduino Uno. It's as if a million teachers, educators, students, hackers, and DIY'ers cried out out in unison, and were NOT silenced by the second syllable after tripping over their tongues!
Here's my first Arduino Uno, still sitting inside its box, with no idea what kind of heinous, mind-stretching, solder-busting torture it's about to go through in the coming months. If it only knew... it might stay inside it's little comfort box:

This is my first one, taken out of the box:
 Here it is, sitting next to my trusty sidekick, the Illuminato Genesis. The Illuminato Genesis is still my go-to-board for high numbers of I/O requirements, and for a slightly faster speed:
 Of course my first reaction was,... does it work with the TouchShield Slide? The answer was... yes, it most certainly does:

 Justin just threw the Arduino Uno up over on the Liquidware Shop... and I uploaded some pictures over at the Flickr page. I'll be using the Arduino Uno in my upcoming projects, and will start seeing if there are any particular anomalies with my code samples, although I expect there not to be.
PS I like the new logo and color art too, nicely done, Team Arduino!

Introducing the Arduino Uno. Uno. Pronounced: "ooo-no"
Not "doooehmillahnoevuh" like the previous version of the Arduino. Just Arduino Uno. Arduino Uno. It's as if a million teachers, educators, students, hackers, and DIY'ers cried out out in unison, and were NOT silenced by the second syllable after tripping over their tongues!
Here's my first Arduino Uno, still sitting inside its box, with no idea what kind of heinous, mind-stretching, solder-busting torture it's about to go through in the coming months. If it only knew... it might stay inside it's little comfort box:

This is my first one, taken out of the box:


PS I like the new logo and color art too, nicely done, Team Arduino!
Tuesday, November 9, 2010
Skin Skeleton Guts (SSG) turns a TouchShield and Arduino into a Tricorder
I met Dominic Muren at the OSHW Summit in NYC. To say he's a pretty smart guy is a dramatic understatement - he's ridiculously creative, plus he has a contagious energy! So I spent some time digging around, and a few emails later, I dug up his TED talk - which to me pretty much hits the nail on the head.
"Modular, Hackable, and Open components that could be reconfigured into a variety of components."
YES YES YES!!! (I think I just had a When Harry Met Sally moment for OSHW modularity...)
Dominic has this idea that skin-skeleton-guts can server as a powerful metaphor for connecting all of the pieces together of modular devices. I've been thinking about this for a while, but Dominic's ideas really push it further than I had thought. The "last mile" of modular gadgets so to speak is the enclosure, the case, and the "wrapping" around modular gadgets.
The problem is that while modularity is clearly the future of gadgetry, no one up until now has really found a satisfying solution to the problem of high-cost enclosure design. Enclosures are hard to build, and require long iterations of designs. Until 3D printing is really on everyone's desktop, the idea of fabricating an enclosure for Open Source Hardware and Electronics is an expensive idea. But moreso than that, even if 3D printing on the desktop were a reality, you'd likely want to minimize the amount of material you use in a custom enclosure.
To the idea of "Skin Skeleton Guts" or SSG by Dominic, is that we should build the skeletal components that hug the sides of modular electronics, and then build wrappers out of flexible fabric, e.g. "skin" to wrap around the skeleton. The modules - for instance, the Arduino modules in this case, serve as the "guts". The fragmented structural hugging pieces serve as the "skeleton", and the flexible, perhaps transparent, fabric material becomes the skin.
The result is... drum roll...
 Pretty...

...darn...
 ...cool.
That's Dominic applying the principles of SSG to the MegaPalm Gadget Kit... stepwise heading in the direction of making it into a full blown device. That just made my entire week, seeing the concept of modularity and reconfigurable gadget components, getting pushed to the next level. It's one of those concepts that seems so straight-forward and natural, it makes me think, "why didn't I think of that?"
I'll have what he's having!
"Modular, Hackable, and Open components that could be reconfigured into a variety of components."
YES YES YES!!! (I think I just had a When Harry Met Sally moment for OSHW modularity...)
Dominic has this idea that skin-skeleton-guts can server as a powerful metaphor for connecting all of the pieces together of modular devices. I've been thinking about this for a while, but Dominic's ideas really push it further than I had thought. The "last mile" of modular gadgets so to speak is the enclosure, the case, and the "wrapping" around modular gadgets.
The problem is that while modularity is clearly the future of gadgetry, no one up until now has really found a satisfying solution to the problem of high-cost enclosure design. Enclosures are hard to build, and require long iterations of designs. Until 3D printing is really on everyone's desktop, the idea of fabricating an enclosure for Open Source Hardware and Electronics is an expensive idea. But moreso than that, even if 3D printing on the desktop were a reality, you'd likely want to minimize the amount of material you use in a custom enclosure.
To the idea of "Skin Skeleton Guts" or SSG by Dominic, is that we should build the skeletal components that hug the sides of modular electronics, and then build wrappers out of flexible fabric, e.g. "skin" to wrap around the skeleton. The modules - for instance, the Arduino modules in this case, serve as the "guts". The fragmented structural hugging pieces serve as the "skeleton", and the flexible, perhaps transparent, fabric material becomes the skin.
The result is... drum roll...
...darn...
That's Dominic applying the principles of SSG to the MegaPalm Gadget Kit... stepwise heading in the direction of making it into a full blown device. That just made my entire week, seeing the concept of modularity and reconfigurable gadget components, getting pushed to the next level. It's one of those concepts that seems so straight-forward and natural, it makes me think, "why didn't I think of that?"
I'll have what he's having!
Monday, November 8, 2010
A Beginner's Tutorial to Programming Android on the Beagleboard
Android is a fun development system platform - but you have to really enjoy googling around for relatively funky command line arguments if you're planning on making any progress in the course of one night. The google guys knew what they were doing, or at least did a great job building something pretty cool that works. Chris and I have been spending a decent amount of time learning how to program Android, and so I figured I'd write up a brief tutorial for anyone out there that doesn't want to spend nearly as much time as it took us to figure it out.
 The first step in programming Android is to download the Android SDK: http://developer.android.com/sdk/index.html
On Ubuntu Linux, I downloaded the SDK into the home directory, and unzipped / untarred it. The next step is to get the Beagle Android Gadget Pack recognizing on the USB port. The next step involves plugging a USB cable into the side of the gadget. Once it's in, run the command:
lsusb
I get a bunch of Bus 001 through Bus 005, followed by Device blablabla information. Here's the trick. You want to find the ID of the Android device, so run lsusb while the device is unplugged, and then run it again. On my computer, the line that changes when the Android gadget is plugged in is:
Bus 001 Device 004: ID 18d1:9018
Ok. Now create a file called "51-android.rules". See the part in the line above that says, "18d1"? and "Device 004"? That's idVendor and idProduct respectively. So change those values in the file content below:
/etc/udev/rules.d/51-android.rules
This is a rather convoluted and manual way to get the Ubuntu Linux OS recognizing the Android Gadget as a native Android device. Now, you can cd into the SDK directory, and type:
./adb devices
And the device should show up. This is what I get:
./adb shell
You'll get kicked out directly to the Android root command line, where you'll notice you can use ls, cd, cp, mv, rm, and cat. And that's about it. No text editor, no vi, no nothing. Pretty limited. Likely, you'll want to copy files on and off of the Android gadget, so you'll typically use these commands that come along with the Android SDK:
./adb install blabla.apk
Voila!
On Ubuntu Linux, I downloaded the SDK into the home directory, and unzipped / untarred it. The next step is to get the Beagle Android Gadget Pack recognizing on the USB port. The next step involves plugging a USB cable into the side of the gadget. Once it's in, run the command:
lsusb
I get a bunch of Bus 001 through Bus 005, followed by Device blablabla information. Here's the trick. You want to find the ID of the Android device, so run lsusb while the device is unplugged, and then run it again. On my computer, the line that changes when the Android gadget is plugged in is:
Bus 001 Device 004: ID 18d1:9018
Ok. Now create a file called "51-android.rules". See the part in the line above that says, "18d1"? and "Device 004"? That's idVendor and idProduct respectively. So change those values in the file content below:
Then copy the file here:
SUBSYSTEMS=="usb"
ATTRS{idVendor}=="18d1",
ATTRS{idProduct}=="0004",
MODE="0666"
/etc/udev/rules.d/51-android.rules
This is a rather convoluted and manual way to get the Ubuntu Linux OS recognizing the Android Gadget as a native Android device. Now, you can cd into the SDK directory, and type:
./adb devices
And the device should show up. This is what I get:
List of devices attached:Now I can use this command to get access to the Android Shell:
20100720 device
./adb shell
You'll get kicked out directly to the Android root command line, where you'll notice you can use ls, cd, cp, mv, rm, and cat. And that's about it. No text editor, no vi, no nothing. Pretty limited. Likely, you'll want to copy files on and off of the Android gadget, so you'll typically use these commands that come along with the Android SDK:
./adb push your_file to_location_on_androidAnd most importantly... if you have an APK downloaded or compiled for Android, and you want to install it, just use:
./adb pull path_to_file_on_android
./adb --help
./adb install blabla.apk
Voila!
Subscribe to:
Posts (Atom)