Friday, January 29, 2010

A Call For Open Source Hardware Gadgets

Last week, I wrote about a few gagdets that were open source, hackable down to the very circuit boards that make them up. True- any device is hackable at a fundamental level if a DIYer is willing to go there (even an iPod Nano). But there are some devices were made to be hacked, to be customized, and to be fully owned and used to the fullest.

That’s an interesting concept: a device is designed to be open source actually enhances the ownership and usability of the product. So what exactly does an open source hardware gadget offer, and why is it a good thing?

1. Customization = more happiness

Devices that are open source are more easily tailored to customize each user’s individual needs, whereas something that’s off the shelf and difficult to tweak usually results in some tradeoffs and compromises. So a well designed, open source hardware gadget that’s meant to be hacked will generally result in more users happier with the end product.

I was once told that the difference between a Mercedes and a Toyota is that with the Mercedes, “they really thought of everything when they designed it”. But what if they didn’t have to? What if there was no way they could think of everything, even if they tried?

In fact, it would probably be quite humbling for a Mercedes, a Samsung, or a Sony to admit that perhaps the customer might actually know what they want…and be able to design it better. So they’re even less likely to make the devices easy to modify. And if it’s not an issue of pride, there’s always one of liability with anything hardware.

2. Devices are less condescending (and less frustrating)

Many products, software or hardware, seem to be designed with the notion of idiotproofing in mind. A classic software example is with Windows Vista and User Account Controls. For those unfamiliar, it keeps asking you to confirm, any time you want to do something. Every time it asks you “are you really sure you want to do this?” it’s like a condescending jab suggesting that you’re a 90-year-old Grandma who’s never  used a computer before (no offense, Grandma :)

I’m willing to live with the fact that if I break my computer, it’s my fault. I’m not going to blame anyone else.

3. Learning by doing

People get to learn through hands-on hacking and tweaking.

I’m an avid overclocker, which for the sake of argument, I’ll consider a simple form of hardware hacking from a firmware level. I do my work in the BIOS, and if I’m working on the GPU, nVidia has a higher level tool for that, called nTune.

This wasn’t always the case, and I had to start from scratch. But wanting to create the most powerful computer my college student dollar could buy, I had to get creative, shop for deals, and get the compatible parts I could customize. Then I did a ton of research, put hours and hours into trial, error and testing, and walked away not only with the best computer for me with my budget, but also a skill set that I could use over and over again, and teach to others as well.

Since then, I’ve even overclocked my netbook, which presumably was never meant to be pushed to such limits. But the ability to do that makes me feel like the $400 I spent was *that* much more worth it.

Post image of HP Mini 311 gets CPU Overclocked to 2GHz (and GPU)

4. Empowered, smarter users

Hackability and open source hardware encourages tinkering and learning by doing. Over time, this will create a group of bright, determined hackers, makers and DIYers excellent in the realm of problem-solving – and ready to teach others their trade.

In general, this makes people more inclined to figure things out and be more analytical, which could translate to folks being better at their day jobs- a more highly skilled and analytical technical workforce.

With respect to “innovation”, there are simply more qualified minds with more tools, and more people thinking about the best solution to a problem. This is excellent for businesses as well, since a growing number of companies realize that a lot of talent exists outside its four walls (see “not invented here”).

How does that translate to immediate, tangible sales? One school of thought suggests that the App Store was what made the iPhone successful, since more uses for the iPhone, intended or unintended, made it more worthwhile to own one. In fact, the ability to jailbreak the iPhone probably resulted in many many more sales of the hardware itself, not to mention the black market app stores that have arisen to create a niche industry in itself.

Hackability is valuable, both to businesses and consumers alike.

5. Stimulate the economy (really!)

All of this is fine and good, but I like to think that it can translate to an even broader phenomenon.

Self/community-taught users with access to open devices conducive to customization could lead to many things:

  • rapid prototyping for product development (something the Arduino is used for a lot)
  • businesses that sell aftermarket products and accessories (like Pimp my Ride for auto mods)
  • consulting businesses designing custom solutions with easy-to-hack hardware

This ultimately leads to the creation of more products and more development by more people, not to mention that it could create more opportunities for folks to start businesses from their hobbies and self-taught expertise.

These are five big reasons why open source hardware gadgets are useful, and why we need more of them. Yes, closed source devices can be hacked to a similar effect. But rather than trying to shut down the hackers, open source welcomes it.

But everything else equal, are most people more interested in having something that looks nice, or having something that they can open up and mod to their heart’s content? Well, it depends on who’s buying. But how that product is ultimately used should be up to the person who spent the money to purchase it, and the more they can do with it, the more it’s worth to them.
Tuesday, January 26, 2010

Grand Unifying Theory of Open Source Hardware Rights

This is a small excerpt from the Open Source Hardware Economics book that I've been writing. There have been a number of posts and comments in recent weeks about open source vs. intellectual property, and I think there's a lot of confusion. This small excerpt was created as a result of notes I made while reading line-by-line through dozens of "open source" licenses, from the web, from companies, and from law firms. I've spent more than a hundred hours pouring through these contracts, so hopefully others don't have to! I hope this helps...

Open Source and Intellectual Property are one and the same. Open Source is the process of granting rights, Intellectual Property is in some ways the process of restricting rights. They aren't opposite ends of a spectrum, they're just different ways to frame the exact same topic. Like the glass half full vs. the glass half empty, you're still talking about a glass and some water. Likewise, with Open Source and Intellectual Property, we're talking about information, and the rights associated with it as it sits, encapsulated in a set of source files that occupy disk space. Creators of these source files (like you) have a set of decisions to make. Some of these decisions you make knowingly, after thinking about them. Some of these decisions you make instinctively, immediately without much thought. The point is, you’re making decisions whether you think about them or not. Let’s run through the types of decisions you’re making, one by one. Each of these decisions is a decision about Intellectual Property rights.

I'll try to frame each from the perspective of Intellectual Property as well as from the viewpoint of "Open Source":

Entity – Can anyone use the files and information you’ve created, or are there restrictions on the types of entity? For instance, is the information for individual use only, or can institutions and companies use it too? Can any government use the information, or are there restrictions imposed by trade and political policy that restrict some governments or groups of people?

Branding / Attribution – If someone else takes the work, must they provide recognition and attribution back to the original author, or are they free to take it, brand it in a new way, and distribute it without recognition or attribution?

Naming – Can someone rename the project once they build it themselves, or must they keep it named the same thing the original author named it?

Field of Use – Can the project or information you provide be used in any field or domain of use, or is it restricted? Can someone build missiles and weapons that kill people with your idea, or are they restricted to public service and commercial domains? Can people use your idea in any industrial use, or only in specifically defined, narrow ones that don’t compete with you?

Share-Back – Can someone make changes to your idea and keep their changes to themselves, or are they obliged to share them back with you, perhaps for inclusion in future versions?

Replication – Do you restrict people from copying or reproducing the information, or can they make as many copies as they want?

Reselling / Transferability – Can the information be resold to others, or is it permanently assigned to a single recipient, and non-transferrable?

Economic Rights – Assuming someone else has a version or copy of the information, can they sell their copy, or resell multiple copies for a profit? Can they charge any price at all, or are they restricted to transferring the information in a non-monetary transaction?

Ownership or Leasing – When someone else has a copy of the information, do they own it legally, or are they only temporarily leasing partial rights from someone else, the original author, or the distributor?

Upgrade Rights – Assuming there are versions of the information, and those versions change over time, does owning a previous version of the information entitle you to all future upgrades, or must future upgrades be re-evaluated, re-purchased, or re-negotiated under new contracts.

Derivative Licensing – If copies or derivative works are permitted, and if they are allowed to be distributed to others, does the original creative author require that the derivative works carry the same license, or are future versions permitted to be covered under different licenses?

Jurisdiction – Does the contract covering information rights remain in effect anywhere on the planet, or universe, or does it only apply in certain geographical jurisdictions? If the contract is contested, and the case goes to court, where will the court case be held, on a boat in the mid-Pacific (you’ll get away with anything), or in Delaware (pro-company), or in Texas (pro-individual inventor), or in New York (the person with the bigger budget wins), or in Washington, DC (pro-US government, pro-lobbyist), or in one of the Norwegian countries (anti-information restrictions, pro-information freedom), or in sub-Saharan Africa (the more guns and money you have, the better your chances of winning. And living).

Target – Your defining a set of information rights. You could be addressing anyone who could possibly ever come into possession of the information, or you may only be defining rights and freedoms for a certain group of people. You might not care what a non-profit organization does with your idea, but you may be very careful about restricting rights for commercial entities.

Timing – Do the rights last forever, or are they restricted in time. For instance, do the rights last for a fixed number of years, as long as the inventor or creator is alive, as long as Mickey Mouse if protected, or for as long as the government who granted those rights is around?

Fees – Does it cost anything to acquire, retain, or perhaps modify the rights granted to you? Or are the rights free to acquire, free to retain, and free to modify?

Platform and Stack – Do the rights cover the entire platform, and the entire system and ecosystem, or are other licenses permitted to cover different rights throughout the system? For instance, if a piece of software is Open Source, does it require that it be run on an Open Source operating system, or can you run it on a proprietary one? Does it have to be compiled with an Open Source compiler or can the tool-chain be closed source and proprietary? At the extreme, perhaps the license requires that everything, from the programming language, to the instruction set architecture, to the silicon masks that built the processor, be completely consistent and covered by the same self-consistent rights.

Enablement – How much is required to be disclosed by the author? Is it sufficient to merely provide the painting, or must the artist describe how the painting was drawn? This is sometimes called the “Mona Lisa” test. To paint the Mona Lisa, you get paint, assemble brushes, set up a canvas, and then … paint the Mona Lisa. In patent law, the concept of enablement requires that anyone attempting to get a patent, must describe accurately and sufficiently in the patent text itself, how a “person reasonably skilled in the art” to recreate the invention on their own.

Editability – Does the author of the information permit the information to be edited, or must it remain in its original form for the duration of its life? If it’s allowed to be edited, can anyone edit the information, or only certain people? Gun laws and gun restrictions require that only certain people, accredited gunsmiths, be allowed to maintain and modify, and fix guns.

Workaround and Trespassing – Are there punishments in place for someone who tries to work around mechanical or security restrictions, like digital trespassing? What burden of proof is required to prove that someone has violated the terms of the contract? Do you have to catch them in the act, or is it enough to associate them with the information indirectly?

Identification and Authentication – Does each copy of the art require a unique identification number, of can the information be distributed widely without identifiers? Alternatively, must the information be “activated” with codes or passwords before it is legible?

Customization and Standardization – Can the information be tailored to specific uses or applications, can it be tweaked, are there different versions of the information, or are they all the same?

Requisite Skillset – Can anyone take advantage of the information with basic education? Can children utilize the information? Must you require years of education and millions of dollars of specialized equipment in order to use the information?

Visibility and Transparency – Is the information understandable or digestable simply by looking at it, or must you peel back a cover or lid to peek inside? Do you need a key, a special set of tools or programs, in order to reverse engineer it before you can understand it, or is the information simple to convey, and described in common formats or vernacular?

Taxation and Registration – During transfer of the information and files, are there taxes or government policy-related registrations required? Owning a map of the world’s nuclear facilities, or blueprints for how to build a nuclear bomb, tend to be restricted and regulated by government authorities.


Each of these dimensions, or attributes, is a piece or part of the terms and conditions imposed on a piece of information by its creator, author, or inventor. These terms are collected from real contracts, from intellectual property law concepts and constructs, and from the field of practical contract drafting. These are the terms and conditions debated in court, addressed by the district and Supreme Courts in rulings on intellectual property rights. This is clearly not a complete list. There are many other concepts in intellectual property theory and Open Source that are clearly not addressed in the list above. That’s ok, this isn’t meant to be an exhaustive list. Rather, it’s meant to be a 90% list. These are the issues that constitute the majority of intellectual property debates and disputes that relate to Open Source and information rights.

This list of attributes is meant to convey one point: Open Source contract terms and conditions are not straightforward.

These attributes are not clear cut, and they are not all created equal. Some are not enforceable, because it would be impossible to determine, practically speaking, whether someone is violating that term. Other attributes are simply not enforceable because they may be inconsistent with government permissible activity. Violating the terms may be punishable by imprisonment, or fines, or a slap on the wrist depending on your jurisdiction and the severity of the penalty. Strictly speaking, in the US, it is only “illegal” to violate trademark, copyright, and patent law.

Once a framework like this is outlined, a logical next question is, “what constitutes the most open source” set of rights? No matter what anyone says, there is no simple, straightforward answer to this question. It depends on the audience, the target, and the nature of the work. This is a topic of significance on many web forums, where the debate has been waged for years. As you no doubt can tell, this is an emotionally charged issue.

There are “open source” licenses of various flavors, but they tend to address the narrow domain of the file itself, and get fuzzy when it comes to what can be done with that file, how it can be put to use, what it can be used for, or not. Some licenses are better than others, some explicitly address the attributes and dimensions above, while other licenses brush over the surface, skip, ignore, or only briefly touch on the dimensions. This can create ambiguity, and ambiguous contracts breed abuse and hurt feelings.

It is the author’s opinion that none of the current “open source” licenses properly covers “open source hardware” to a sufficient quality standard to be used in a widespread way. Instead, most of the open source hardware licenses in wide use today are merely repurposed open source software licenses! This is a serious problem.

Let’s examine that assertion further in the next chapter.


Thursday, January 21, 2010

Top 5 Consumer Open Source Hardware Projects

After CES wrapped up last week, I began thinking about open source hardware could mean for consumer gadgets. For the most part, I have (somewhat subconsciously) been equating open source hardware with DIY, hobbyist PCBs, wires, pin headers, and exposed components. Something that I could hack and rebuild myself, with some parts and a soldering iron.

But what about something that was maybe a little more user-friendly and ready to go right out of the box? To me, one aspect of open source is accessibility, both in terms of depth and breadth. By depth, I mean the level at which someone could modify, reuse, repurpose, and rebuild the hardware. Open source hardware that allows one to hack at the circuit level is “deeper” than a device that only allows hacking at the firmware level.

Breadth of accessibility could mean many things, though. It may mean, “how many platforms is it compatible with?” or “how many tasks could this hardware be repurposed to serve?”

Both these questions are really asking the same thing, which is: “how many people could make use of this hardware?”

That raises a more fundamental issue: can something be open source hardware, hackable, and DIY- yet be usable as is, right out of the box? I can imagine a consumer gadget that is ready to go, but for the adventurous, it could be customized indefinitely. Perhaps it could even inspire a non-tinkerer to start messing with their hardware?

With that in mind, I scoured the web for open source hardware that wasn’t in kit form, was a little more finished, but is built to be reused, to engender further innovation. To help categorize some of these gadgets on that consumer spectrum, I’ll provide a not-so-scientific labeling regarding intended out of the box use, as well as “hardware hackability”. In no particular order…

Chumby

image
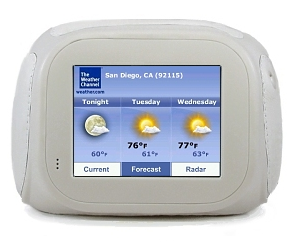
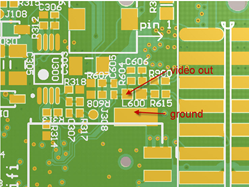
Ah, the Chumby. The internet-alarm clock-information-station does more than just run Linux. With a 3.5” touchscreen, an ARM9, integrated Wi-Fi, and an accelerometer, all wrapped up in a rotund, friendly enclosure, there’s no question that it’s a bona fide consumer gadget. What’s noteworthy is that it’s open source hardware hackable as well, with available schematics, in addition to a wiki where people share hacks like adding a video connector to the chumby One.

Intended Use: Mainstream
Hardware Hackability: Good

image

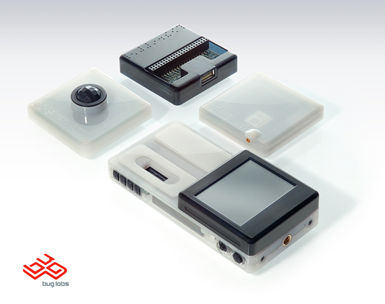
Bug Labs’ BUG

The BUG is an open source hardware platform consisting of modular, functional components. It’s similar to the Arduino in that there is a base + “shield” add-on structure. The BUG platform is Linux-based and driven by an ARM11 processor and has many features comparable to a mobile computer as well as serial interfaces. Each module is encased in a sleek plastic, with a recessed connector for plug-and-play functionality.

imageWhile some of the schematics are available online, the finished casing, lack of exposed circuitry makes it hard to hack, and a basic starter set will run well over $700, so it’s not the most accessible platform for a hacker on a budget.
Intended Use: Professional
Hardware Hackability: Moderate

VIA OpenBook

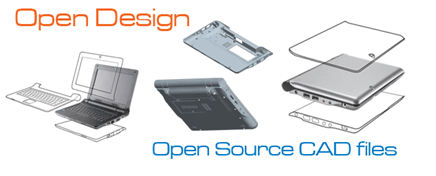
The VIA OpenBook was a concept for an open source hardware netbook released in 2008. The CAD reference design files were shared, and VIA even posted movies where the computer was taken apart “to reveal the internal hardware guts”.

imageThis was especially interesting for me, since I wanted to overclock my HP Mini 311 netbook, and make other mods only previously available to desktops. It would certainly be extremely interesting to have a truly open source hardware computer that I could hack.
Unfortunately, while VIA has long since launched other netbooks, it seems like this was more a marketing attempt than a full-fledged project.

Intended Use: N/A (vaporware)
Hardware Hackability: N/A (vaporware)

NanoNote

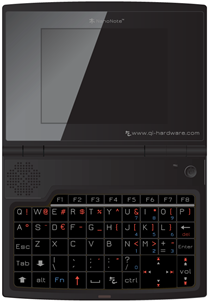
Another interesting project, the Qi Hardware NanoNote, was founded by a set of former OpenMoko employees. Given their experience, it makes sense that this group would come together to launch an open source hardware handheld mobile PC. As customary for open source devices, the computer boots Linux. They’ve also applied an infrastructure by which hardware changes are shared and updated collaboratively, in a manner similar to that found in software.

image

The first edition of the NanoNote is expected to ship in the near future, and hardware information is released under a CC-BY-SA copyleft license. While the open source aspects clearly apply in the development stage, it’s unclear whether the finished device itself will be hardware hackable.

Intended Use: Mainstream
Hardware Hackability: Not expected

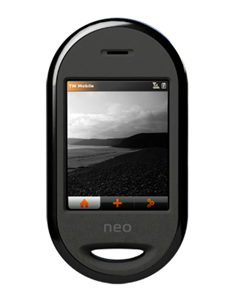
OpenMoko Neo FreeRunner

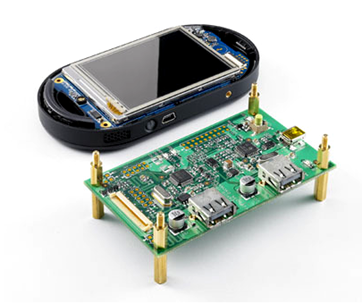
imageFinally, OpenMoko’s Neo FreeRunner is the classic example of the open source, finished, consumer gadget that “made it” from a vaporware concept, to stylized Blender/CAD images, to a real, physical device. The open source smartphone has sold 10,000 units since its July 2008 launch runs Linux and Google Android. Not only is the software and firmware open source, however, the hardware schematics are available, and the $230 device is sold with a separate “DBoard” for debugging. Full-on hardware hackability, for an extra $99. Hardware hacking at a premium? Perhaps there is a business model after all, but that’s a story for a different day.
Intended Use: Mainstream
Hardware Hackability: Excellent (see picture below)

image

These are five examples of projects taking open source hardware to a new level. Rather than “raw” electronic kits that hobbyists assemble to use, these products aim to blend principles and practice of open source hardware with consumer, off-the-shelf usability.

I’ll close with a couple thoughts that came to mind while reading about these projects. Consumer open source hardware can mean multiple things:

1) Hardware that is built collaboratively, and in an open source way, but produces a finished device whose hardware is not meant to be altered

2) Hardware that is finished, but reference designs and schematics are shared for future use and innovation

3) Hardware that can be used and customized however the consumer wishes: from no modifications at all, to circuit bending, trace cutting, resoldering, and hardware level, physical hacking

I think it is the last one that the electronics world is missing. If open source hardware is fundamentally about letting the customer truly “own” the device, it’s important for that device to be accessible at a mainstream, usable off-the-shelf level (to become widespread), but also designed to be completely hackable for whatever purpose the customer intended.

It doesn’t have to have rough circuit boards, nor does it have to be the latest sleek device designed by IDEO. It’s about giving the user control and freedom to use the product at any level.

I wonder why there aren’t more open source hardware consumer gadgets out there. Perhaps it’s a blend of hackable and finished that doesn’t currently exist, but browsing the outputs of the latest CES, there’s a wealth of devices that could really use some open counterparts.

Monday, January 18, 2010

IXM Robust Computing Research Linkfest

Dave and the students and researchers taking his class on "robust physical computation" have been really busy recently, hacking the IXM and learning about robust computation theory and applications. I've been getting more and more emails about the IXM, parallel systems, and multi-processing, so I figured it would make sense to pull together a post about a bunch of links that I've been collecting.

EDIT: I just found this video, and it's so cool I had to swap it out...


Here's a video by Dave on "living computation"
http://livingcomputation.com/

Here's a link to the UNM course page
http://www.cs.unm.edu/~ackley/491/

It contains a fair number of quite conceptual and research-oriented papers and readings, for anyone interested in really diving into the concepts behind why robust computing is so important, and where it's all heading.
http://www.cs.unm.edu/~ackley/491/

Some of my favorite reading is by Von Neumann (pdf alert).
http://www.cs.unm.edu/~ackley/491/papers/vonneumann1951-glta.pdf

The class had a wiki with some basic up-and-running sketches to run on the IXM
http://robust.cs.unm.edu/doku.php

Here is a direct link to the tutorials that Dave and the class wrote describing how to get the IXM up and running with some basic robust computational concepts
http://livingcomputation.com/s/doc/Tutorials.html

Some of my favorites include his tutorial on an embedded system parallel message passing sketch. This is one of my favorites because such a complex topic is boiled down into such a simple set of programs and metaphors.
http://livingcomputation.com/s/doc/pingpong_8cpp-example.html
http://livingcomputation.com/s/doc/forward_8cpp-example.html
http://livingcomputation.com/s/doc/log_8cpp-example.html

All of the parallel and robust systems data structures and classes, in one place. This page literally contains everything someone would need to learn about the inner workings of parallel and multi-processing systems. Impressive.
http://livingcomputation.com/s/doc/annotated.html

Plenty of low and high level code examples.
http://livingcomputation.com/s/doc/examples.html

The students and researchers that took Dave's class uploaded some projects that they built on top of the IXM. This is a blog post in an of itself, soon to come.
http://robust.cs.unm.edu/doku.php?id=project_pages

Here's even a Java emulator of the IXM (by Daniel), although I haven't played around with it (yet).
http://www.cs.unm.edu/~ackley/491/dan/IXM.jar

Friday, January 15, 2010

Learning How to Hack Games with Arduino Asteroids

What would you get if you crossed 7 minute abs with DIY and Open Source and a retro gaming tutorial? I don't know, but it sounded a lot better when Chris and I were talking about project ideas last week... we were reminiscing about how in middle school I bought a bunch of books filled with hollow promises that claimed to be able to teach game programming in 1 hour, 12 minutes and 22 seconds. Flat. No one ever learns game programming this way.

I think you learn game programming by taking something open source, and tweaking the settings around until you get more and more comfortable with the concepts. I like to think this is like physical computing meets programming. I learn a lot better by taking apart than by building, so this guide is intentionally written backwards. Instead of building from the "ground up," by learning all the painful parts of programming slooooowly, the steps are written by getting quickly to the end, and then "tearing it apart top down" like the way a reverse engineering hacker would think about it. I don't know, I just think better that way. Maybe I don't have the attention span to write line by line of code following a 500 page book. Thiiiiiiiis iiiiiiis hooooow yoooou maaaake an intttttteeeeggggerrrrrrr hellllllllloooooooo wooooooorrrrlllllllddddd (like whale speak from Finding Nemo).

So here goes my annotated tutorial on how to build your own DIY Handheld Asteroids Game.

Here's a little video and picture of the finished product:


Step 1: Assemble the Hardware

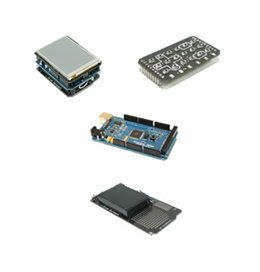
The nice thing about Arduino's, are that they interface to just about anything. You can make buttons out a pieces of wire, potentiometers, or whatever. Sometimes, you just want something quick and dirty, other times you want lots of features. I like features. So I used a Arduino GamePack for this project:
I could also use the MegaPalm (which is like the GamePack but uses the Arduino Mega instead):
For the sake of simplicity, the code samples and such are going to use these parts. But once you get the hang of it, the circuit could easily be adapted to use any other open source hardware you wanted, naturally...


Step 2: Get everything up and running

Connect the hardware together to make the physical device. In this case, that means connecting the Arduino and Lithium Backpack to the backside of the ExtenderShield, and then popping the TouchShield Slide and InputShield onto the top of the ExtenderShield.

What do all the parts do?
The game code runs on the TouchShield Slide. The TouchShield is like a graphics card and display for Arduino-based gadgets. It runs a small program that is written in the Processing graphics programming language.
The InputShield has a joystick and some buttons. When you press them, they shield changes the digital and analog pins on the bottom of the shield to different values, so you can read them with an Arduino and tell which direction the joystick is pointing, and which buttons are being pressed.
The Arduino constantly polls and reads the joystick and button's values, and determines which direction the joystick is being pressed or which buttons are being held.
The ExtenderShield connects the Arduino, TouchShield, and InputShield together. It replicates the pins so you can connect the shields together.
The Lithium Backpack provides power to the gadget so that it's portable.

How to program it?
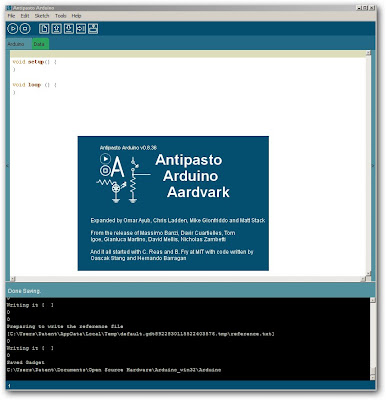
Make sure you have the latest version of the Antipasto Arduino IDE for Windows or Mac (email me for linux), which is downloadable from the Open Source app store.
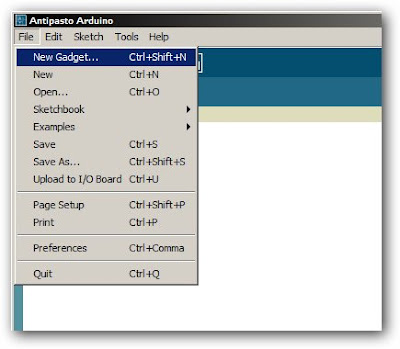
Use File menu -> New Gadget, name the gadget "Asteroids", and then click save:
The gadget file let's you program different Arduino shields and modules at the same time quickly, all in one place. It's a branch of the main Arduino IDE. Now, add the Arduino module and the TouchShield module by clicking the plus sign in the pop-out drawer on the left side:
Click the Arduino, and then copy and paste this code, and program it to the Arduino:


#include <afsoftserial.h>
#include <inputshield.h>

#define RX_PIN 3 /* TouchShield's Tx Pin */
#define TX_PIN 2 /* TouchShield's Rx Pin */

/* Create a serial connection to the TouchShield */
AFSoftSerial mySerial = AFSoftSerial(RX_PIN, TX_PIN);

/* Create InputShield on modes A and pass it software serial */
InputShield inputShield = InputShield(0, mySerial);

void setup() {
}

void loop() {
inputShield.SendHardwareState(mySerial);

delay(100);
}


Then, click the TouchShield icon on the left, and copy and paste the code in the file called "MegaAsteroids_TouchShield_Code.txt" in the file downloadable here, and program it to the TouchShield Slide:
Then turn the power on and off to the GamePack by flipping the power switch on the Lithium Backpack, and the game is up and running...


Step 3: Tear the code down into its main parts

Ok. Clearly, all the fun happens in the TouchShield Slide code section, and it's written in Processing. If you're not familiar with Processing, here's a great overview of all the graphics functions available. Mark has pretty systematically ported almost all of the graphics functions onto the TouchShield...

So the code has a few major functions that matter:

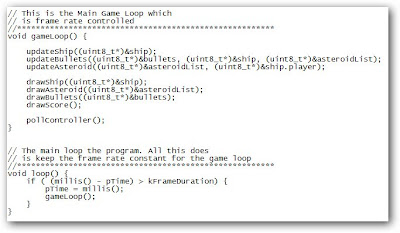
gameLoop() - the function that updates and draws the ship, bullets and asteroids on the screen. It just calls other functions that do all the work, and just sits around looping, hence the name "loop".
readInputShield() - this function grabs all the code from the Arduino and InputShield. You don't have to worry about this one, it just works.
setup() - configure the background of the screen.

updateAsteroid() - a psycho-crazy function that updates all the asteroids' locations based on their locations.
drawAsteroid() - actually draw the asteroids, drawing all of them

updateShip() - a cool function that updates the ship, and takes into account which way it's facing, and which way it should turn based on values from the InputShield
drawShip() - this function actually draws the ship

updateBullets() - a function to update the position and location of the bullets that shoot at the asteroids.
drawBullets() - a simple little that erases old bullets and draws new ones elsewhere

There are 3 main things in the Asteroids game: asteroids (duh), a ship (naturally), and bullets (a lot of people forget that these are their own thing). Each has a function to update the position, and draw or update the drawing of each.

If you're just starting out, each of these functions might be a little over your head. In my opinion, that's at least a lot better than being placated with stupid little hello world programs that leave you scratching your head wondering, "great, why did I buy this book again?"


Step 4: Find the Important Pieces of Code

The trick to learning how to change code's behavior is actually first in learning where to spot the fun parts of the code. Great programmers (e.g. not me) that I know can just pop open a massive source code file, and skim through it and immediately know where all the cool functions and critical variables are going to be. It's almost like a 6th sense.

Where are the cool parts of code that are going to help you change the behavior? Here are some..

This is the header section, where global variables get defined - it's usually at the top:

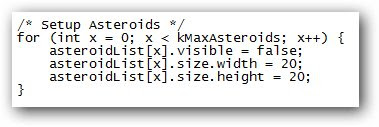
This code initializes the asteroids and sets how they are:
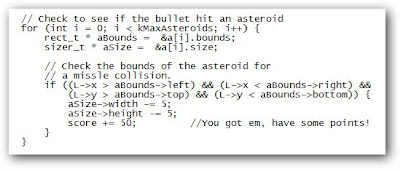
This is the collision code that checks for whether the asteroid got hit by a bullet:
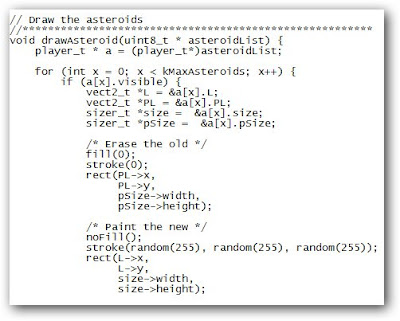
Here's the code that draws the ship:
...and the asteroids:
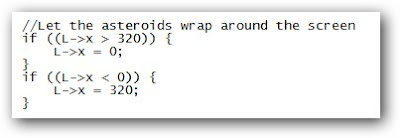
This code makes the asteroid wrap around the screen:

Step 5: Change the behavior of the game

Once you've figured out the cool parts of the code, now you're ready to change the behavior of little parts of the program, one at a time. Every time you change a feature, you get more and more comfortable with how the game works. Change the feature, recompile the code, send it down to the TouchShield, and see how it affects the game play.

For instance, kMaxAsteroids is the maximum number of asteroids to have in the game. It's currently set to 10. What happens if you set if to 5? Or 7?

What if you change the width to 40, and height to 10?
Now, let's do comparisons. This code checks for what happens when a bullet is within the bounds of the box formed by the asteroid. The part that matters is the if ((L->X > aBounds->left... part:
Try deleting or commenting out all the code from everything inside the if statement, like so:

//aSize->width -= 5;
//aSize-%gt;height -= 5;
//score += 50;

Now, when you shoot an asteroid, nothing happens. Ok, now for some fun, put those lines back in, but this time, change them to += 5 instead of -= 5:

aSize->width += 5;
aSize-%gt;height += 5;
score += 50;

Now, when you shoot the asteroids, they get bigger, not smaller... ok, you just learned variable setting and comparisons, and incrementors, and all kinds of stuff that has long names that don't matter as long as you know how to change the size of asteroids now :-)

Now, try changing the color of the ship. Instead of stroke(255), which is white, make it stroke(255,0,0), which is red:

You can do the same thing here, too, and the color of the asteroids could be changed to stroke(0,0,255) to make them blue.
Finally, here's the code again for the asteroid wrap-around-the-screen effect:
Instead of making the asteroid wrap, make it adopt a new random direction, which will make asteroids freak out every time they hit the edge of the screen (which is fun).

Replace:

L->x = 0;

with:

a[x].rotation = random(50,130);

...and replace:

L->x = 320;

with:

a[x].rotation = random(50,130);


Step 6: Build your first cheat code patch!

Let's be realistic. The real reason anyone first learns how to program is to hack their favorite game so they can get a higher score and be "that guy" in math class and at lunch with the highest score. Anyway, this may be the first official ARDUINO CHEAT CODEZ!!!!111 ever. This is a proud day for all Arduino hackers...

See that little line there that says score += 50. What happens if you change it to 5,173 instead of 50. Why 5,173, you ask? Because if you set the score incrementer to a big whole number like 5,000, it'll be obvious as you're playing that you're cheating the score. But if you make it a fancy number like 5,173, no one will notice, and it'll look like your score is going up naturally, just really fast. Clever :-)


Conclusion

So there you have it. An Open Source Asteroids game for the Arduino, written in Processing, and a short tutorial that teaches game hacking. This is the guide I wish someone had written for me when I was first learning programming. All I wanted was a step by step guide for how to hack games, and play around with them.

Arduino TouchShield Slide Asteroids from Matt Bitz on Vimeo.


Monday, January 11, 2010

A Digg Button for the Arduino

After Chris uploaded the TButton library, he and I got to talking about what other button apps would be neat to pull together for the Slide. With a little inspiration from Ladyada’s Digg Button (thanks Limor!), Chris and I started writing an Arduino-based Digg Button for the TouchShield.

Digg button kit - Click Image to Close

I guess it’s a little ironic that a completely virtual, digital button on a website became a distinct physical button on a dedicated device…and now I’m turning that physical button back to a virtual one- but still on a dedicated device. Well, here goes!

SONY DSC

Mark, Thom, and Alain all used image-based icons as buttons, which is the first thing I decided to do. So I went over to Digg

image

…zoomed in, and used WinSnap to grab the screenshots of the iconic Digg button into a bitmap for the counter:

digg1

and the “digg button” itself:

digg2

These are the exact bitmaps I used, so they’ll work perfectly when placed in the same folder as the Gadget file, or where the code is located.

Using the latest Antipasto Arduino IDE, I coded the following and uploaded it onto the TouchShield Slide.

Antipasto Arduino Slide Digg Button Code

The first chunk uploads the two images to the slide, and sets the rest of the background to white:

PImage digg1;
PImage digg2;
int count = 0;
POINT p;

void setup() {
    digg1 = loadImage("digg1.bmp");
    digg2 = loadImage("digg2.bmp");

    background(255);
    image(digg1,80,0);
    image(digg2,80,160);
    drawNumber(count, 120, 35);
}

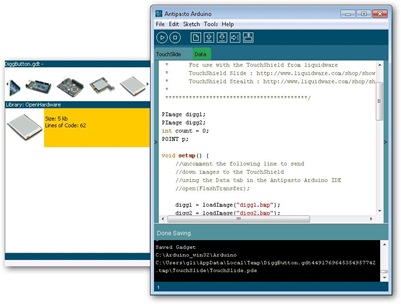
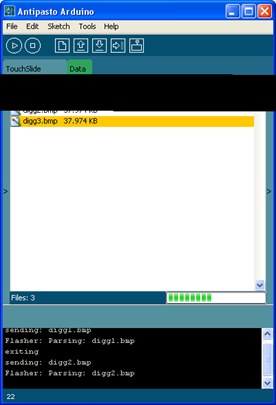
Here’s what it should look like when the pictures are uploading correctly: DiggButton_IDE_Screenshot_uploading_images

Then I added a few lines to pick up the button presses, and have that increment the counter accordingly.

void loop() {
  if (touch_get_cursor(&p)) {
    count++;
    drawNumber(count, 120, 35);
    delay(50);
  }
}

Finally, the last part of the code reads out the state of the counter in 7-segment font.

void drawNumber(int number, int xPos, int yPos) {
  int counter;
  int16_t h,t,o;

    h = number / 100;
    t = (number - (h*100) ) / 10;
    o = number - (h*100) - (t*10);
    stroke(115, 105, 38);
    fill(255,241,159);
    if (h) {
       Display7SegmentDigit(xPos,yPos,h,25);
    }
    if (t) {
    Display7SegmentDigit(xPos+32,yPos,t,25);
    }
    Display7SegmentDigit(xPos+32+32,yPos,o,25); 
}

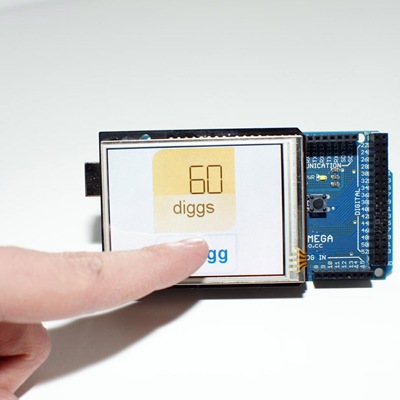
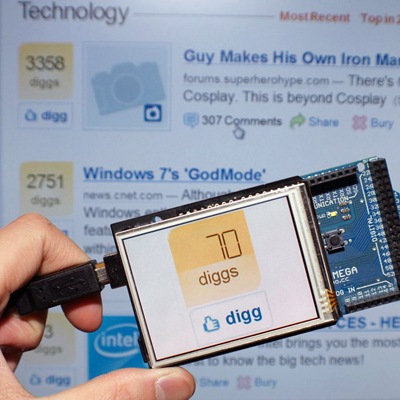
The finished project looks something like this:

SONY DSCSONY DSC

And here’s a video of the whole thing in action:

It’s a simple project to get started on using images as buttons on the Slide. The full code can be downloaded over at the App Store.

Friday, January 8, 2010

Open Source Hardware Book Volume 2 - Table of Contents Sneak Peek

Justin, Tristan, Paul and I have been writing up our notes from our interviews and coffee discussion over the past couple of weeks. I think we've finally settled on an official table of contents that covers all of the topics we've heard and talked about.

I tried my best to schedule discussions over the phone, and when that didn't work, over email, with as many people as I could find who had interests in Open Source business, economics, intellectual property, and theoretical experience. This included people in small and large companies, educational institutions, academic research and think tanks, and even some government strategists. Justin's been talking to people around the world, almost all day long for the past 2 weeks straight.

I didn't expect there to be so many people thinking about Open Source Hardware, but I was wrong. It's funny how little gets captured on the web sometimes, despite the vast numbers of blogs, wikis, and forums. In the Internet era, I can vouch first hand for the fact that a lot of the best thought on Open Source Hardware (on economics and business models) is offline, off the web, and off blogs. I've had to really dig around to collect it all together in one place.

That's where the book comes in.

The first volume, titled "Open Source Hardware Volume 1" was about introducing projects people could do when they first picked up an Arduino and wanted to learn how to program and code it. It taught about transparency, openness, modularity, and re-usability of hardware components. "Open Source Hardware Volume 2" is a different kind of book. While there are many books out there that examine and dissect the nature of the software and tools that allow people to build Open Source Hardware, there hasn't been nearly as much discussion about the fact that hardware and tinkering in the "real world" with real components costs "real" money. So this volume is about the economics side of Open Source Hardware, and about the "business models" people are experimenting with.


The book isn't for everyone. It likely isn't going to teach anyone Justin or I interviewed a tremendous amount they didn't already know. Instead, the book is meant for all those new folks coming on the field, or people who are really interested in the theory and concepts behind Open Source Hardware. It's also meant for anyone who's trying to build and distribute Open Source Hardware to the community.


Without further ado, here's the table of contents. If you think there's something missing, please email me, and Justin, Tristan, and I will try to incorporate some materials into the book, or readjust the chapters... (it's structured like a 5-act play, or opera). First, here's the high level book structure:

Overture: The Backdrop
Act I: Cast of Characters
Act II: Open Source Strategy
Interlude: A Day in the Life of a Hardware Hacker
Act III: A Hacker in King Arthur’s Court
Act IV: The Macro Economic Time Machine
Act V: Deus Ex Machina
Curtain Bows: The Future of Open Source Hardware

...and here's the full set of subchapters and subsections...

Overture: The Backdrop
About this Book
What is Open Source?
Open Source Software vs. Hardware
The 9 Schools of Open Source Hardware
Open Source and Intellectual Property
The Limitations of Intellectual Property
Enforcing Open Source Rights

Act I: Cast of Characters
Let’s Meet the Soprano
Introducing the Chorus
The Tangible Man Month
The Great Economic Divide
Does Open Source Hardware Scale?
A Grand Unifying Theory of Information Rights
Not All Licenses Are Created Equal
Open Source Hardware Business Models
Innovation and Open Source

Act II: Open Source Strategy
Enablement and Open Source Hardware
Shaping the Landscape 1 Project At a Time
Herding Cats and Hackers
Where is Silicon Valley Hiding?

Interlude:
A Day in the Life of a Hardware Hacker

Act III: A Hacker in King Arthur’s Court
The DIY Budget and the Quantity Monopoly
Capital Expenditure and Inventory Challenges
Marketing Open Source Hardware
Non-Zero Cost of Replication

Act IV: The Macro Economic Time Machine
Innovation and Openness
Open Source and its Discontents
Open Source, the Unknown Ideal
The Economic Commons

Act V: Deus Ex Machina
Capital Experiments and the Invisible Hand
Freetarded: Why Free Hardware Isn’t the Answer
Open Source Hardware Strategy and Strategies
The Silicon Generation Meets the Web Generation
The Role (or not) for Venture Capital
Micro Competition

Curtain Bows: The Future of Open Source Hardware
Challenges and Threats to Open Source Hardware
A Roadmap of Open Problems: Where are the Tools?
The Future of Open Source Hardware

Now that that's out there, it's time to get back to writing... right now, the book is one target to be over 200 pages... and climbing.

Oh and one more thing, if you want to be the first to know when the book is done, just email me at inthebitz at gmail.

Thursday, January 7, 2010

Antipasto Arduino 0.8.38 Released with Slide Button Library

I just released the latest Antipasto Arduino for Windows, Linux, and Mac OS X x86. The IDE is available for download on illuminatolabs.

Along with a number of code "housekeeping" updates, there were a couple larger changes:

The antipasto_arduino repository is located on github.

Chris added the TButton library after several people asked about projects that use the TouchShield Slide as a menu system. Writing code for custom touchscreen buttons was part of what made the TouchShield so useful (instead of having real buttons), and it was actually something that came up quite some time ago. Actually, Matt and I remixed the original BitDJ code to create a TouchShield app to make breakfast.

clip_image002

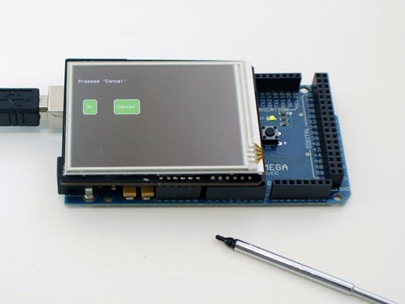
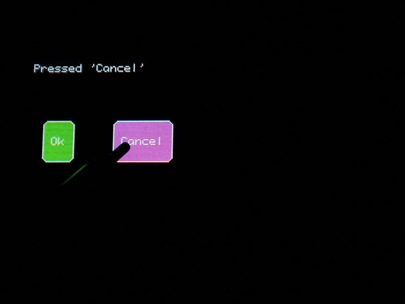
Here’s the simple ButtonDialog example I’ve included:

SONY DSC

SONY DSC

And this is the code:

#include <TButton.h>

TButton ok = TButton("Ok",20,80);
TButton cancel = TButton("Cancel",80,80);

void setup() {
  ok.Paint();
  cancel.Paint();
}

void loop() {

  if (ok.GetTouch()) {
    stroke(255);
    fill(0);
    text("Pressed 'Ok'    ", 10, 30);
  }

  if (cancel.GetTouch()) {
    stroke(255);
    fill(0);
    text("Pressed 'Cancel'", 10, 30);
  }

}

Of course, TButton is just a basic library to make it easier to get started with menus. I think the next step is to make it easier to crop and upload images as buttons, much like Alain’s ArdTouch project that mimics an iPhone interface. I’d love to check out other cool Slide menu projects and code too – jhuynh at gmail

SN3B0101.jpg

DSC05647.JPG

Tuesday, January 5, 2010

How OLEDs work ... optically speaking

I got the funniest question a couple of days ago from a tech science teacher who is using the TouchShield Slide with her classes to teach about how technology works. Actually, for the actual class she uses a demo kit from the OpenBerry pack, with some custom code I wrote for her that says funny messages about her classroom.

She told me that some of her students asked how different colors worked on the TouchShield, like how does it display 1000's or millions of colors? Funny you should ask :-)

I just so happen to have a microscope at my day job that I can borrow and use from time to time, so I did... and this is what you see underneath it:

That's a start... this is a passage from the bible, actually (I know, I'm not too religious personally, but she teaches at a Cristian middle school so I figure it's appropriate, plus Tim Tebow is religious so that makes everything ok because he's ridiculous... but I digress). For the more agnostically-inclined, here's a picture under the microscope of "Hello World" in blue too:

From here, everything clearly looks bluish in color. Actually, this is a picture of the TouchShield Stealth (since the full Slide wouldn't fit under the microscope).

Now, if I zoom in to the "world" part, all the fun happens:


Here you can see clearly the different segments for Red light, Green light, and Blue light.

Everyone always says "RGB" and I used to wonder why... well, here you can see how and why: because each single pixel is actually 3 little bars of organic substance that glows when electrical current is passed through to it. Those three little bars are made in 3 colors: red, green, and blue.

Why those 3 colors? A couple of reasons, as far as I can tell. First, because those colors are the fundamental colors of the light wheel which basically says you can create any color through a combination of reg, green, and blue lights):


There is a much better writeup on that concept over here so I won't try to recreate the wheel... the "color" wheel if you will... buh dump chhh.... ehhhhh I know...

Back to the point, those 3 segments form red, green, and blue light, and better yet, they're controllable. There's a tiny circuit underlying each little colored bar that controls how much current gets to the light cell. A really good color display has 256 stages of brightness increments that can be controlled programmatically.

Math time... so if there are 3 bars of light, and each bar of light can be controlled to one of 256 stages of brightness (actually, 255 stages of brightness levels plus 1 level for "off"), how many different combinations of brightness can be achieved?

256*256*256 = 16,777,216 different colors

Most people just abbreviate this as "16M" of colors for 16 million colors, even though technically there are more than that. On the old Mac OS's, they used to just call this "millions" of colors, because no one wants to be "that guy" who's like "errr... technically there are 777,216 more that you're forgetting about".

Coincidentally, that what HTML is designed to support, and that also what the Processing language is designed to support, with functions like fill() and stroke() that are set to take an RGB value, like so:

fill(255,0,0)

This makes red, because it says, "set red to full brightness level 255 and set green to 0 brightness (aka off) and set blue to 0 brightness (aka off)"

stroke(0,255,0)

This makes green.

fill(0,0,255)

Blue.

Why 256 colors (255 plus 1 for off)? I don't know. Technically, it's convenient because 255 is 2^8. And 8 is the number of bits in a byte. Technical guys don't like to say 8 bytes, they like to say "24 bits of color" to sound more impressive, but it's the same thing. Which means an RGB color can be stored in just 3 bytes. When web coders write:

#33FF00;

...to represent a color, they're actually saying, "33 in hex is 51 so set red to brightness level 51, FF in hex is 255 so set green to brightness level 255, and 00 in hex is 0 so turn off blue."

And sure enough, there's even an online color wheel that I've always used when writing TouchShield and Arduino gadget apps, perhaps because it updates instantly... it's over here:

And that's a really really simple, abbreviated version of how the TouchShield Stealth and Slide make tons of different colors on their OLED displays, in case anyone besides a student taking this class is wondering... and had about 15 minutes of time to spare :-)


Monday, January 4, 2010

Open Source Hardware, Gadgets, and a StickyNote App

I promised that I'd have more time than normal this past week, and it turned out to be true. I've been making lots of progress writing up my notes from my interviews on Open Source Hardware, and more importantly, I've had time to write some new code... like this blog here...

If Open Source Hardware is to succeed, it's going to be because it allows everyday hackers to build things, like gadgets, faster and cheaper than they could the "traditional" way. By traditional way, I mean the sell-your-soul-to-a-large-company-by-signing-up-for-a-crappy-2-year-contract-thinking-that-there'd-be-an-app-for-that-only-to-realize-that-the-apps-are-all-closed-source-you-can't-run-your-own-code-without-violating-the-warranty-and-the-AT&T-network-is-slow-and-sucks.

There are problems with the old model. One problem is that closed and proprietary are meant to protect the average consumer from screwing up their devices, invalidating their warranties, and costing companies $$$ in tech support fees. That may have been the case 15 years ago, but is it still the case today?

I just came from visiting my family, and the elders were talking about CDMA vs. G3, the children were scrambling around the tree looking for properly set voltage wall-warts, and the mothers are talking about how BluRay format is sharper but the density of the media suffers, and even the family toddler was crawling around with a blackberry that he pressed to make the screen glow.

The "average" is definitely getting more tech savvy.

Here's a very specific example: my cousin is 12. She has jailbroken her iPhone because "all her friends at school are doing it." A 12 year old girl is breaking the law, because it's socially acceptable to be a hardware/firmware hacker. Of course she probably wouldn't call herself a "hardware hacker", but the point is:

Jailbreaking an iPhone is a gateway drug to Open Source Hardware.

One minute you're thinking, "I wish I could make this device work differently," and the next minute, you're thinking, "I wish I could make it run different code, I wish I could put another button on it, I wish I could put a bigger storage drive on it, I wish it had a different wireless protocol with longer range."

Well, it's not going to happen instantaneously, but I think we're getting there. I tried a little experiment... I've always wanted to make myself a desktop digital sticky-note application, but never had the right parts lying around to pull it off. I timed myself in trying to figure out two different ways to do it:

1) Use Open Source Hardware and Software modules based on the Arduino (e.g. what I'm used to)
2) What it would take to write the same program on my^D^Da jailbroken iPhone

It didn't take long to figure out that the easiest way to go is with the commercial SDK. The jailbroken way is really messy, and would take months. Meanwhile, I took some of Chris' old code, and made my Arduino-based stickynote program in 2 hours and 15 seconds, flat.

Now someone else could take the code, and since it's open source, they could tweak anything they wanted in seconds, and have a perfectly customized Arduino-based StickyNote app :-)

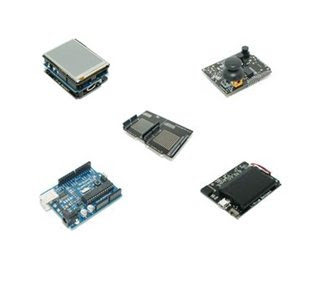
Here's a picture of all the modules, including an Arduino, a TouchShield Slide, a ButtonShield, an ExtenderShield, and a Lithium Backpack:


This is a picture of me holding the finished gadget:

I color-matched the StickyNote app to perfectly match the Arduino IDE:

Here's a shot of the StickyNote app with the lights turned off, so that the OLED is illuminated:

I've uploaded all the code to the Open Source "App Store" over here. The major function is the part where the key presses get translated from the ButtonShield to the Slide, with this code:


if ((pTime-lTime)>300) { //"debounce", e.g. wait a little bit

if (myButt == 0) {
sprintf(out,"",myButt);
} else if (myButt == 61) {//newline
lTime = pTime;
pouty += 1;
poutx = 1;
} else if (myButt == 63) {//space
lTime = pTime;
poutx += 1;
} else if (myButt == 62) {//popup keyboard display
lTime = pTime;
if (keyout) {//hide the keyboard
fill(33,104,134);
stroke(33,104,134);
rect(1,190,320,190);
maxrows = 24;
keyout = 0;
} else { //display the keyboard
fill(4,79,111);
stroke(4,79,111);
line(0,190,320,190);
rect(0,190,320,190);
maxrows = 18;
stroke(0,0,0);
for (int i = 97; i<123; keyout =" 1;" ltime =" pTime;">
Here's a video walkthrough: