The past week, I've been really busy. To begin with, I'm rushing to build everyone's TouchShields that have been ordered over the last couple weeks since the store was sold out. Justin, Mike, and I have been soldering up a storm, and testing connections, cables, you name it.
Also, I've been really busy hacking out some code for VGA, RFID, and USB. The idea is to make a fully self-contained, Arduino powered laptop with all those inputs and outputs... and I'm definitely trying my hardest to stand on the shoulders of others:
I really like Limor's data logging shield, but I think it'd be really useful to find a way to data log onto a USB drive too, since that's how I store most of my data. I also think the VGA code work is pretty cool, though it looks like there's still some ways to go before anyone hacks out small pixels. Of course, a number of folks have hacked the Parallax RFID reader, so I'm going to see if I can use some of that code too. Anyway, it's going to be a busy set of weeks, that's for sure!
Monday, October 13, 2008


Sunday, October 5, 2008
Hacking the Esquire cover e-ink screen with the Arduino

Last month, Esquire magazine published a cover that contained an E-ink screen. I was really looking forward to it, actually... so much so that I marked it in my calendar to make sure I picked one up around the corner. There was quite a bit of hype about it, and a lot of people wrote about it on their blogs and websites, and Esquire even encouraged hackers (does that include me?) to play around with the screen. The local store had a couple of copies left over this past week, so I grabbed one, and decided to see what I could do in a couple hours of playing around.


Of course the first thing I did was rip off the cover:

I noticed that the cover was a folded-over piece of card stock, so I pried it open:

The funny part was that it kept on blinking even as I took it apart... felt a bit like the scene in 2001 A Space Odyssey when the guy unplugs Hal:

This is the back-side of the device:

And this is what the front side of the PCB board looks like. The components have been identified on other sites, but suffice to say there are a lot of batteries, two shift registers, and a small PIC chip that runs the program.


I knew within a few minutes of looking at the board that I could either approach this one of 3 ways:
1-Hack the PIC chip, perhaps by reprogramming it
2-Hack into the shift registers, by cutting the input line, and taking them over... but what if they're held in some level by the PIC chip, and there's a via under the chip that I miss?
3-Hack directly into the screen (hoping that there protocol and voltage isn't too difficult to work with, and that I can safely bypass the rest of the circuit with little to no consequences).
I chose method 3, because it seemed like the most straightforward, and the one I could probably get right on the first try. The cable to the screen had 12 wires, and the PCB had resistors lined up in two rows after the connector. I soldered solid-core wire directly onto the small round pads the PCB designers left for me (thanks, guys!), in perhaps the world's sloppiest, hackiest, and odd-looking design ever. Actually, I took a perspective photo of it below, and I think it came out pretty nice!

I connected the wires from the PCB onto a white mini-protoboard - mainly because of the fragile nature of the PCB-solid core soldering job I did. Even a small jostle would disconnect the wires from the PCB, and I knew I'd be rearranging the wires quite a bit as I discovered which lead was ground, or how they were wired up. I tried a few configurations, including assuming ground was in the middle, far right, or far left of the connector. I found that by applying +5 to one lead, and 0 GND to the ground pin, I could turn a segment on. Then, I found that by applying 0 GND to the lead, and +5 to the ground pin, I could turn the segment back off. This is the same as saying the screen accepts +5 to -5 voltage as it's range, where +5 turns it on, and -5 turns it off. Ugh. That means it'll be a little tricky to work with, but I've seen worse!


Ok, so I was fairly proud of my soldering job, so here's another shot of the wires:

I connected the ground pin to the Arduino pin number 2, and all of the other pins on the first row to Arduino pins 3-7, and the second row from 8-13. I wrote a small piece of code to turn the pins on and off:
void turnon(int pin) {
digitalWrite(2, LOW);
digitalWrite(pin, HIGH);
}
void turnoff(int pin) {
digitalWrite(2, HIGH);
digitalWrite(pin, LOW);
}
After a little experimenting, I mapped each of the connector wires to the segments on the screen:
pinMode(3, OUTPUT); // the 21st century
pinMode(4, OUTPUT); // now
pinMode(5, OUTPUT); // right bar
pinMode(6, OUTPUT); // center bar
pinMode(7, OUTPUT); // boxes around now
pinMode(8, OUTPUT); // right box
pinMode(9, OUTPUT); // background
pinMode(10, OUTPUT); // begins
pinMode(11, OUTPUT); // left box
pinMode(12, OUTPUT); // left bar
pinMode(13, OUTPUT); // middle box
And of course as soon as that was done, I was ready to go... I wrote a small night rider script, and then rewrote it to run on a black background:
void barnightrider( void) {
turnoff(5);
delay(t);
turnon(12);
delay(t);
turnoff(12);
delay(t);
turnon(6);
delay(t);
turnoff(6);
delay(t);
turnon(5);
delay(t);
}
void barnightriderblack( void) {
allon();
delay(t);
turnon(5);
delay(t);
turnoff(12);
delay(t);
turnon(12);
delay(t);
turnoff(6);
delay(t);
turnon(6);
delay(t);
turnoff(5);
delay(t);
}
And then I played around with the text code segments:
void centurynowcycleblack(void) {
allon();
delay(t);
turnoff(3);
delay(t);
turnoff(10);
delay(t);
turnoff(4);
delay(t);
turnon(3);
delay(t);
turnon(10);
delay(t);
turnon(4);
delay(t);
turnoff(4);
delay(t);
turnoff(10);
delay(t);
turnoff(3);
delay(t);
turnon(4);
delay(t);
turnon(10);
delay(t);
turnon(3);
delay(t);
}
Finally, I put all the scripts into functions, and combined the functions to run a little version of the playback demo:
Probably the coolest part of all, though, is the fact that when you unplug the Arduino from power, the E-ink screen stays lit or programmed with whatever was on the screen at the time it was unplugged... cool!

A final suggestion for the next time Esquire does this... please give us a dot-matrix version, with individually addressable pixels. If you do, I promise I'll hack it, and make it available to everyone to code, and I think that'll pretty much guarentee that I'll buy about 10 magazines just for myself :)
I've uploaded all the source code over at www.liquidware.org. Have fun!
Tuesday, September 30, 2008
Graphics demo on the Arduino and TouchShield
I just happened to be browsing around the other day, and ran into this pretty insane looking video by cathedrow. I can honestly say this is the most ridiculous program I've seen to date running on the TouchShield. I mean seriously, how on earth did you do that?
That's pretty much the coolest thing I've seen done with an Arduino to date... not worthy :-)
That's pretty much the coolest thing I've seen done with an Arduino to date... not worthy :-)
Sunday, September 28, 2008
Invention lab and project ideas
One of the most interesting emails I've gotten in the last couple days was pointing me to a set of websites with lots of cool gadget and project ideas. Someone mentioned that they thought it would be neat to make the Invention Lab page more like the kind of pages over at Radio Shack and Bug Labs:
Radio Shack Invention Lab
The funny thing is, I must have seen this in passing, but never really spent a lot of time there. There were a couple of pretty interesting projects that I think I'll try to make with my Arduino one of these days... the point would be to prove that you can make a lot of things with the Arduino, and that it really does simplify life quite a bit!
-A solar car
-World's smallest security system
-OBDII MPG Display - Actually, I spent some time learning OBDII a while back, so this one shouldn't be too hard...
-Homeland security helmet - A slight spin on this one that might be fun might be to make a little desktop interface that turns the TouchShield different colors when the security status changes?
-PDA notebook - this one is especially cool looking, so maybe I'll try to compress my Arduino laptop project into a book holder case
Buglabs Idea Management
Someone else wrote in saying I should check out this link... wow! Really cool stuff. I kinda look up to the guys over at Buglabs, since they're a "real" company with real funding, and a huge team of programmers. Anyway, I think it'd be a pretty nice complement to their stuff if the Arduino community had similar gadgets too, like:
-Mesh networking - actually, this one's probably not too hard to do, given some of the cool stuff over at Libelium. I have two of the Libelium Xbee shields right here on the desk, so maybe it's time to try them out!
-Solar panel module - I think solar power is definitely the future, but the hardest part is getting a large enough current to make it useful. Anyway, next time I buy something from digikey or mouser, I'll grab a few panels too.
-Qwerty keyboard - the funny part is that Pete posted this one himself. Hey Pete, feel free to grab some of the code I wrote over here! That should work for any PS2 keyboard (I'm still working on the USB one... let me know if you make anything cool with it).
-Mass storage reader - Hmmm... that's really interesting. I know Limor has hacked out SD access on her media shield... I wonder how hard it would be to make something similar for USB drives, for instance?
So I guess my little "invention lab" online notebook seems pretty lame by comparison to the ones up above, but here are a few things I'm working on:
-Etch-a-sketch project - ever since I was a kid, I wanted to make my own
-Gesture recognition PC input system - this would look so cool controlling Mathematica objects (especially now that Steve Wolfram and team have opened up the GUI for external input sources)
-Motorcycle lap timer - I can't bring myself to buy one of the expensive ones they sell in catalogs, and I feel like I could make a decent one myself now.
-Networked Arduino with token ring protocol
-Stacked RelaySquids - this one just looks cool, and would be neat controlling all the lights in my apartment :)
Anyway, thanks again for all the links and inspiration. What am I doing still typing? I have lots of projects to work on!
Radio Shack Invention Lab
The funny thing is, I must have seen this in passing, but never really spent a lot of time there. There were a couple of pretty interesting projects that I think I'll try to make with my Arduino one of these days... the point would be to prove that you can make a lot of things with the Arduino, and that it really does simplify life quite a bit!
-A solar car
-World's smallest security system
-OBDII MPG Display - Actually, I spent some time learning OBDII a while back, so this one shouldn't be too hard...
-Homeland security helmet - A slight spin on this one that might be fun might be to make a little desktop interface that turns the TouchShield different colors when the security status changes?
-PDA notebook - this one is especially cool looking, so maybe I'll try to compress my Arduino laptop project into a book holder case
Buglabs Idea Management
Someone else wrote in saying I should check out this link... wow! Really cool stuff. I kinda look up to the guys over at Buglabs, since they're a "real" company with real funding, and a huge team of programmers. Anyway, I think it'd be a pretty nice complement to their stuff if the Arduino community had similar gadgets too, like:
-Mesh networking - actually, this one's probably not too hard to do, given some of the cool stuff over at Libelium. I have two of the Libelium Xbee shields right here on the desk, so maybe it's time to try them out!
-Solar panel module - I think solar power is definitely the future, but the hardest part is getting a large enough current to make it useful. Anyway, next time I buy something from digikey or mouser, I'll grab a few panels too.
-Qwerty keyboard - the funny part is that Pete posted this one himself. Hey Pete, feel free to grab some of the code I wrote over here! That should work for any PS2 keyboard (I'm still working on the USB one... let me know if you make anything cool with it).
-Mass storage reader - Hmmm... that's really interesting. I know Limor has hacked out SD access on her media shield... I wonder how hard it would be to make something similar for USB drives, for instance?
So I guess my little "invention lab" online notebook seems pretty lame by comparison to the ones up above, but here are a few things I'm working on:
-Etch-a-sketch project - ever since I was a kid, I wanted to make my own
-Gesture recognition PC input system - this would look so cool controlling Mathematica objects (especially now that Steve Wolfram and team have opened up the GUI for external input sources)
-Motorcycle lap timer - I can't bring myself to buy one of the expensive ones they sell in catalogs, and I feel like I could make a decent one myself now.
-Networked Arduino with token ring protocol
-Stacked RelaySquids - this one just looks cool, and would be neat controlling all the lights in my apartment :)
Anyway, thanks again for all the links and inspiration. What am I doing still typing? I have lots of projects to work on!
Thanks, y combinator!
Wow, I must live in a bubble, but bootload over at ycombinator put a link on the hacker news section about my little project, and I got a lot of emails! I had no idea what Y Combinator even was, but a little research later, I figured out they're a seed stage VC firm (I think). Anyway, it looks like they give money to small teams of smart college guys and recent grads to make projects. Sounds neat :)
I got a bunch of nice emails, and a nice list of cool project ideas too. Also, I saw a comment on the website suggesting I should try to hack together a Frogpad keyboard, so I just bought one and I'll give it a shot! If I manage to get an Arduino reading and writing from a the Frogpad keyboard, I'll be sure to post the source code, and pictures.
In the meantime, I've been inspired to upload a bunch of scans and ideas from my engineering ideas notebook up to the invention lab page. I'm thinking that I'll start posting a bunch of scans for ideas, and based on comments and any emails, I'll try my best to code them and make them real projects (of course it'd be nice to have some help too)!
I got a bunch of nice emails, and a nice list of cool project ideas too. Also, I saw a comment on the website suggesting I should try to hack together a Frogpad keyboard, so I just bought one and I'll give it a shot! If I manage to get an Arduino reading and writing from a the Frogpad keyboard, I'll be sure to post the source code, and pictures.
In the meantime, I've been inspired to upload a bunch of scans and ideas from my engineering ideas notebook up to the invention lab page. I'm thinking that I'll start posting a bunch of scans for ideas, and based on comments and any emails, I'll try my best to code them and make them real projects (of course it'd be nice to have some help too)!
Monday, September 22, 2008
Homemade Arduino laptop / palmtop thingy
This past weekend, I saw a friend with a new eeePC, and I got a bit jealous, so I decided to try to make my own. I'll admit it's not the most advanced thing you've ever seen, and it certainly doesn't run Open Office (yet - ha), but at least it's a start. And I'll have to say it definitely turned more heads at Starbucks than his eeePC when I met back up with him a couple hours ago to show it off :-)
Here's a close-up picture of the Arduino, TouchShield, DoubleWide ExtenderShield, and Lithium Backpack, sitting on top of the Happy Hacker keyboard:
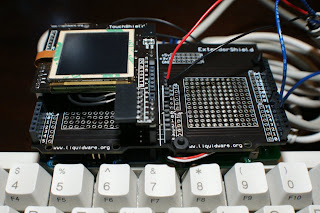
When I turned it on, I could see this faint green glow from the Arduino underneath, which looked really cool:

The Happy Hacker keyboard is a simple PS/2 keyboard (nothing fancy), so it only needed to be interfaced with two pins (Data and Clock), as well as +5V and Ground. You can barely see how I plugged Data and Clock into pins 4 and 5:

And this is my first test, with the text "hello world....":

Here's a close-up picture of the Arduino, TouchShield, DoubleWide ExtenderShield, and Lithium Backpack, sitting on top of the Happy Hacker keyboard:

When I turned it on, I could see this faint green glow from the Arduino underneath, which looked really cool:

The Happy Hacker keyboard is a simple PS/2 keyboard (nothing fancy), so it only needed to be interfaced with two pins (Data and Clock), as well as +5V and Ground. You can barely see how I plugged Data and Clock into pins 4 and 5:

And this is my first test, with the text "hello world....":

And here's a little video of me showing it off :)
Arduino and TouchShield pretending to be a laptop from Matt Bitz on Vimeo.
Arduino and TouchShield pretending to be a laptop from Matt Bitz on Vimeo.
Tuesday, September 9, 2008
TouchShield function reference wiki
Ok, so speaking of things people emailed me about, I've also written up a quick wiki describing the common functions of the TouchShield.
I really like pbwiki, and I think they must have some impressive coding skills to pull off a wiki system that complex all in javascript. Anyway, the real reason I like them is because their font and layout functions are the most like a real word processor.
I made the whole reference completely wikiable, so anyone can chime in and contribute, or add functions they find useful. I don't like it when wiki's are set up by people with lots of complicated user permissions and passwords, and anyway I think that defeats the whole purpose of a wiki anyway. I hope it's helpful!
You can check out the function reference over here.
I really like pbwiki, and I think they must have some impressive coding skills to pull off a wiki system that complex all in javascript. Anyway, the real reason I like them is because their font and layout functions are the most like a real word processor.
I made the whole reference completely wikiable, so anyone can chime in and contribute, or add functions they find useful. I don't like it when wiki's are set up by people with lots of complicated user permissions and passwords, and anyway I think that defeats the whole purpose of a wiki anyway. I hope it's helpful!
You can check out the function reference over here.
What is the projects page all about?
Well, a couple of folks have written in saying they liked the new projects section, and I’m really flattered (thanks David and Jorge)! That was actually the first thing I’ve ever written in Ruby, and I have to be honest… it wasn’t as easy as everyone makes it out to be, and I'd be lying if I didn't have a lot of help. Seriously, maybe it’s because I grew up with the old school linear programming metaphor etched into my brain, but when it comes to Ruby, I really struggled (I mean it’s kinda nifty to write things out like sentences with the object model, but it can get confusing too).
Anyway, in case you haven’t seen it yet, it looks like this:

Anyway, in case you haven’t seen it yet, it looks like this:

I tried really hard to make the colors match. I have to say thanks to my really good friend Matt (no, not me, really, another Matt), who helped me with the graphic design – thanks!
I think the biggest problem is that I couldn't really find something that worked exactly like what I needed. Wiki's were a little too unstructured, and uploading photos can be a pain, most of the source code repositories - even the newer ones - are focused on text, and the description and tutorial part comes later, instruction sites like instructables was the closest for me, but the funny thing is that it's not set up for source code projects... so I guess the answer was to write my own.
I’m going to try to upload all the projects I’ve made with the TouchShield onto the site, since I was running out of places to keep the source code, pictures, and instructions all in one place.
I’m going to try to upload all the projects I’ve made with the TouchShield onto the site, since I was running out of places to keep the source code, pictures, and instructions all in one place.
Friday, August 29, 2008
Burning Man 2009 desktop count-down
Burning Man 2008 week is wrapping up, and I know quite a few folks that consider burning man to be the beginning and end to their year (just about replacing New Years)! So to commemorate the coming Burning Man 2009 year, I wrote a little program on the TouchSheild to count down the days until next time. I hope you enjoy it!

Arduino and TouchShield Burning Man 2009 countdown from Matt Bitz on Vimeo.
Arduino and TouchShield Burning Man 2009 from Matt Bitz on Vimeo.

I've just uploaded all the source code, pictures, and image uploader utility over at the projects page.

For a shortcut, here's the source code for the TouchShield:
Arduino and TouchShield Burning Man 2009 countdown from Matt Bitz on Vimeo.
Arduino and TouchShield Burning Man 2009 from Matt Bitz on Vimeo.
I've just uploaded all the source code, pictures, and image uploader utility over at the projects page.
For a shortcut, here's the source code for the TouchShield:
#include "touchLargeNums.h"
largeNum myFont = largeNum();
POINT p;
unsigned long days;
char out[5];
COLOR c = {236,191,51};
int demo = 0;
int demodelay = 100;
int numpix = 4;
void setup()
{
//uncomment this to stall the touchshield into picture uploading mode
//image_interface_begin();
days = 365;//365;
myFont.setForeColor(c);
numpix = 4;
}
void loop()
{
for(int i=0;i<numpix;i++){
if (i==0) bmp_draw("burn001",0,0);
if (i==1) bmp_draw("burn002",0,0);
if (i==2) bmp_draw("burn003",0,0);
if (i==3) bmp_draw("burn004",0,0);
printbignum(days--);
if (days == -1) {
while(!touch_get_cursor(&p)){};
days = 365;
};
if (!demo) {
while(!touch_get_cursor(&p)){};
} else {
delay(demodelay);
};
}
} //end loop
void printbignum(unsigned int num) {
int len = 3;
//itoa(num,out,10);
dtostrf(num,3,0,out);
//dtostrf((unsigned int)out[1],3,0,out);
if (out[0]==32 && out[1]==32) {
len=1;
} else if (out[0]==32 && out[1]!=32) {
len=2;
}
if(len==2) {
dtostrf(num,2,0,out);
myFont.putst(out,10,15);
} else if (len==1) {
dtostrf(num,1,0,out);
myFont.putst(out,18,15);
} else if (len==3) {
dtostrf(num,3,0,out);
myFont.putsb(out,30,45);
}
}
Glamor shots with the Arduino
 A friend of mine is a photographer, and he and I spent some time together this last weekend. He knows a lot about taking product photos, so he took a few, and taught me some tricks of the trade.
It just goes to show what a decent camera can really do - wow! It almost makes me want one, so I guess I'll have to start shopping around on Ebay for a decent used one :)
This is a shot of me holding the TouchShield with my hand:


Here's the TouchShield, stacked on the Arduino, and Lithium Backpack:

Here's a side shot of the Arduino and Lithium backpack:

And a solitary (aw, so lonely) shot of the Lithium Backpack:

The full photo stream is over at Flickr, if you're interested :)
Thursday, August 28, 2008
How to communicate from the Arduino up to the TouchShield
Chris found a pretty compact way to send data from the Arduino up to the TouchShield. Since more and more projects that I'm building rely on this code, I figured I'd pull it out of the Pin Visualizer project, just to illustrate how it works. At the least, it sure beats trying to manually "bit-bang" across the pins!
On the Arduino, this code sends an unsigned integer up to the TouchShield, by sending the high byte first, then the low byte:
#include //include the serial library
#define RXPIN 3 //set up the receive pin
#define TXPIN 2 //and transmit pin, which will connect to software serial on the TouchShield
AFSoftSerial mySerial = AFSoftSerial(RXPIN, TXPIN); //init the software serial connection
mySerial.begin(9600); //and set the speed
while(mySerial.read() != 'U'); //wait until the TouchShield sends a sync character
unsigned char lowByte, highByte; //define this wherever you want to use the code below
unsigned int val = 123; //this is the value that will be sent
lowByte = (unsigned char)val; //extract the lower byte
highByte = (unsigned char)(val >> 8); //extract the upper byte
mySerial.print(highByte); //send the upper/high byte first
delay(1); //hang on a millisec
mySerial.print(lowByte); //send the low
delay(1); //hang on a millisec
On the TouchShield, this code accepts the high byte first, then the low byte, and then recombines them to make a single unsigned integer:
Serial.begin(9600); //set up the TouchShield serial connection
delay(3000); //and wait a little for the Arduino to boot up
Serial.print('U'); //send a sync character to the Arduino
unsigned int val; //define this variable in the function wherever you want to receive
val = (Serial.read() << 8) + Serial.read(); //read the high first, shift it up, then read the low
//Now you can use the val, which was sent from the Arduino
I hope it works for you! Let me know if you find anything cool to make with it...
On the Arduino, this code sends an unsigned integer up to the TouchShield, by sending the high byte first, then the low byte:
#include
#define RXPIN 3 //set up the receive pin
#define TXPIN 2 //and transmit pin, which will connect to software serial on the TouchShield
AFSoftSerial mySerial = AFSoftSerial(RXPIN, TXPIN); //init the software serial connection
mySerial.begin(9600); //and set the speed
while(mySerial.read() != 'U'); //wait until the TouchShield sends a sync character
unsigned char lowByte, highByte; //define this wherever you want to use the code below
unsigned int val = 123; //this is the value that will be sent
lowByte = (unsigned char)val; //extract the lower byte
highByte = (unsigned char)(val >> 8); //extract the upper byte
mySerial.print(highByte); //send the upper/high byte first
delay(1); //hang on a millisec
mySerial.print(lowByte); //send the low
delay(1); //hang on a millisec
On the TouchShield, this code accepts the high byte first, then the low byte, and then recombines them to make a single unsigned integer:
Serial.begin(9600); //set up the TouchShield serial connection
delay(3000); //and wait a little for the Arduino to boot up
Serial.print('U'); //send a sync character to the Arduino
unsigned int val; //define this variable in the function wherever you want to receive
val = (Serial.read() << 8) + Serial.read(); //read the high first, shift it up, then read the low
//Now you can use the val, which was sent from the Arduino
I hope it works for you! Let me know if you find anything cool to make with it...
Tuesday, August 26, 2008
You can find me in da club...
Oh boy. I’ve never really been the clubbing type. The music is too loud, the floor is cramped, and I find the crowd to be mildly obnoxious. Suffice to say clubs are generally not my venue of choice. It’s the weirdest thing, though, because I do like the crazy lights and powerful bass. Maybe it has something to do with being unhealthily mesmerized by oscillating screensavers since the age of 8, but that’s a story for a different day.
Well, it's a little more complex to program flashing lights that beat to the music, but here's the next best thing. And it tests your sense of rhythm too! Mike played this one (I just shot the video), and it's surprisingly easy to put together. It took me maybe 10 minutes to throw together, and then I spent forever playing our homebrewed version of "Spotlight" Hero. I even brought my girlfriend and resident Guitar Hero expert over to play a few rounds!
Well, it's a little more complex to program flashing lights that beat to the music, but here's the next best thing. And it tests your sense of rhythm too! Mike played this one (I just shot the video), and it's surprisingly easy to put together. It took me maybe 10 minutes to throw together, and then I spent forever playing our homebrewed version of "Spotlight" Hero. I even brought my girlfriend and resident Guitar Hero expert over to play a few rounds!
To build all this, I just connected some colored lights up to the RelaySquid, and then controlled them with a few digital switches that I picked up from RadioShack. The circuit itself was powered by a Lithium Backpack that I strapped on to the setup.
First, I set up the colored buttons- but any plain old switches will do.

Next I connected the other side of each button to the respective relay you want it to control, and then I then secured the Lithium Backpack to the PC Board with the 4 Buttons on it. After that I connected each Button to the RelaySquid Digital Input that controls it’s respective color output. That meant I took the wire from the blue button, and tied one end to +5V, and the other end I plugged into the labeled pin on the RelaySquid that corresponded to the blue light. I also connected the Lithium Backpack’s +5V and GND to the RelaySquid’s respective inputs on J8.
I turned on the Backpack and press the buttons to test each Squid Relay (you should hear a click with each press). When this test worked ok, I plugged in each AC plug (including the power input coming from the RelaySquid.
I made sure the lights were on, and then every time I pressed a button, the corresponding relay on the RelaySquid would turn on. That’s it! More details, pics and vids over on the projects page.
Subscribe to:
Posts (Atom)